September 2020
Release 3.0.17 is full of new enhancements to the User Dashboard, Chart Alerts, Admix Queue, Depression Screening, and Results sections of iKnowMed Generation 2. We're excited to bring these enhancements that will further improve your experience.
Release Highlights
| Application Area | Highlight Information |
|---|---|
| User Dashboard | The new Worklist Queues Report allows you to view the number of pending items each provider has in their queues across all locations to ensure these items get resolved. |
|
Chart Alerts |
Two new charts alerts have been introduced in this release. The first alert can be used to flag and identify potential study patients. The second alert can be used for billing information but expires within one day. |
| Admix Queue | You can now filter the queue by a medication name, use new options when adding medication instructions, and have the pharmacy location print on the medication label. |
| Depression Screening | You can capture a patient's Total Depression Score on their chart and have all depression screening details display on the Interval Summary. |
| Results |
The print view of imaging test results has been cleaned up for a more professional look and the print view of lab test results now includes NCS and CS results. You can also hide unmapped genetic test results for a more streamlined view of the Flowsheet. |
User Dashboard
Improve Practice Efficiency with Worklist Queues Report
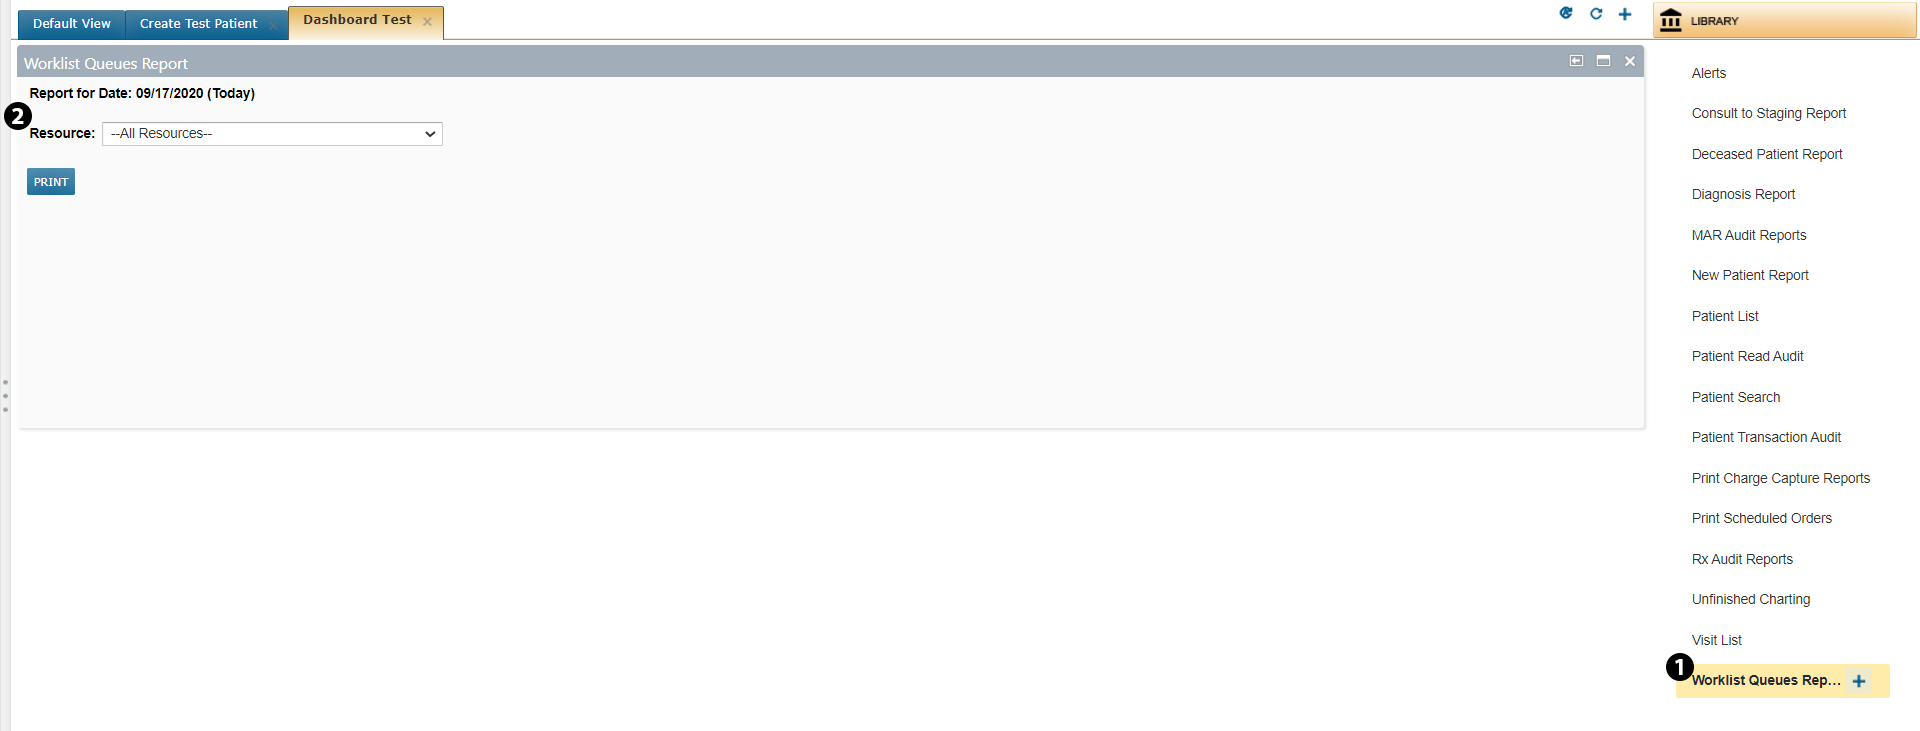
You can now view the number of pending items each provider has in their queues across all locations to ensure these items get resolved.
From your dashboard use the plus icon in the upper right corner to create a new dashboard. Click on LIBRARY and locate the new Worklist Queues Report option. Click the plus icon to add it to your new dashboard (see callout 1).
Under the Resource drop-down you can view a report by each provider, or you can choose All Resources to generate a report on all providers (see callout 2). Once you’ve chosen how to view the report, click PRINT.
Please note that this report only lists providers with pending items in their queues. If a provider does not have any pending items, they will not show up in the report. Also, providers working in multiple locations will only show on the list once and will have the same number of pending items listed across all locations, even when the list is generated for one individual location.
Accelerate Reimbursement with Unreleased Charges Report
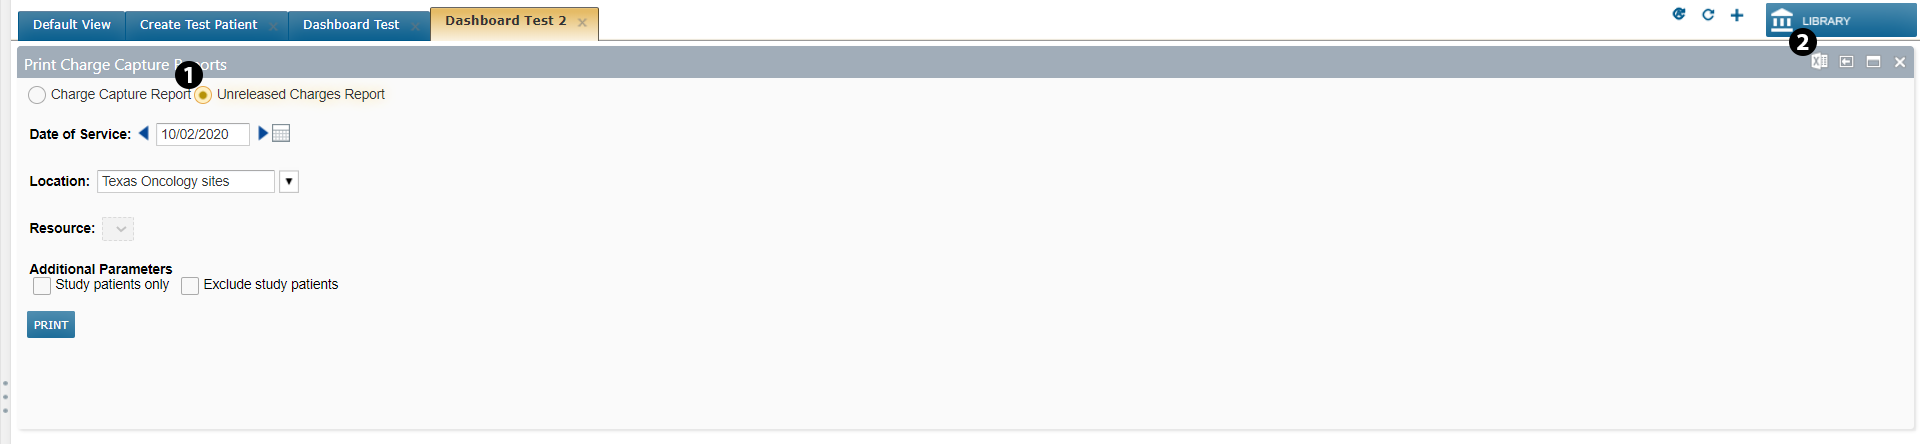
Print Charge Capture Reports now has an option to print an Unreleased Charges Report (see callout 1) that will show all unreleased charges for a specified date. This will help practices act on any unreleased charges to ensure all services rendered are reimbursed in a timelier manner. You can also export this report using the Excel icon in the upper right corner of the window (see callout 2).
Print Visit List Using Date Filters
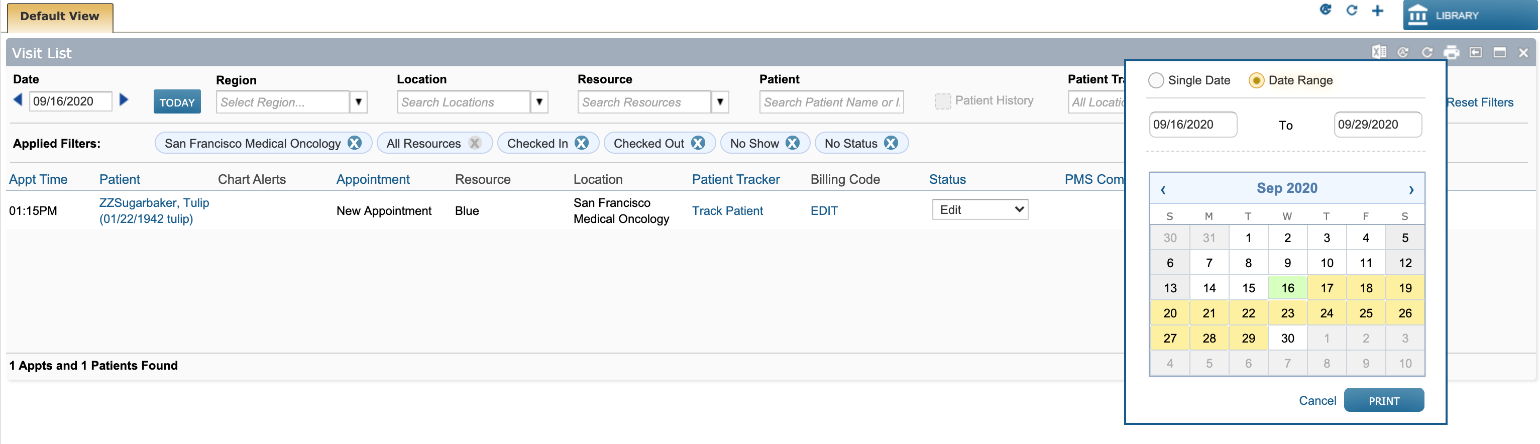
You can now print your Visit List using a date range by clicking the printer icon in the upper right corner. You have the option to choose a Single Date or a Date Range. Please note that when using the Date Range option there is a 14-day range limit. If you attempt to print a longer range, a notification will display, and you will not be able to move forward.
Worklist Queues
Admix
Admix Queue Medication Filter Enhancements
Filtering the Admix queue by medication name allows you to prepare all orders for that medication at once, and makes inventory planning easier by allowing you to generate reports for that one medication.
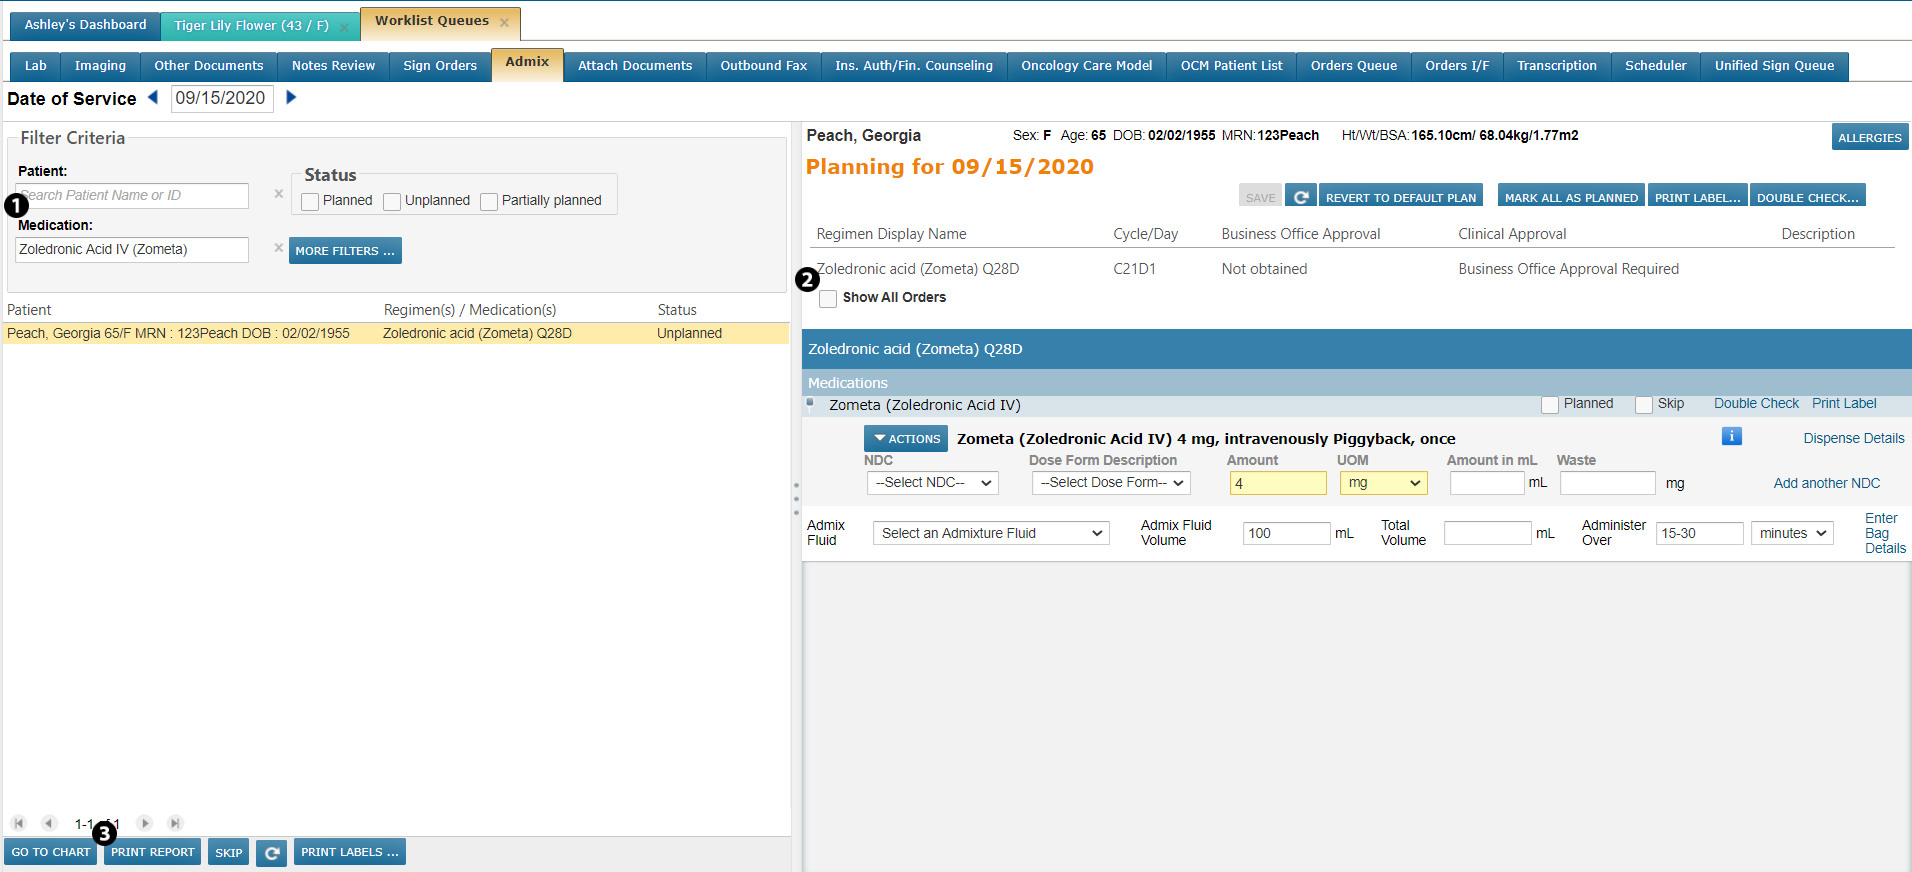
To filter your queue by medication, go to Worklist Queues > Admix and in the Medication filter, enter the name of the medication (see callout 1). This will return all patients prescribed that medication.
When selecting a patient, notice that now you only see the medication entered in the filter. You no longer see all their other medications listed. However, if you do want to see all those medications, simply check the Show All Orders option and the system will display them (see callout 2).
Using the PRINT REPORT button in the bottom left of the screen (see callout 3) will run a report that only shows patients receiving the medication entered in the filter regardless of their Status (i.e. planned, unplanned, etc.).
Enhanced Medication Instructions
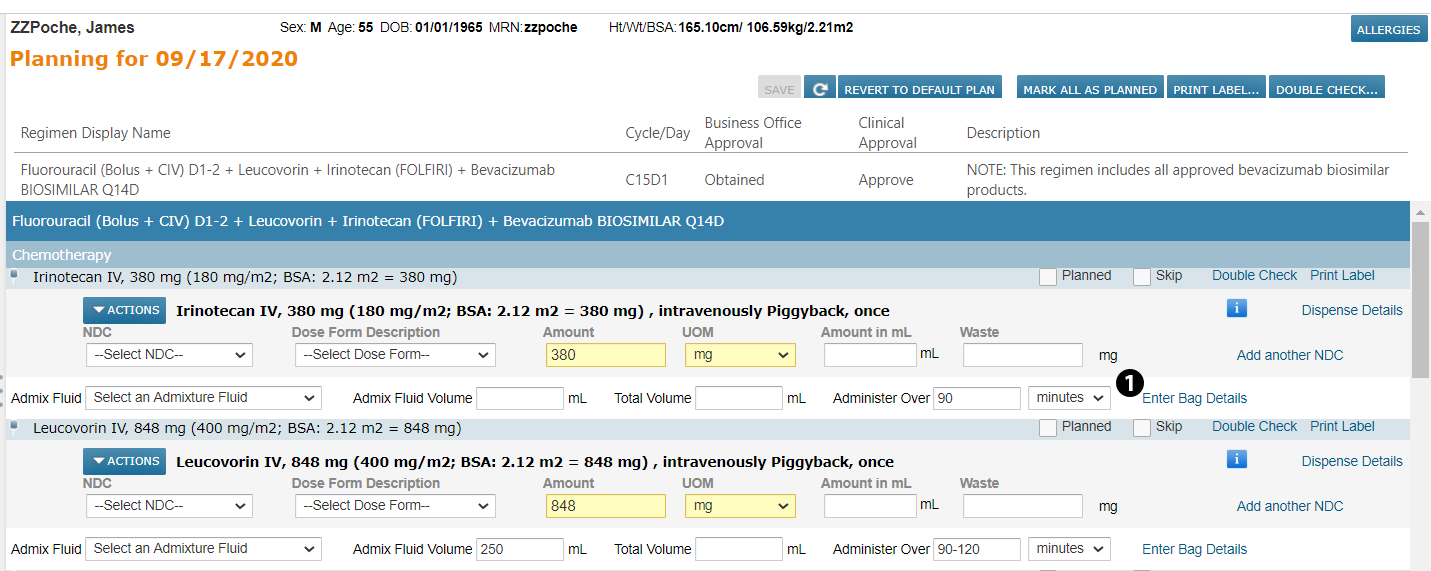
When in a patient’s Admix tab or in Worklist Queues > Admix, you will see enhanced options for adding medication instructions. For example, when working with orders that require medications to be mixed in a bag, click the Enter Bag Details link (see callout 1).
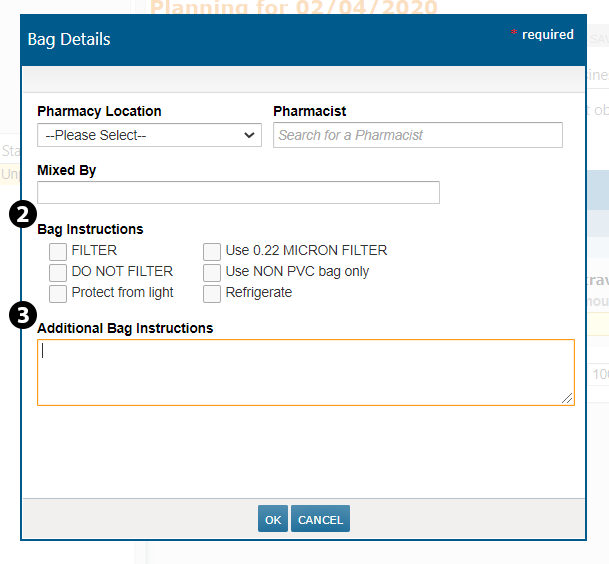
This will bring up the Bag Details window where you can choose from new instruction options, including the Pharmacy Location, the name of the Pharmacist, and who the medication was Mixed By. You will also see several of the most common instructions have already been called out for you. Simply check the box next to the ones you need (see callout 2). If you need to add any more information, you can do so in the Additional Bag Instructions text box (see callout 3).
After you SAVE your instructions, you will see that the link under the medication now says View Bag Details, indicating that the information for this medication has already been entered (see callout 4). You may still add or edit information when clicking this link.
Furthermore, when clicking the PRINT REPORT button (see callout 5), you will see all your added instructions appear alongside the medication.

Add Pharmacy to Medication Labels
Prior to this release, the location that printed on medication labels was either the location of the patient’s appointment or the location where the order was made. Now you can tag locations as a pharmacy and have that print on the label instead.
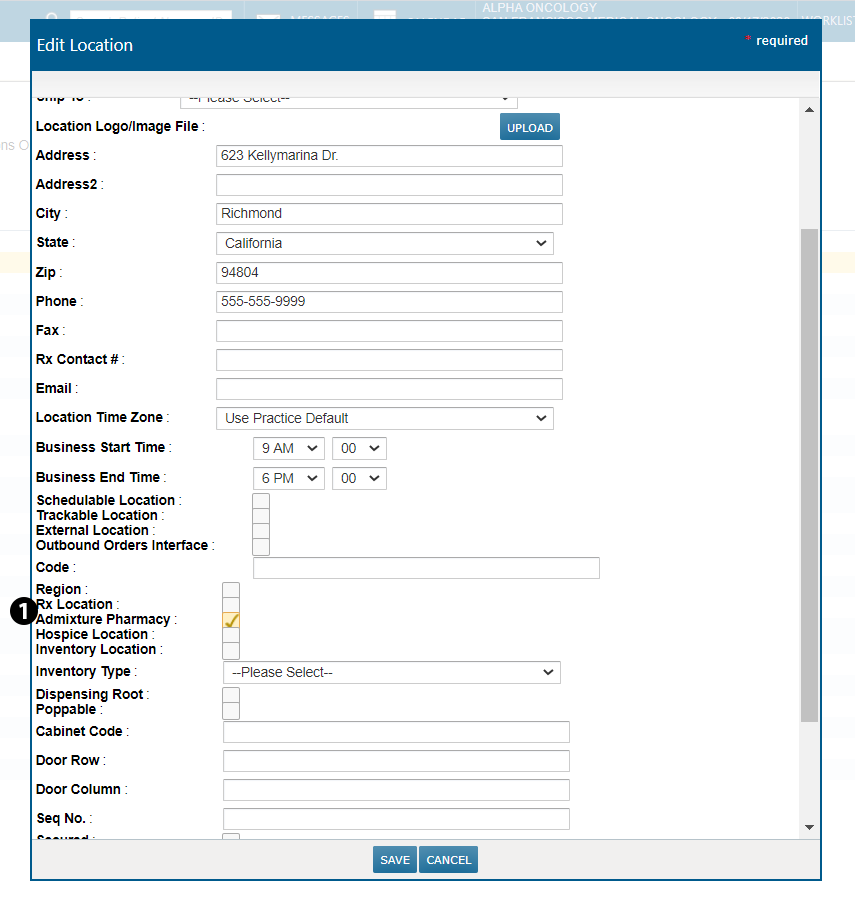
Go to ADMIN > Locations. Create a new location by clicking the ADD LOCATION button and filling in the name and address of your location. Tag this location as a pharmacy by checking the new Admixture Pharmacy box (see callout 1). Click the SAVE button to confirm your changes.
To change an existing location, select your location’s name and click the EDIT button. Check the new Admixture Pharmacy box (see callout 1) and click the SAVE button to confirm your changes.
Now when adding instructions to a medication using the patient’s Admix tab or in Worklist Queues > Admix, you can choose your location from the Pharmacy Location drop-down and have it display on the medication label. Otherwise, the label will continue to show the location of the patient’s appointment or the location where the order was made.
Clinical Profile
Chart Alerts
New Chart Alert for Potential Study Participants
A new chart alert icon has been added to make it easier to flag and identify potential study patients.
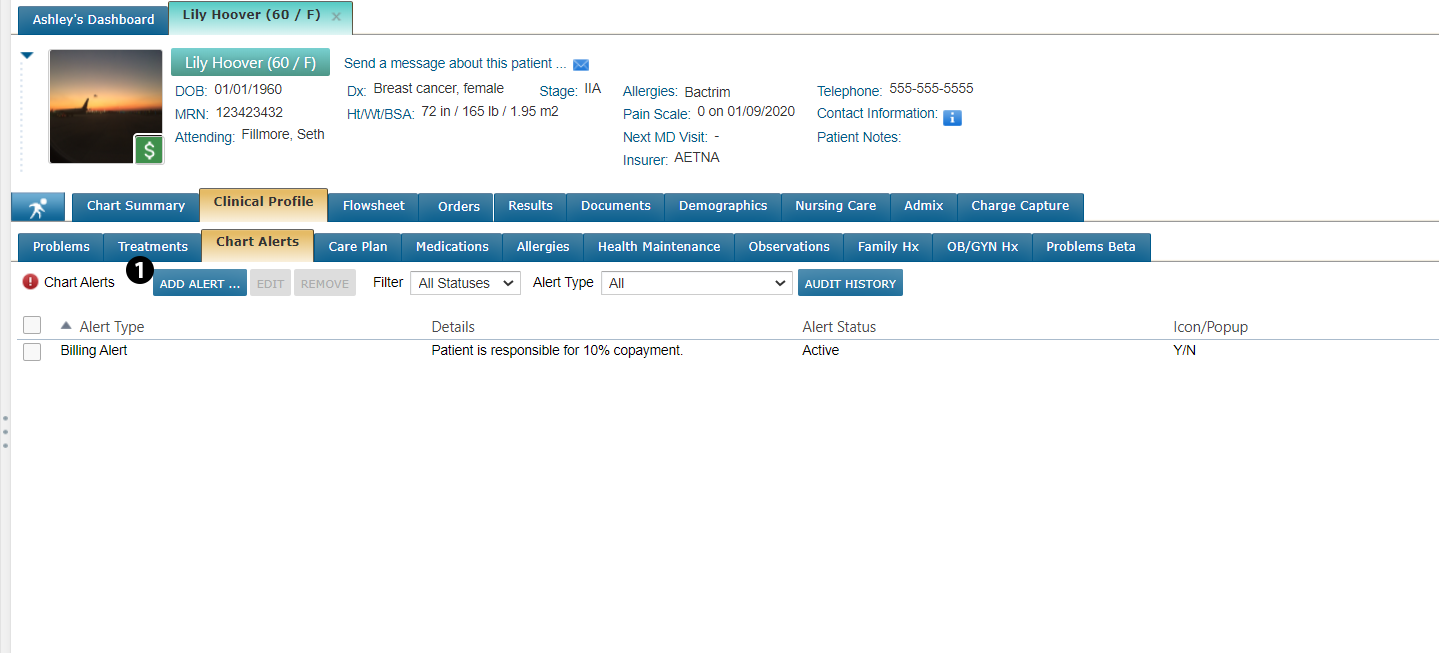
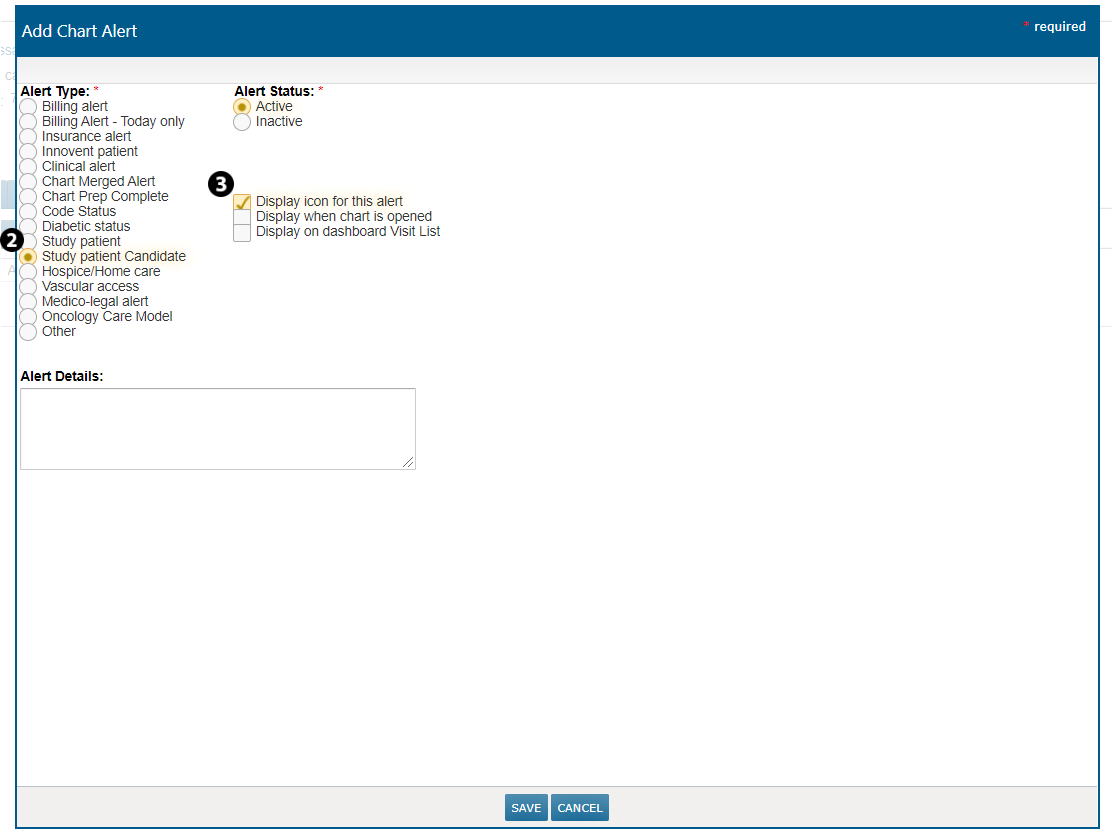
A patient can be tagged with this icon under Clinical Profile > Chart Alerts by clicking on ADD ALERT (see callout 1) and selecting the Study patient candidate option (see callout 2). You can also use the options on the right side of the screen to determine how and when this icon appears (see callout 3).
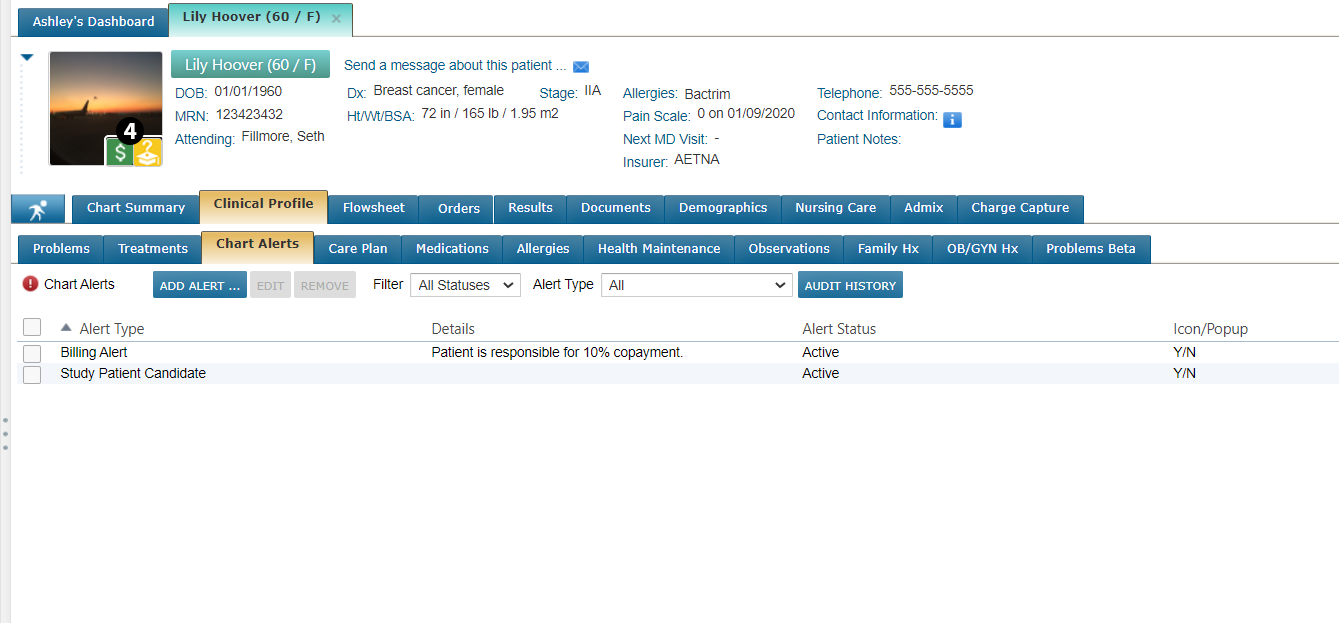
After you SAVE your changes, you will see the new, yellow icon appear on the image associated with the patient’s chart (see callout 4).
Going forward, whenever you see this icon on a patient’s chart it means this patient has been flagged as a potential study participant, reducing the amount of manual searching needed to locate candidates.
New Date-Driven Chart Alert for Billing
The current Billing alert for patients never expires and requires additional information to be added to it for each day. This is a tedious process that clutters the Charge Capture Report.
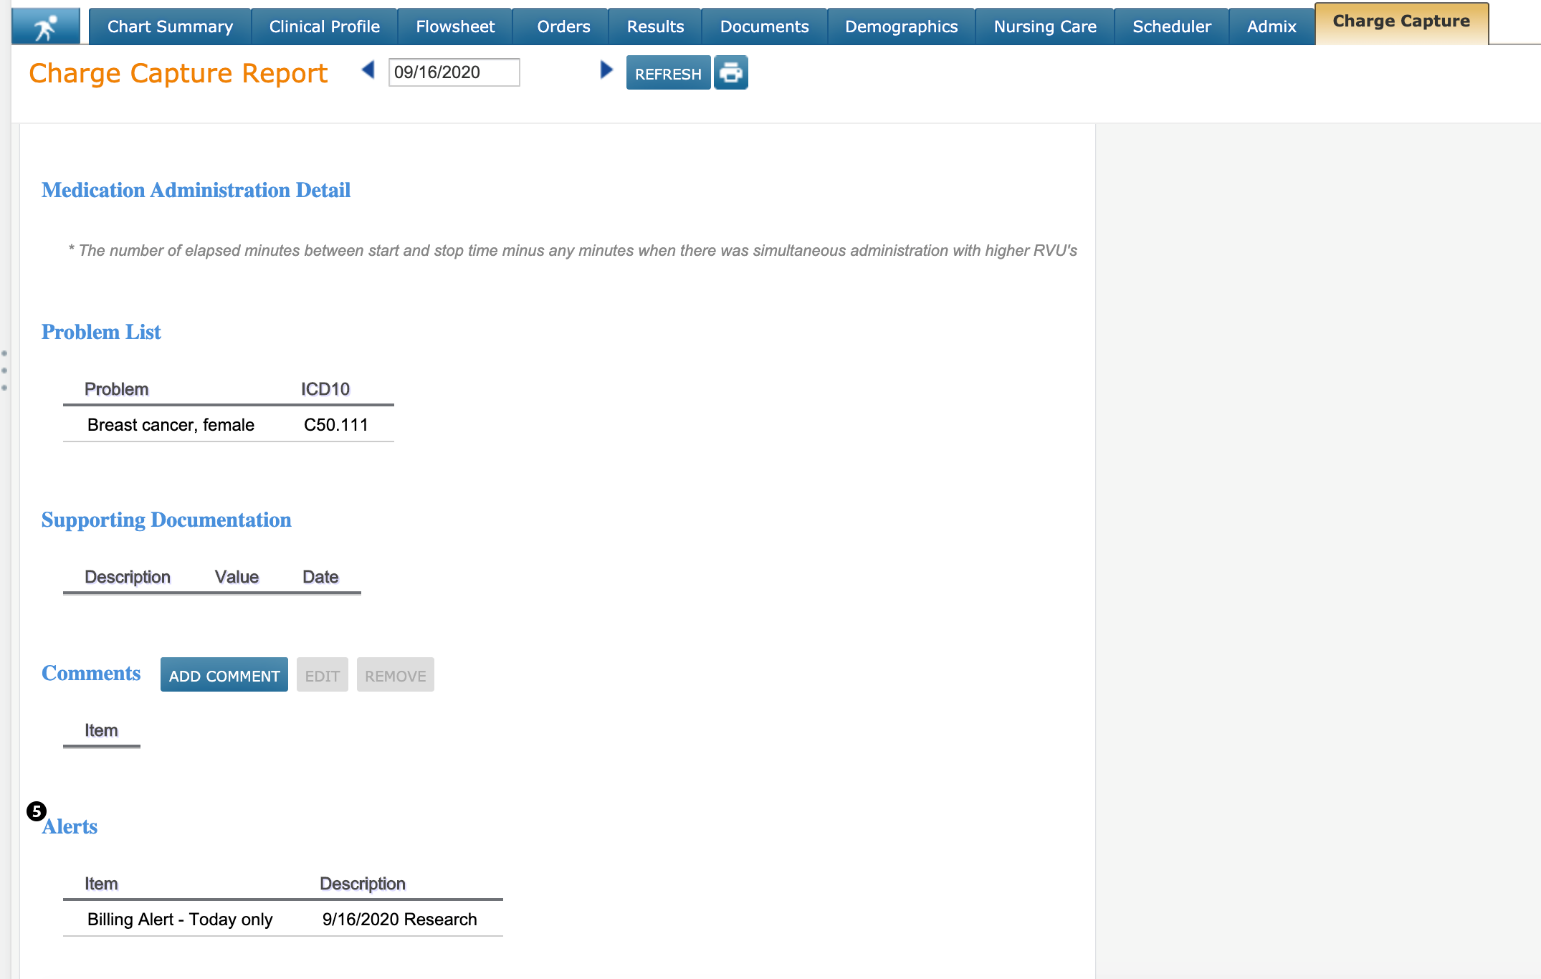
Therefore, a new alert called Billing Alert - Today only has been created. This alert is only good for the day it is assigned to and will not show on the patient’s chart or in the Charge Capture Report beyond that day.
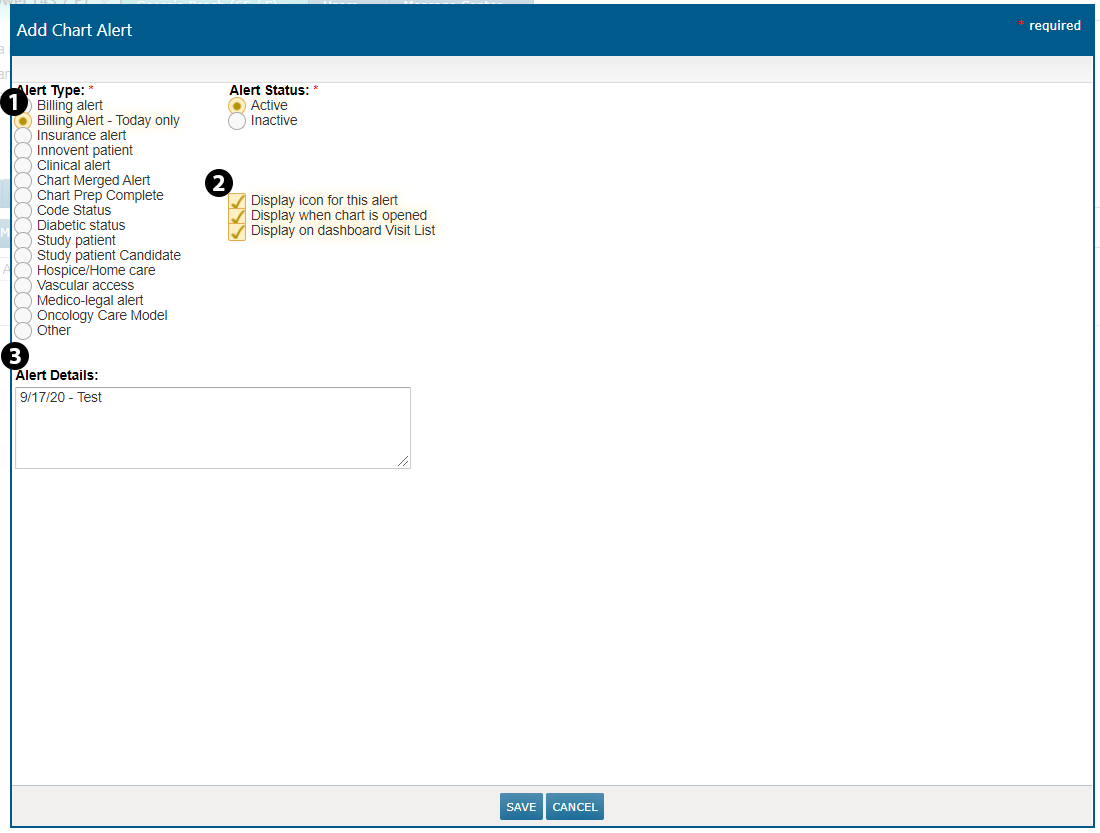
To use this alert, click ADD ALERT from the Chart Alerts page and choose Billing Alert - Today only from the Alert Type column (see callout 1). You can also choose how you want this alert to display in the right column (see callout 2). Lastly, enter the Alert Details that you want to show on the chart and in the charge capture report (see callout 3) and click SAVE.
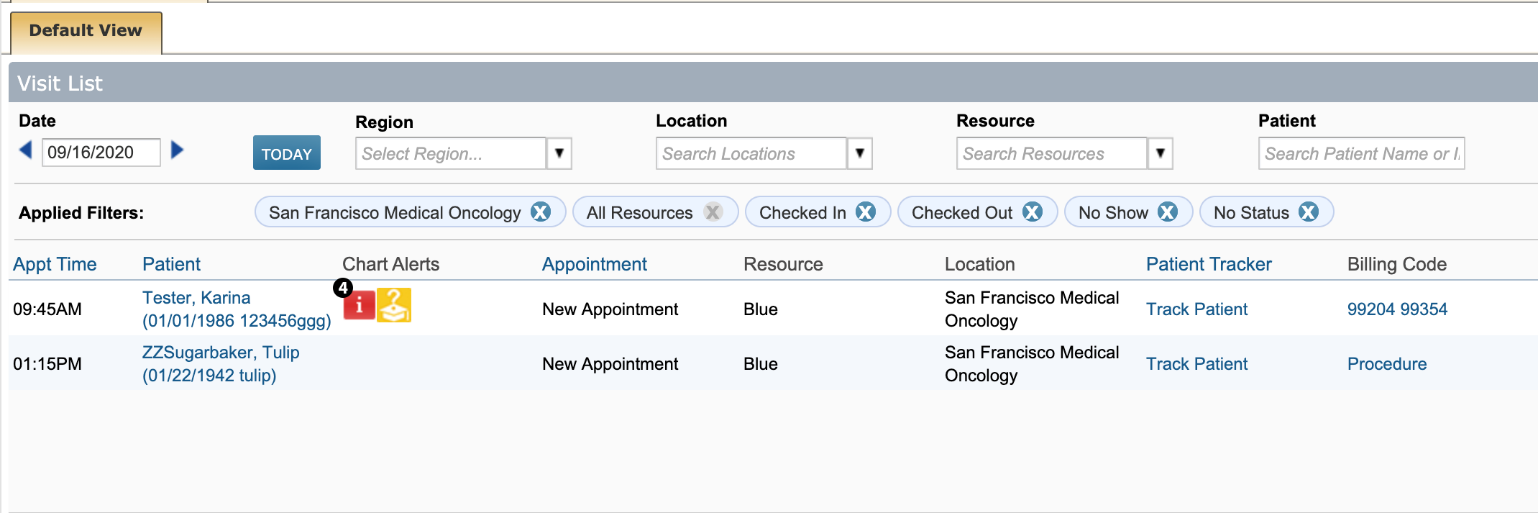
This alert will now display as a chart alert icon on the Visit List (see callout 4) and as an item on the Charge Capture Report under the Alerts section (see callout 5).
Observations
Capture Total Depression Score on Clinical Profile
You can now capture the Total Depression Score in the Add Depression Status window of the patient’s chart. Previously, you could only document which depression screening tool was used with the patient, the outcome, and the plan.
Now, when you go to Clinical Profile > Observations you can capture the score from the screening tool in the new Total Depression Score field. You may enter a score from 0 to 100. If you attempt to enter a score higher than 100 in this field, an error message will display, and you will be unable to SAVE your changes.
This enhancement can be used when conducting a new screening for a patient by clicking the Add Depression Status button, or it can be used on previously screened patients by selecting the previous screening and clicking on the EDIT button. This will not change the Observation Date of the original screening.
These enhancements will also appear if you access the Add Depression Status option from the Quick Action or running man menu.
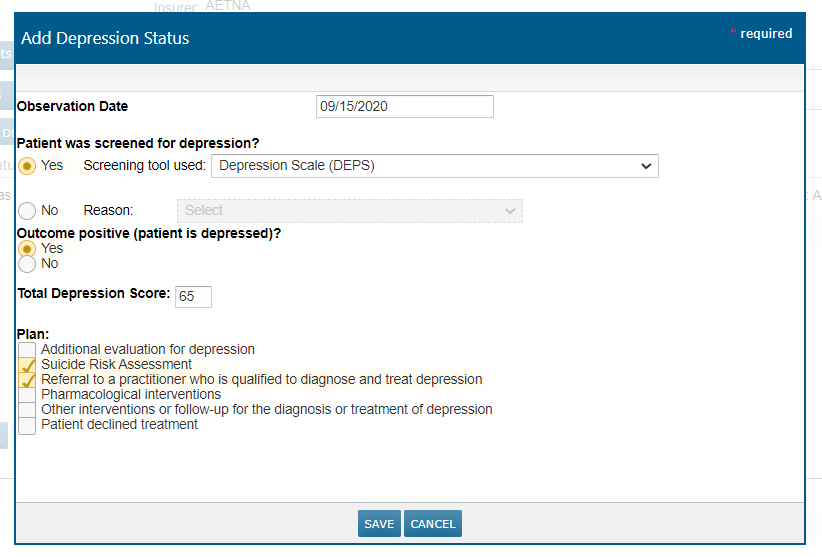
Chart Summary
Interval Summary
Depression Details Added to Interval Summary
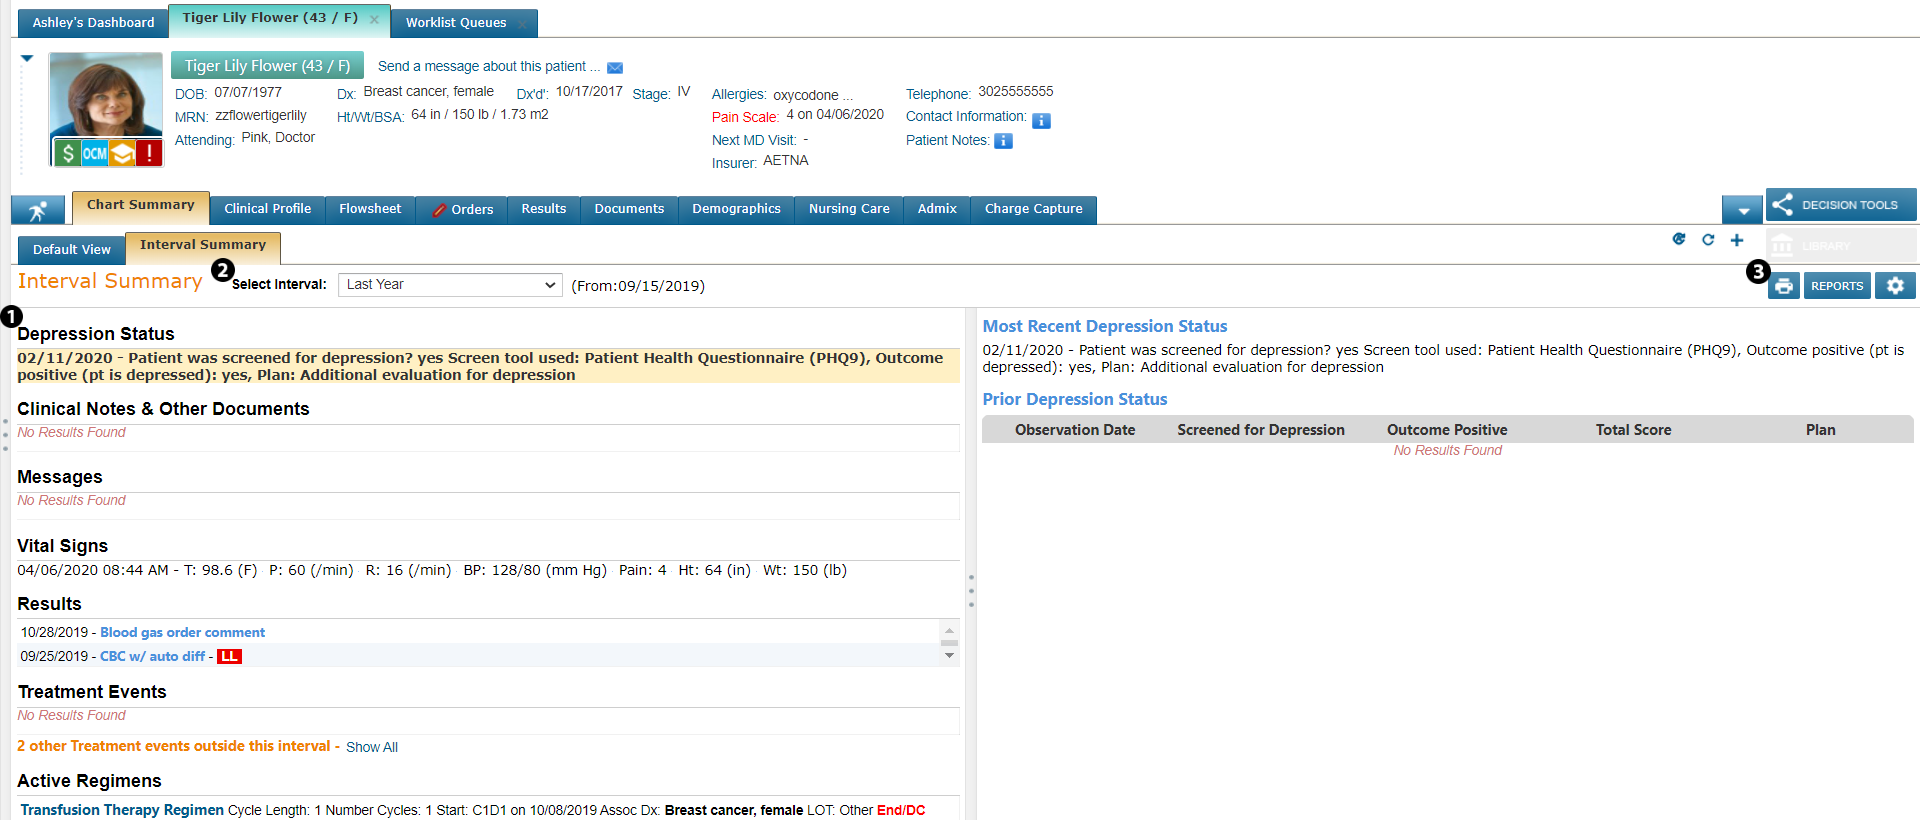
To increase the visibility of a patient’s depression status, a new section for Depression Status has been added to the Interval Summary (see callout 1). This section will display the Depression Status based on the time period selected from the Select Interval drop-down (see callout 2).
This new section will display the date of the screening, which screening tool was used, the outcome of the screening, the total depression score, and the follow up plan if any was recorded.
When you click on this section, you will see more details on the status in the right-hand column. If more than one Depression Status has been documented during the interval selected, items will divide into Most Recent Depression Status and Prior Depression Status.
You can print this information using the PRINT button (see callout 3). The items that will appear in the print view are the same ones seen in the right-hand column.
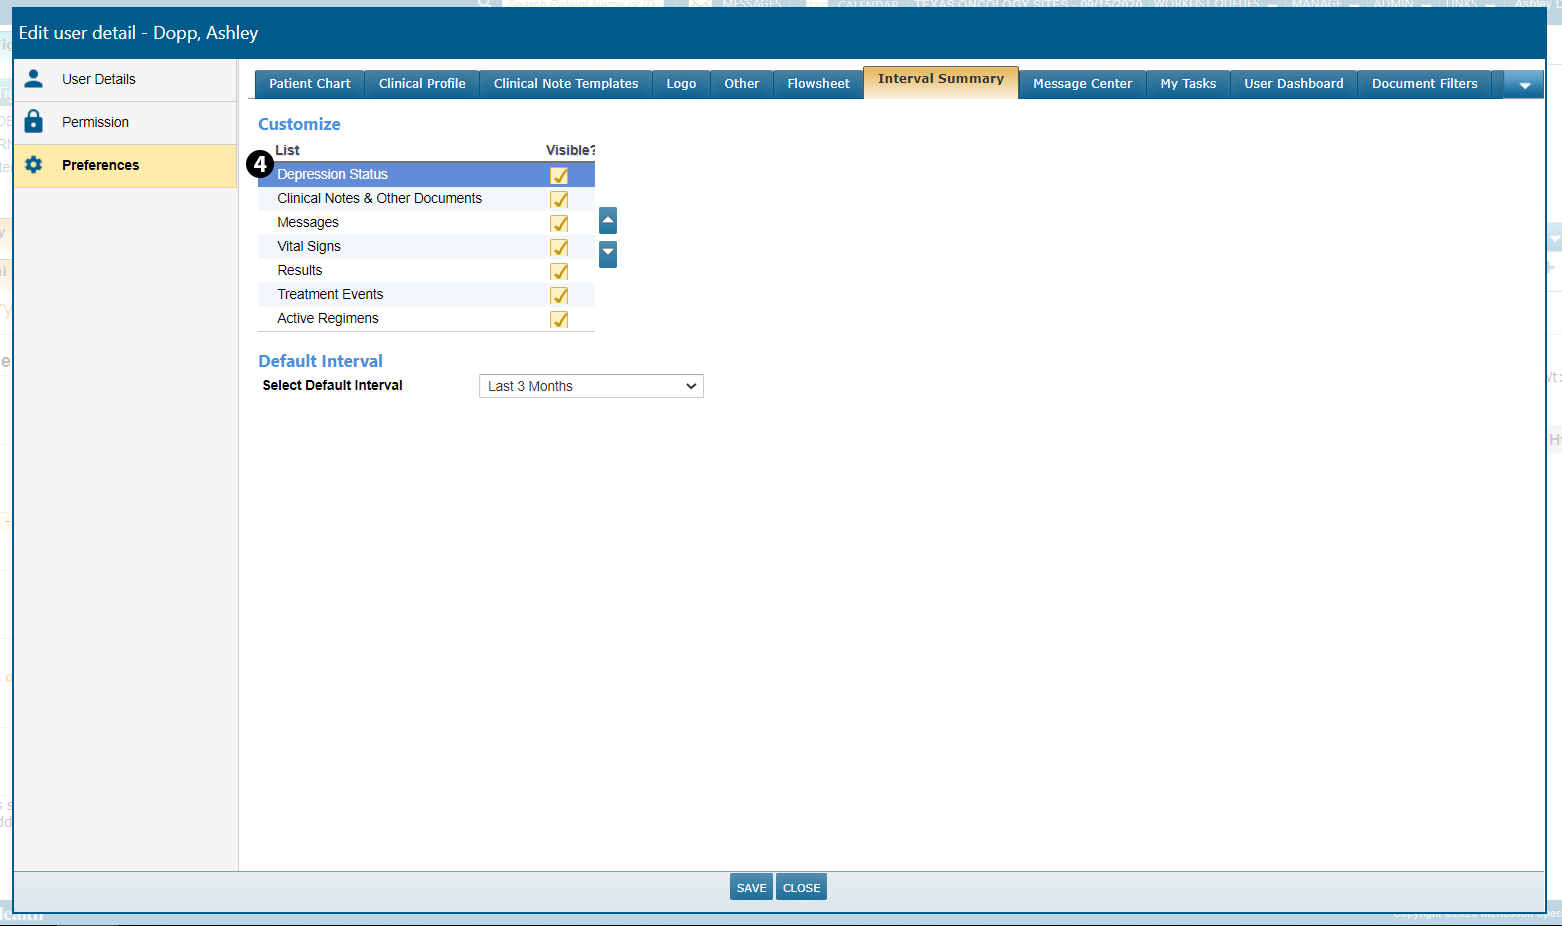
Lastly, you can choose where the Depression Status section displays in the Interval Summary by clicking on the gear icon in the top navigation. Under Preferences > Interval Summary you can choose whether you want this section to appear by checking or unchecking the box under the Visible column. You can also use the blue arrows to move this section above or below others (see callout 4).
Flowsheet
Enhancements to the Audit Note
Several enhancements have been to the Audit Note in the Flowsheet to make the report easier to read. This report has been shortened and simplified by:
-
Displaying the ADMIX section only if you save something on the Admix tab or in Worklist Queues > Admix. The note will no longer display this section as soon as an order is entered.
-
Displaying the MAR section only if you save something on the Nursing Care > MAR tab. The note will no longer display this section as soon as a clinical treatment day is approved.
Documents
Clinical Notes
Add an Addendum to Signed Notes
Once a clinical note is signed, that note is considered a final legal document. However, situations do arise when information needs to be added afterwards. Thus, the option for the note’s original author or a note reviewer to add an addendum to a signed note has been introduced in this release.
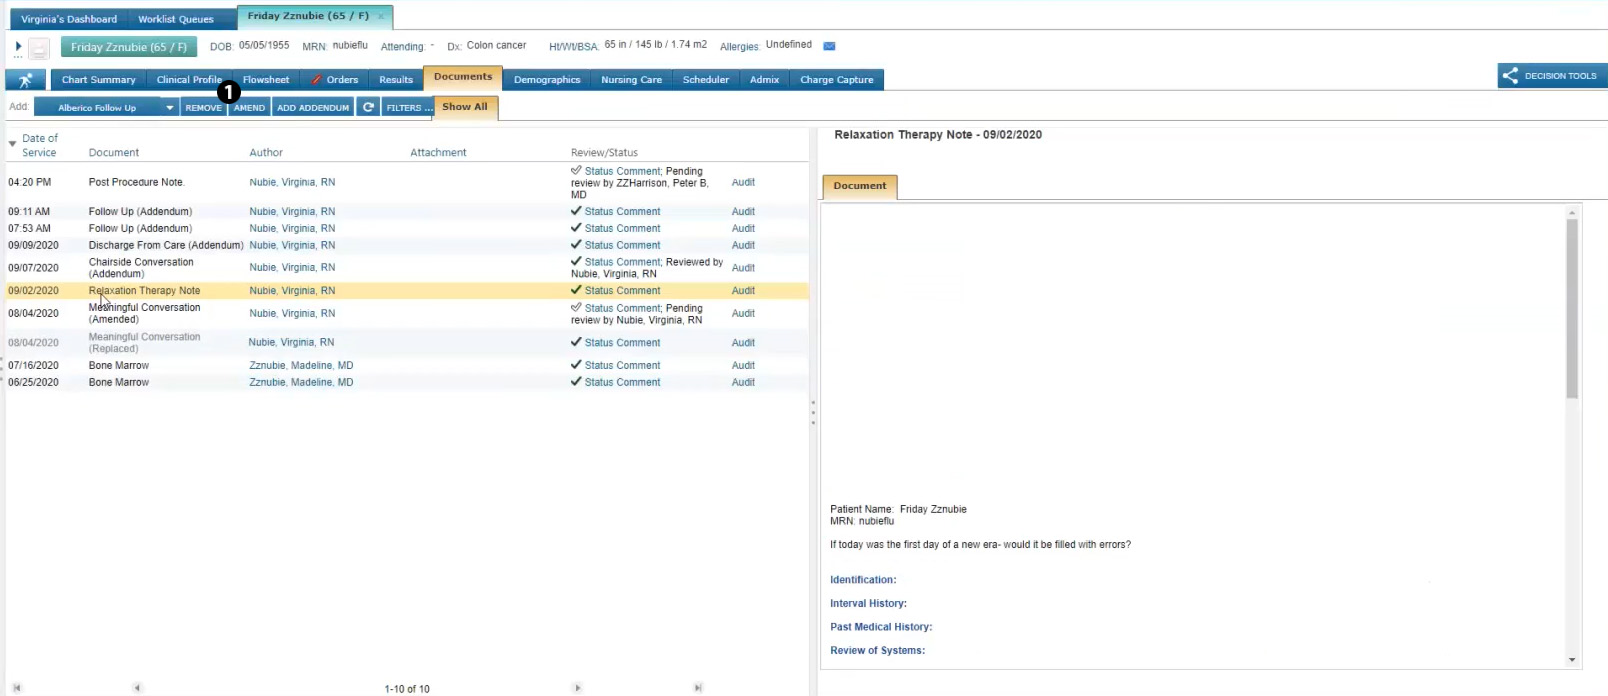
To add an addendum to a signed note, go to the Documents page and click the ADD ADDENDUM button (see callout 1). Please note that if you are not the note’s original author or a note reviewer, this button will be inactive.
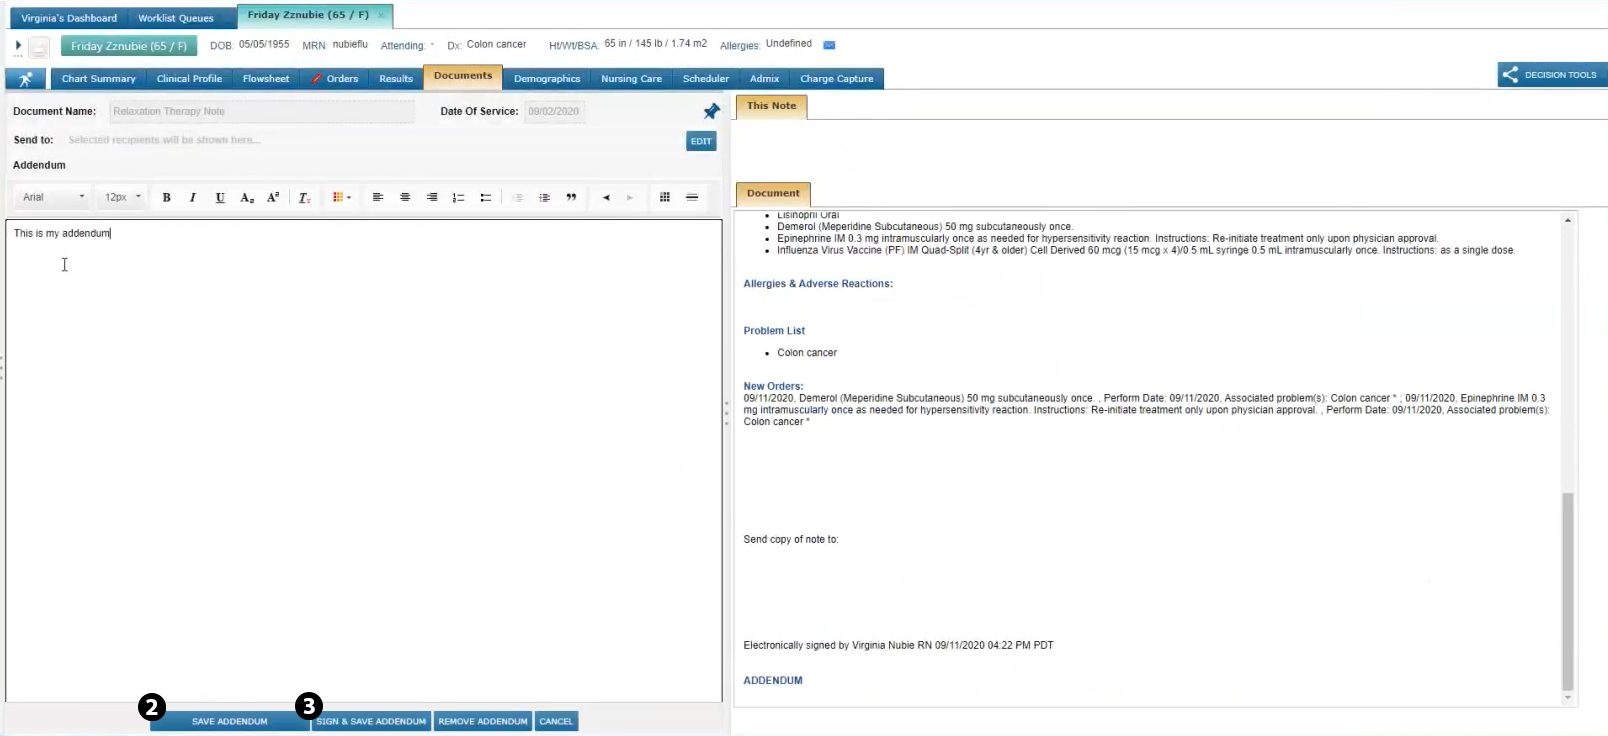
After you’ve entered your content, you have the option to SAVE ADDENDUM (see callout 2), which will add your content but still allow the addendum to be edited later, or you can SIGN & SAVE ADDENDUM (see callout 3) to add your content and sign the note. Once an addendum is added and signed, no further changes can be made to the note by anyone.
Any content added as an addendum will display at the bottom of the note under the ADDENDUM section alongside your e-signature and the timestamp.
Lastly, the Review/Status column on the Documents page will collect this information in the audit trail so you can hover over the check mark icon and see who has added an addendum to the note and when.
Limit Amendments of Signed Notes
Amending clinical notes gives users the ability to edit information after notes are signed; however, a signed clinical note should be considered a final legal document. Therefore, this release limits amendments of signed notes to the original author, preventing unauthorized changes.
This means that if a user selects a signed note on the Documents page, the AMEND button will only be active if they are the original author. All other users will see the button grayed out and be unable to amend the signed note.
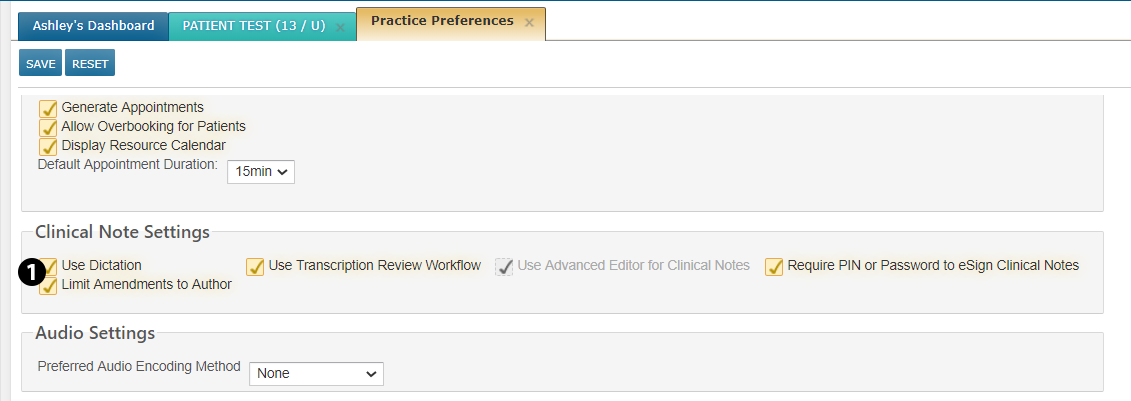
Practices can override this behavior in ADMIN > Practice Preferences under the Clinical Note Settings. The new Limit Amendments to Author option (see callout 1) is selected by default, permitting only the original author to amend a signed clinical note.
If you turn off this setting, amending signed notes is no longer restricted to the author.
Messaging
Print Multiple Messages in the Message Center
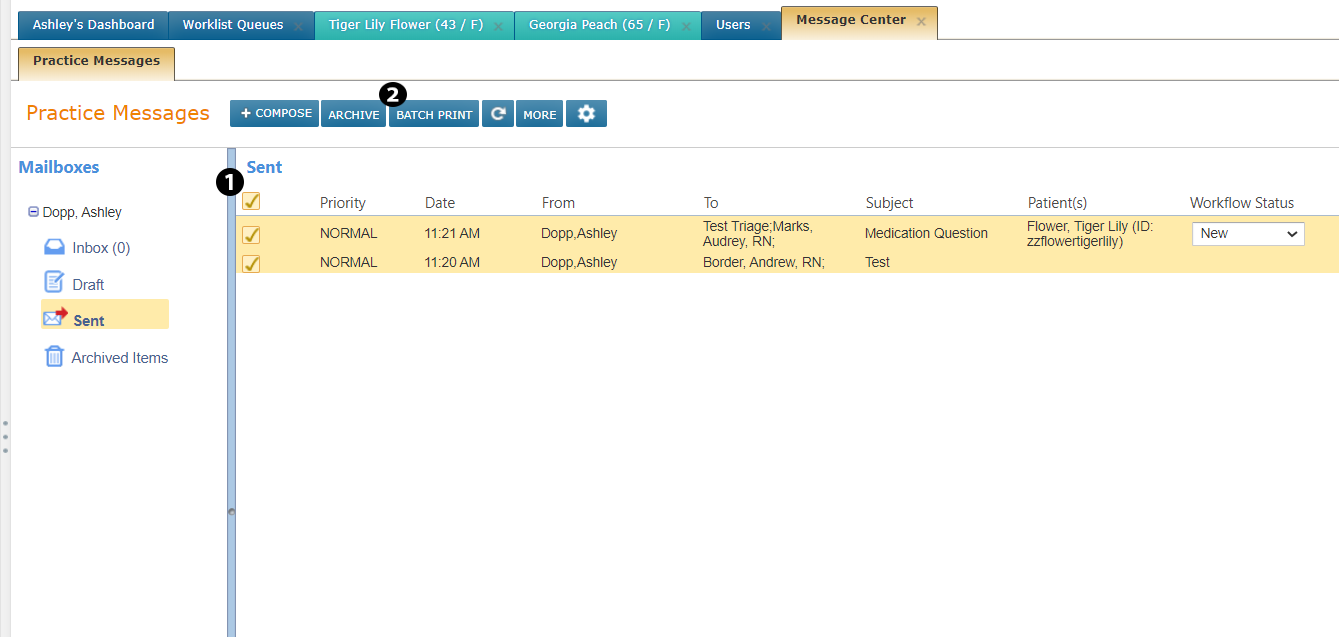
You can now print multiple messages from your Inbox, Draft, Sent, or Archived Items folders in the Message Center. Manually select the different items you want to print or check the box in the upper left corner (see callout 1) before clicking the BATCH PRINT button (see callout 2). This will print all your items together at once.
Results
Improved Print View of Imaging Test Results
When printing imaging test results from Results Review you will notice that the report has been improved with a cleaner, more professional appearance.
Improved Print View of Lab Test Results
Prior to this release, labs with Not Clinically Significant (NCS) and Clinically Significant (CS) results only displayed on the Results Review page. Now these results will also be displayed when you print lab results.
Hide Unmapped Results in the Flowsheet
You now have the option to prevent unmapped genetic lab results from showing for a specified interface in the Lab - Other section of the Flowsheet. By not showing these unmapped results, the Flowsheet becomes more manageable and easier to use.
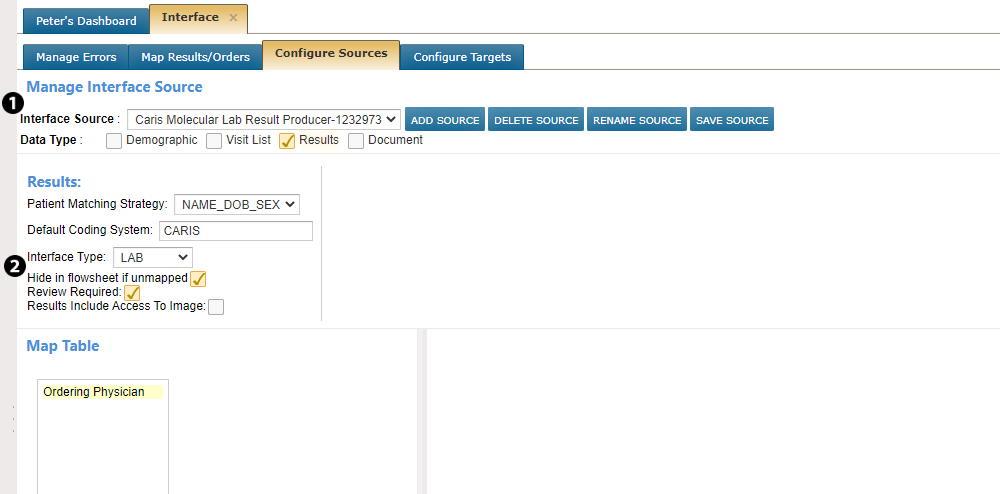
To hide unmapped results, go to ADMIN > Interface. Under Configure Sources, choose your interface using the Interface Source dropdown (see callout 1). Under the Results section, check the box next to Hide in flowsheet if unmapped (see callout 2). This should only be used for genetics labs interfaces.
If a result is later mapped, then it will appear in the correct section of the Flowsheet without any additional steps required by the user.
Lastly, all unmapped lab results will still appear in the Results Review queue on the Results tab of the patient’s chart.
Charge Capture
Ability to Add Modifiers to Procedures
Previously, only items in the E/M Code section of the Specify Billing Code screen could have a modifier attached to them. This was an issue if you needed to bill for services that were in the Procedures section.
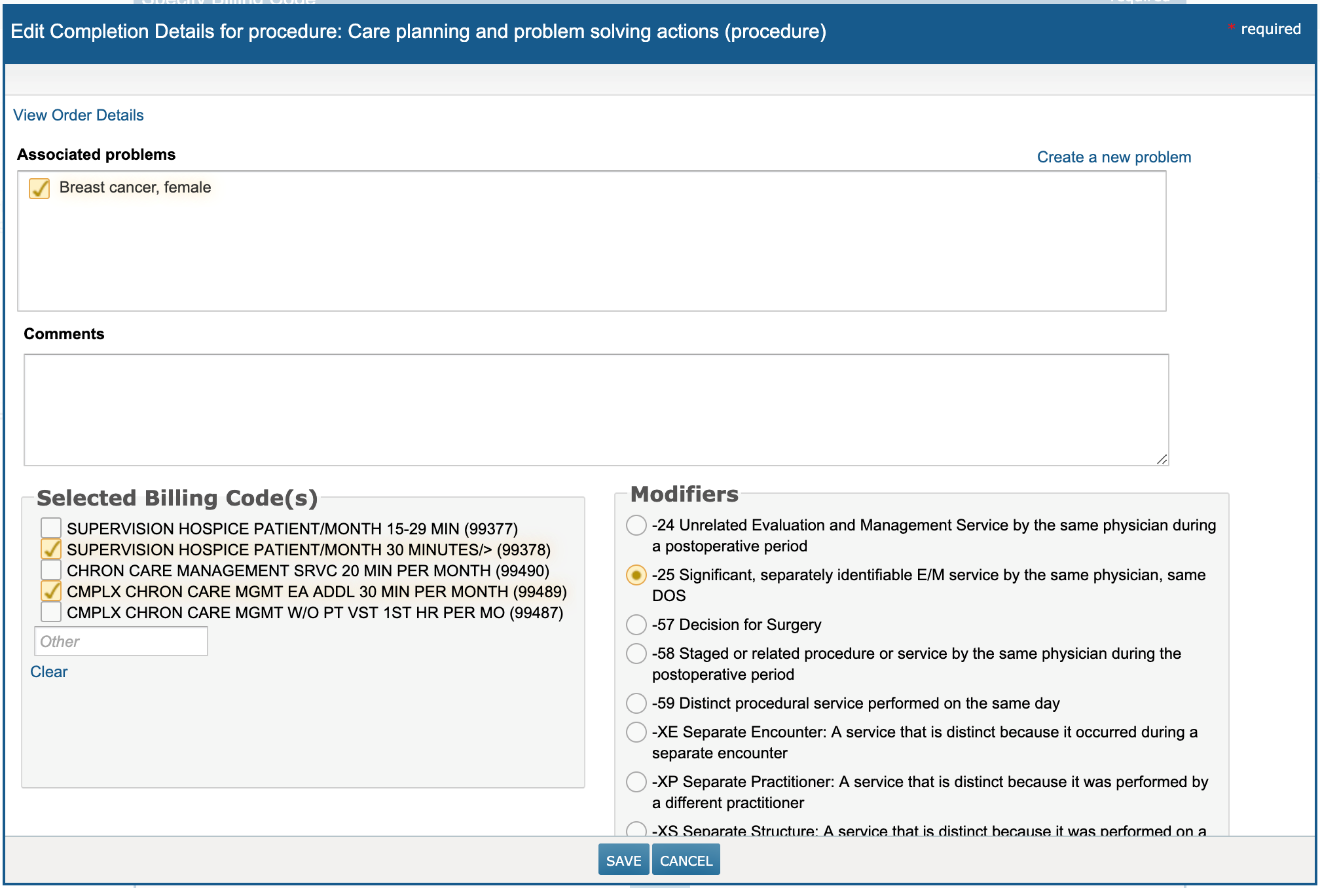
Now, you can add a modifier to your services in the Procedure section by choosing Selected Billing Code(s) on the left and a Modifier on the right. The Modifier applies to all billing codes selected in this screen. It does not apply to codes selected on other procedure searches, nor does it apply to codes selected in the E/M Code section.
In this release, only one modifier may be chosen for your billing codes. However, the next release will provide you with the option to choose up to 4 modifiers for both the E/M Code and Procedure sections.
Admin
Users
View Only Users Permission
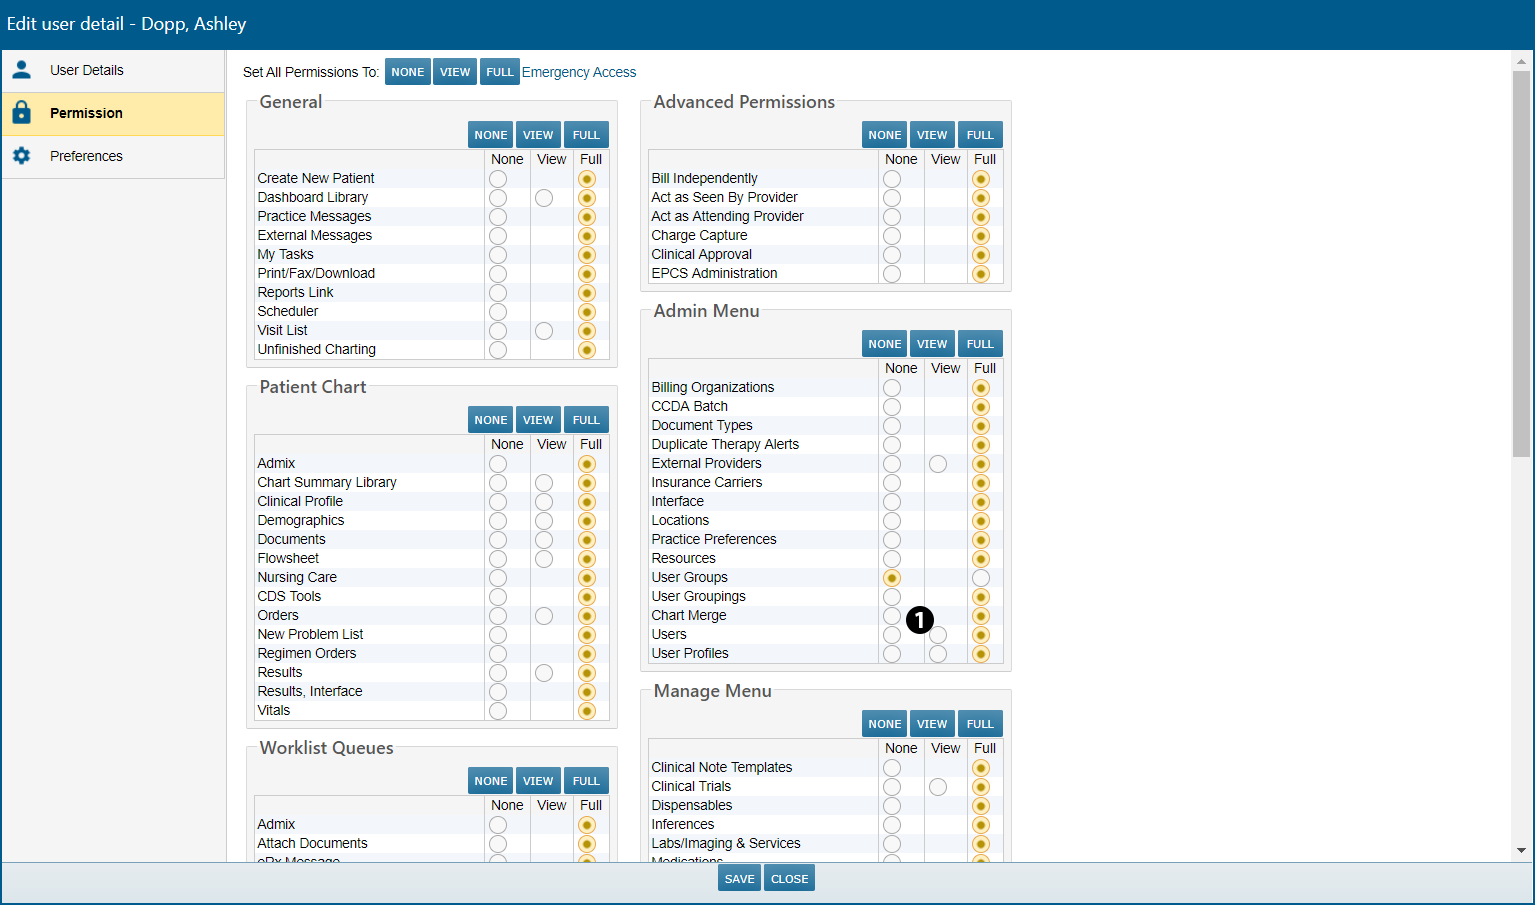
You can now assign a VIEW only permission under ADMIN > Users (see callout 1) that will allow users to run and print a user audit report but not make changes to user permissions.
After you SAVE your changes, this user can run and print a user audit report using the USER AUDIT REPORT button on the Users page. However, this user will still be unable to add new users or edit existing ones.
Enhancements to User Report
When running a User Report, you will now see three new columns in the document: Date Created, Created By, and Last Login. These columns provide further information on the creation of a username and the last time that user logged in, which will help track what users are setup for your practice and help determine if any should be deactivated. You can access the report by clicking on the Excel or printer icon on the Users page.
