3.0.21 Release Notes
February 2021
In release 3.0.21 we've implemented some important fixes regarding Charge Capture. Additionally, we've added enhancements around messaging, COVID-19, Billing, and the Patient Chart.
Charge Capture Report Fixes and Updates
Feedback on the charge capture feature in iKnowMed Generation 2 included the need to improve the user experience, ease of billing, and billing accuracy. We will be working on several updates to charge capture in this release as well as in upcoming releases to address these issues. In version 3.0.21, the following charge capture issues have been fixed.
Interrupted Infusions Billing Units Fix
FIXED: Prior to this release, when an infusion was interrupted resulting in multiple start and stop times, the system sometimes doubled the billing units for the amount of the drug administered over the entire appointment. This is now fixed, and when a nurse selects Add Time in the MAR to add another start and stop time, the Charge Capture Report will continue generating one charge line for the medication and generate the correct number of billing units for the charge.
Medication Administration Details Fix for Split Medications
FIXED: Prior to this release, when a single ordered medication was split in Admix resulting in more than one administration in the MAR, the Medication Administration Details on the Charge Capture Report did not accurately reflect the amounts of each administration for treatments without start and stop times.
The Medication Administration Details on the Charge Capture Report will now accurately display the split amounts in the Drug and Waste columns (see callouts 1 and 2).
Do Not Bill Applied Incorrectly for Certain Drugs
FIXED: If drugs with the same name or sharing the same billing codes were administered more than once on a particular date, but only one instance was marked as Do not bill drug and/or Do not bill admin in MAR > Administration Details, all charges for those drugs would be marked as Do not bill drug and/or Do not bill admin in the Pending Review section of the Charge Capture Report.
This is now fixed, and the medication order and corresponding administration charge will receive only the Do not bill comment. For example, if Fluorouracil was marked as Do not bill on one administration but not on the other, the Charge Capture Report accurately reflects this by placing the Do not bill comment on only one Fluorouracil charge (see callouts 1 and 2).
Add Billing Codes in Any Order
FIXED: Prior to this release, if a nursing procedure was added after an E/M code was on an appointment, all billing codes would be preserved by the system and charges were generated, but the E/M section of the billing screen would appear blank if the user returned to view it after all codes were charted.
This is now fixed, and the order of billing codes charted on an appointment no longer affects the E/M section of the billing screen.
Group Charges by Appointment ID
iKnowMed Generation 2 has logic in place that groups charges onto one charge capture report with one appointment ID when the following items for the charge are the same:
-
Date of the Appointment
-
Location
-
Attending Provider
-
Seen By Provider
This grouping of charges means that some individual appointment charges are combined with other appointment charges and both appointments receive the same appointment ID on the charge capture report. A common example of this is when a patient has an E/M appointment and an infusion appointment at the same location on the same day with the same Attending and Seen By Provider.
The combining of more than one appointment charges under a single appointment ID can cause additional manual work in the Practice Management System (PMS).
In this release, we created the option to group charges by Appointment ID. Practices who have not reported an issue with the way charges are grouped today will likely not need to utilize this new feature.
Your practice may not be experiencing any additional work because of the way appointments are set up such that the Location, Attending, and Seen By are not the same. Or, you may see charges combined on the Charge Capture Report, but based on the storage of appointment IDs by our charge interface partner, when the charges are consumed by the PMS, the correct Appointment IDs are applied and the charges do not need to be manually associated to the correct appointment.
For practices that are experiencing additional work to manually associate the charges in the PMS, we have created a Practice Preference to group charges by the associated Appointment ID instead of by common Date, Location, Attending Provider, and Seen By Provider.
See example below of an E/M appointment and an infusion appointment bundled on the same Charge Capture Report when the Practice Preference is turned off.

See example below of an E/M appointment and an infusion appointment with the same Date, Location, Attending, and Seen By that has two separate charge capture reports each with its respective Appointment ID. This is how charges are generated when the Practice Preference is turned on.


It is important to understand that this Practice Preference should not be turned on without coordination between your organization, Ontada, and your PMS vendor. Each PMS is different and requires additional setup and monitoring to accommodate the change in the way charges are received.
Recommended Usage
-
This feature is only intended for practices that have a scheduling interface which supplies appointment IDs and a charge interface which transmit charges to a practice management system. This feature was not designed for practices using the scheduler inside of iKnowMed.
-
This feature is only intended for practices that book separate appointments for each provider the patient is seeing and separate appointments for treatment and provider visits. If your practice has a workflow that adds multiple rendering providers onto one visit or wants to continue having all charges for multiple appointments appear on one charge capture report for printing, we do not recommend using this feature.
-
We do not recommend turning this feature on and then off again as charges will not be retroactively bundled. Charges are generated in real time and reflect the status of the practice preference at the time the charge was generated.
How to Utilize This Feature
-
Reach out to your Account Manager so that they can facilitate conversations with the Ontada interface team.
-
Reach out to your PMS vendor to let them know you will be turning on this feature. It is recommended that you include your Account Manager in this conversation.
-
Once your Account Manager and PMS vendor confirm this feature can be turned on, proceed to the next steps.
-
Go to Practice Preference > Charge Capture Settings and locate the Separate Charge Capture Reports by Appointment ID from Practice Management System option.
-
The checkbox is defaulted to unchecked. You must check the box to turn it on.
iKnowMed Generation 2 Design Updates
In version 3.0.20, we introduced an enhanced design to several pieces of iKnowMed Generation 2. Now, in version 3.0.21, we've expanded this look and feel to include the following:
-
New icons for the Library, auto-refresh, refresh, and add on the Dashboard and Chart Summary (see callout 1).
-
New icons for print, fax, and refresh on the Clinical Profile (see callout 2).
-
New pop up design in the patient banner (see callout 3). Notice there is no longer a close button on these pop ups. To close them, simply click the X in the upper corner or click anywhere on the screen outside the box.


New Location for Messaging Groups
The iKnowMed Generation 2 team is enhancing the process of creating and maintaining user groups to include the ability to associate groups with provider type, medical specialty, region, and/or location.
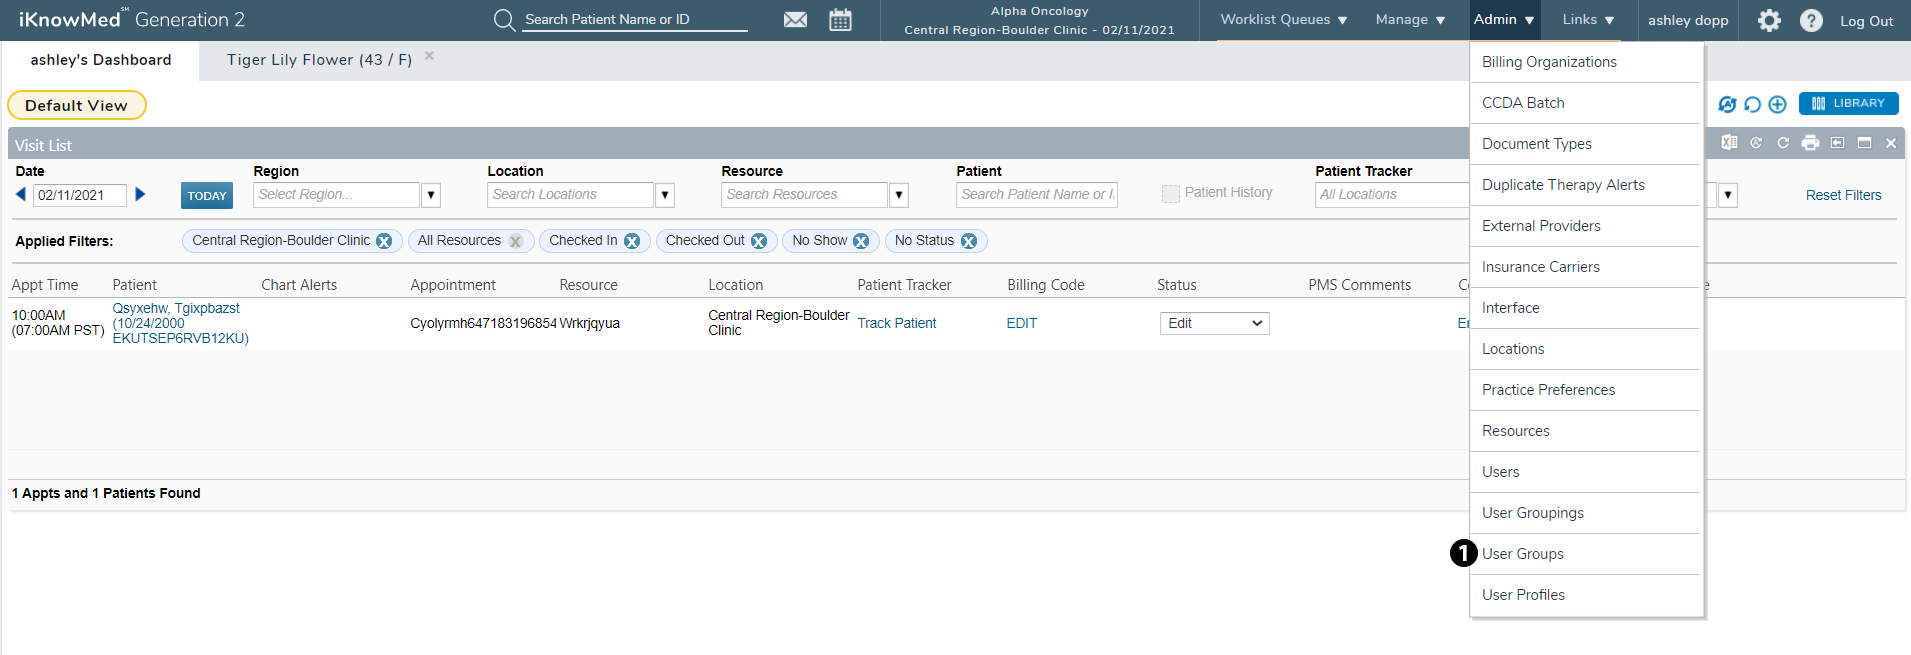
The first step in this enhancement includes the relocation of the creation and maintenance of user groupings. Starting with version 3.0.21, users must create and maintain messaging groups under ADMIN > User Groups (see callout 1).
The previous location in ADMIN > User Groupings will remain to create and maintain all other user grouping types as this enhancement will be a phased roll out.
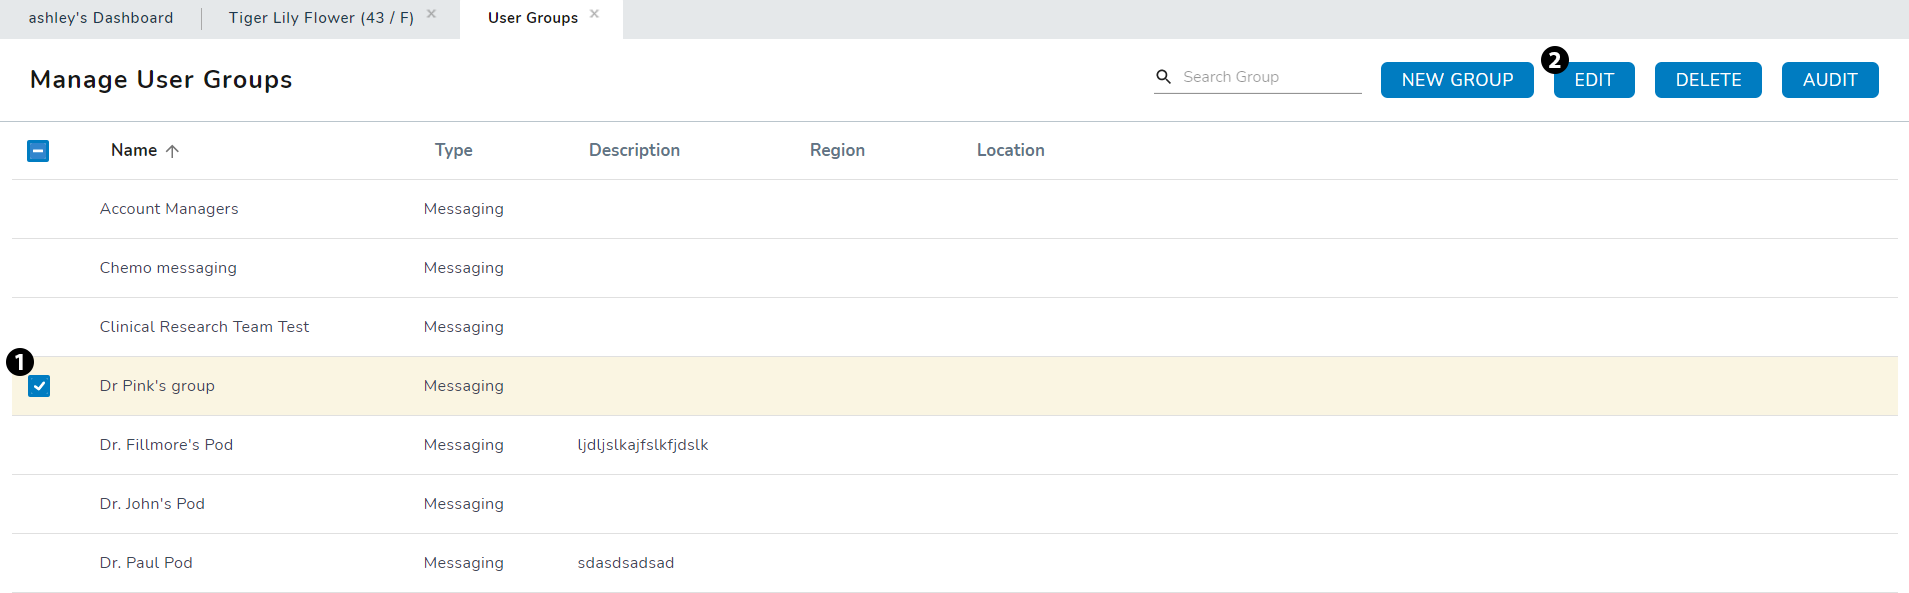
To work with an existing group:
The new ADMIN > User Groups page will be prepopulated with all your practices’ previously created groups so that you can continue to maintain them.
-
Select an existing group on the page (see callout 1).
-
Choose either the EDIT, DELETE, or AUDIT buttons (see callout 2).
-
EDIT: allows you to make changes to an existing group, such as members associated with this group.
-
DELETE: allows you to remove an existing group.
-
AUDIT: allows you to see any actions taken on this group and when those actions took place, as well as who took those actions.
-
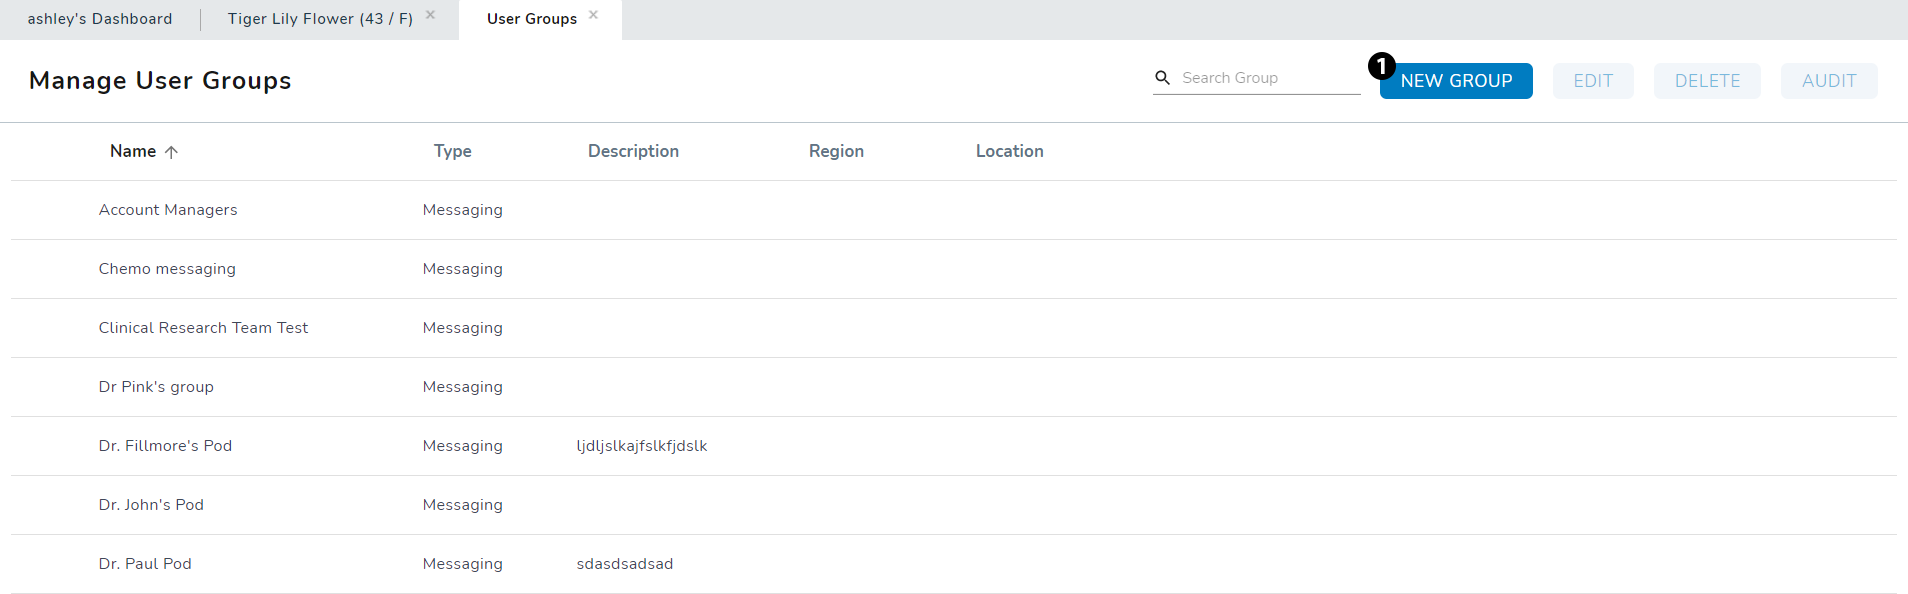
To create a new group:
-
Click the NEW GROUP button (see callout 1).
-
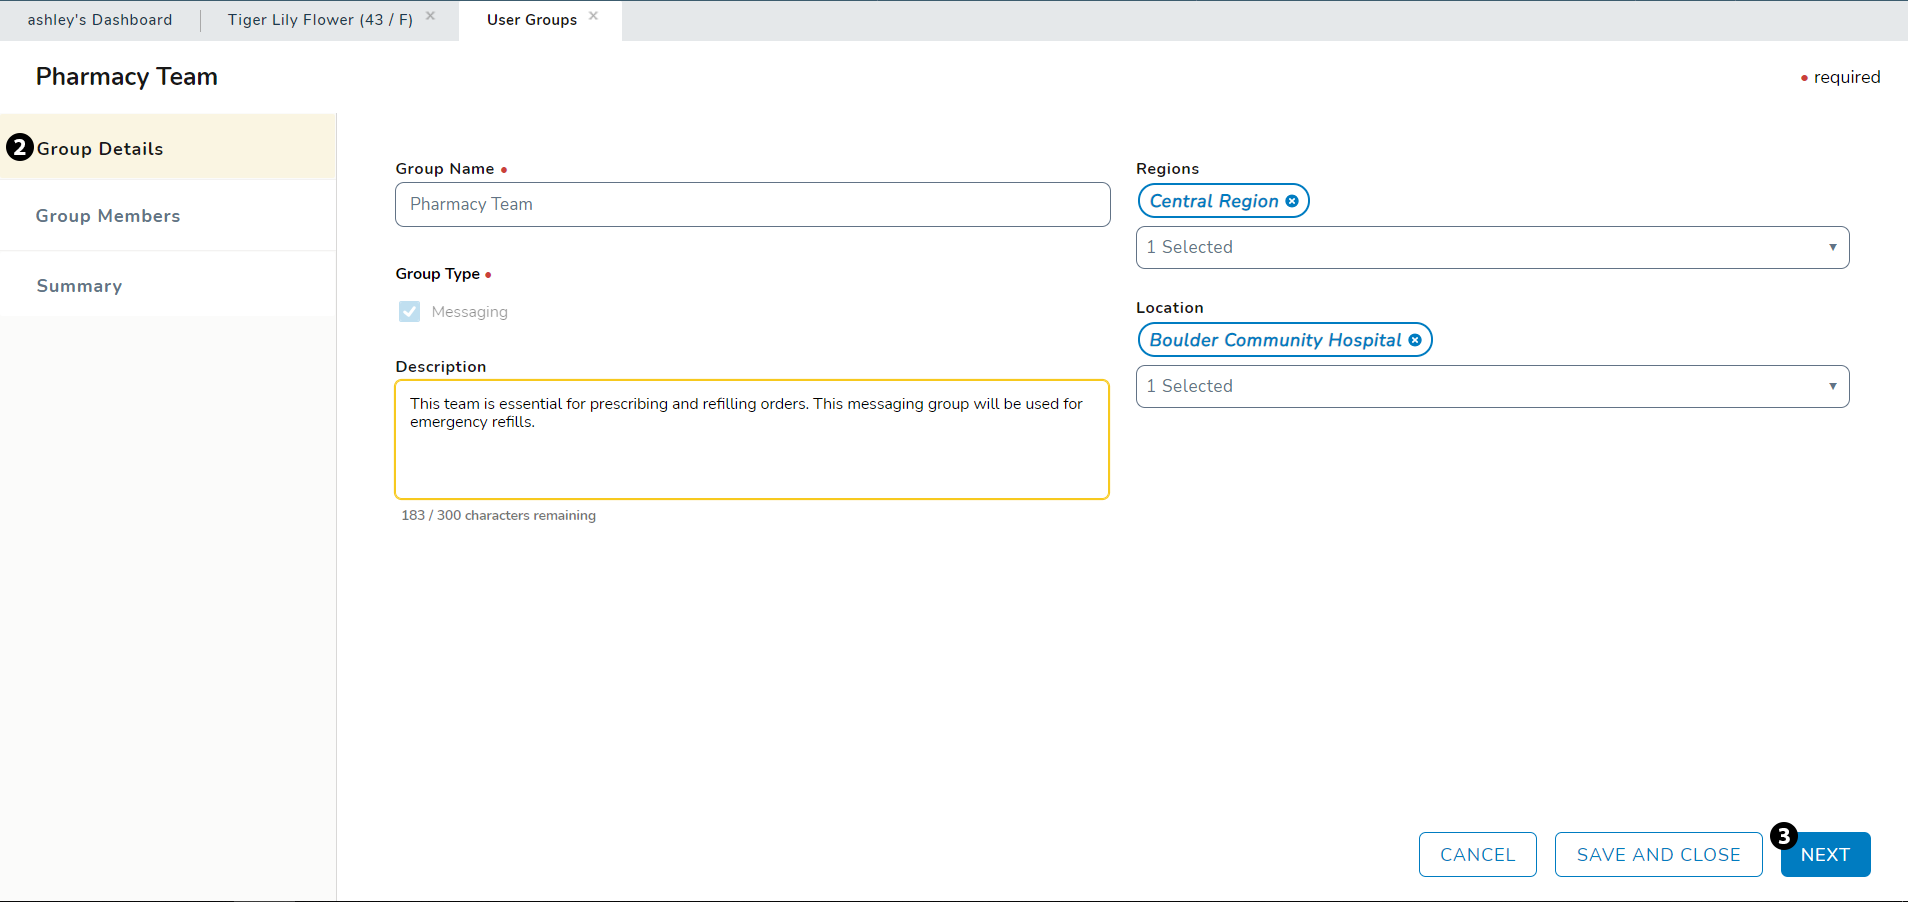
From the Group Details section in the left-hand menu (see callout 2), enter as much information about the group as needed.
-
Group Name: this is a required field. Name the group in a way that makes it easy to identify later.
-
Group Type: currently this required field will default to Messaging and cannot be changed.
-
Description: use this field to enter a description of this group to help you identify it later, such as who is in the group and why.
-
Regions: you have the option to choose the region this group belongs to.
-
Location: you also have the option to choose a location if this group is associated with a certain place.
-
-
Click the NEXT button (see callout 3) or select Group Members from the left-hand menu (see callout 4).
-
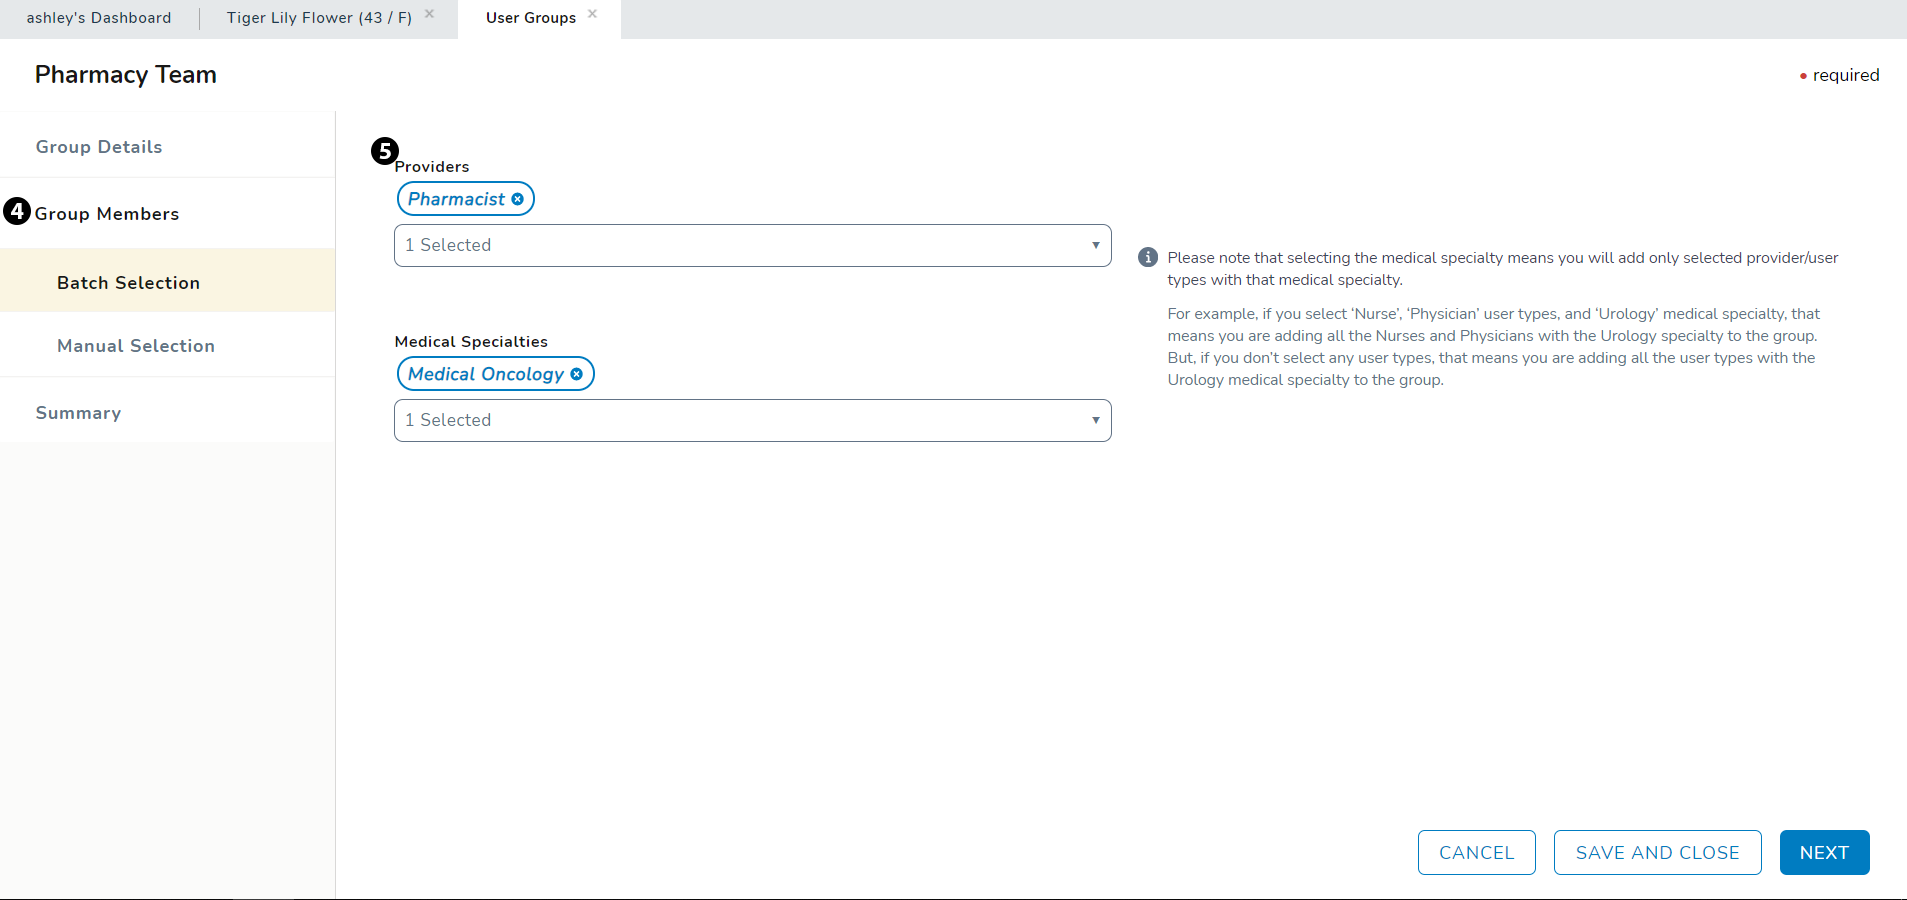
The Group Members section gives you the option to add members using a Batch Selection and/or a Manual Selection.
-
Batch Selection: allows you to choose all users at your practice by provider type or medical specialty. Any users in your practice whose profile is assigned these roles will be included in your messaging group (see callout 5).
-
Please note that when creating groups using provider type, those users will not show on the Summary page until it is saved and then edited.
-
-
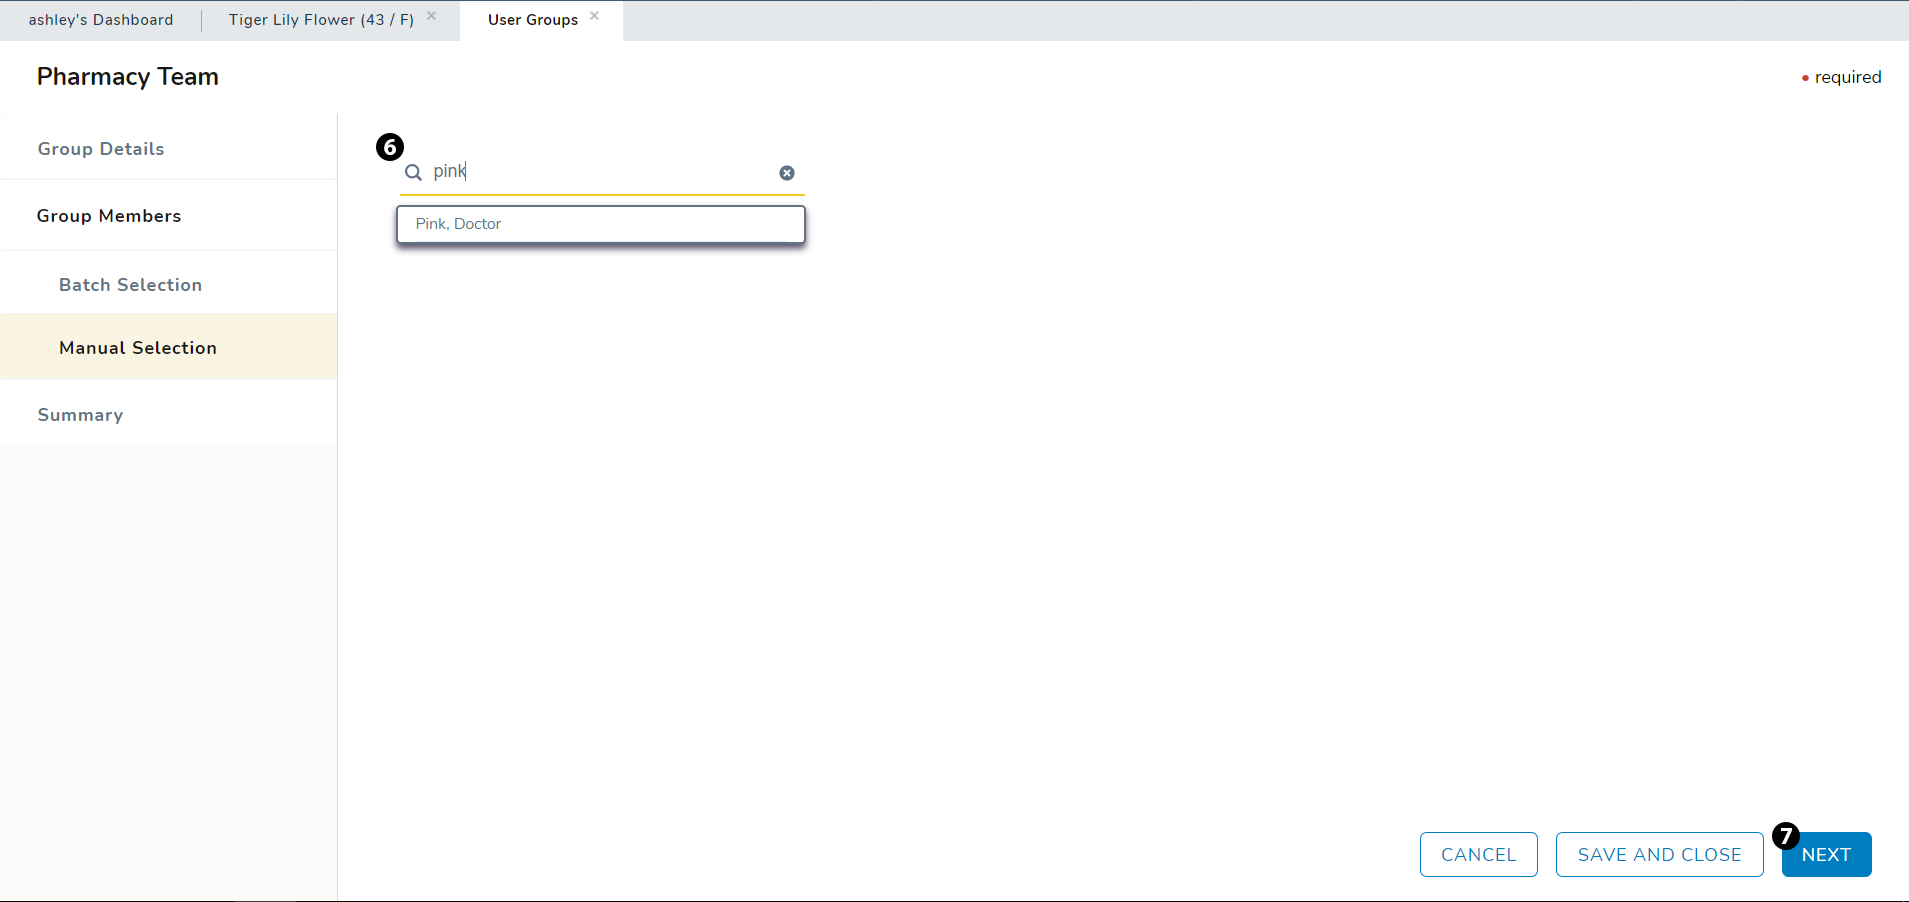
Manual Selection: allows you to search for and add group members individually by their name (see callout 6).
-
-
Click the NEXT button (see callout 7) or select Summary from the left-hand menu (see callout 8).
-
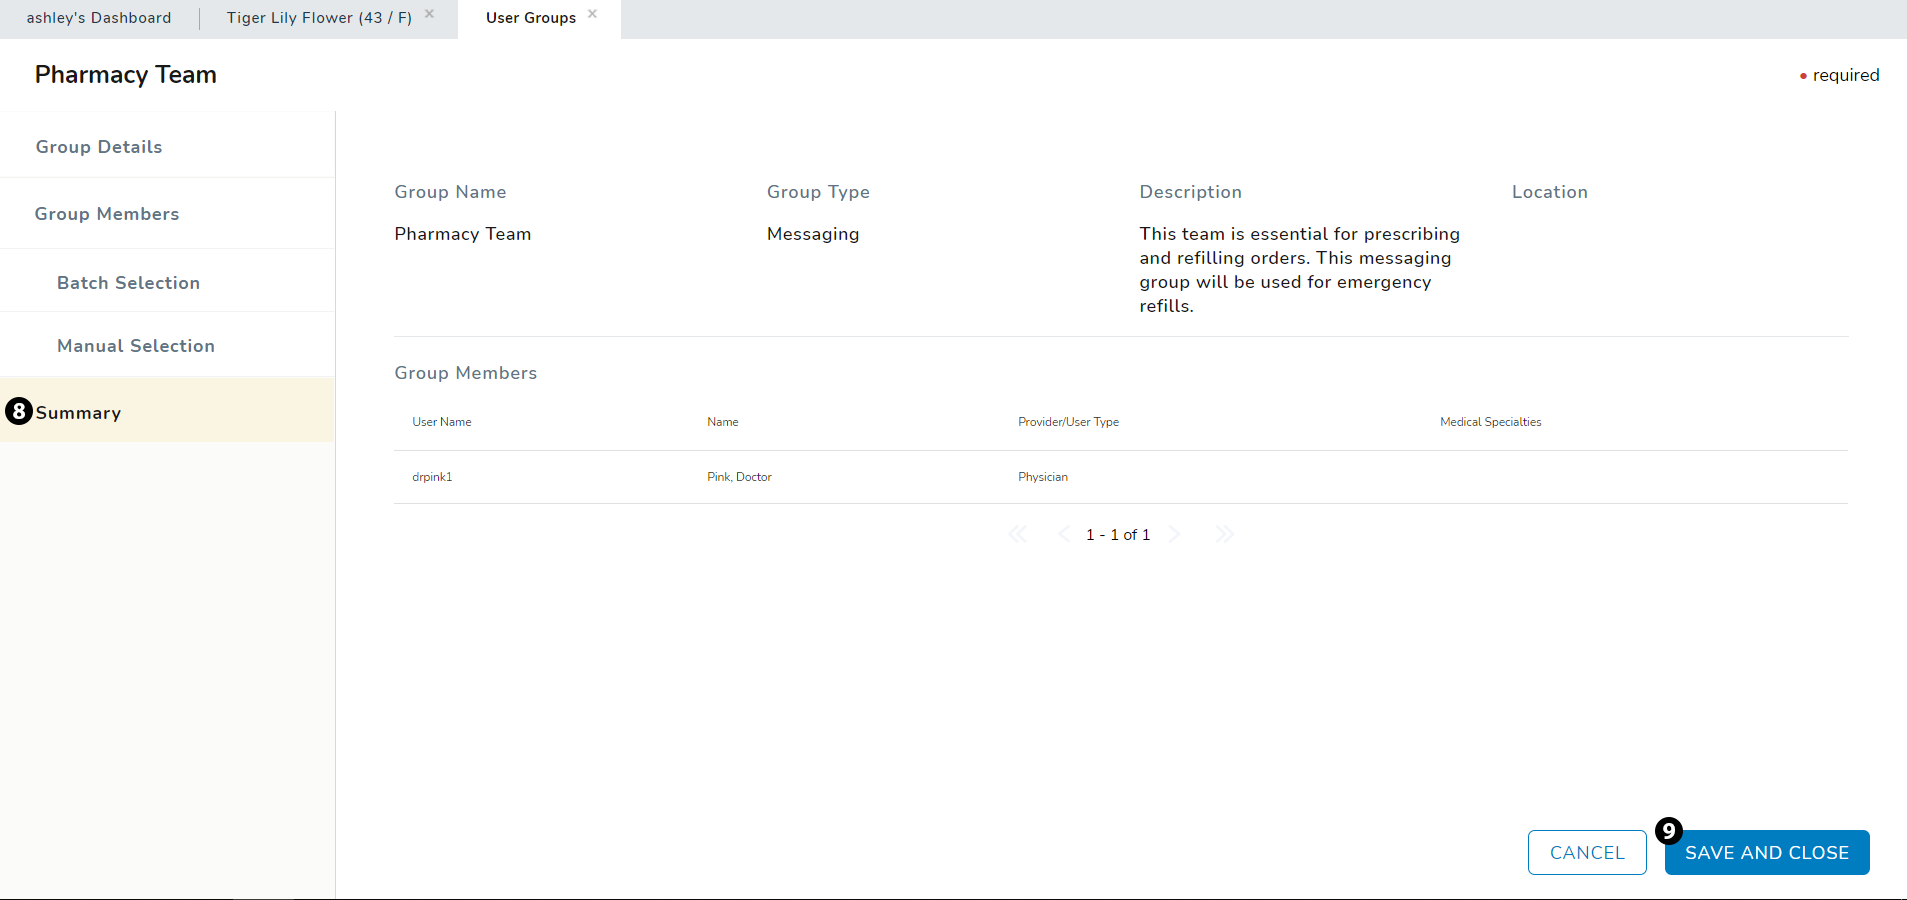
The Summary page displays all the information you entered for this new messaging group. If you need to change anything, simply select an area from the left-hand menu to go back. If all the information is correct, select the SAVE AND CLOSE button at the bottom of the page (see callout 9).
-
Please note that groups creating using provider type will not show on this page until it is saved and then edited.
-
Capture COVID-19 Vaccination Information in Screening Tool
You can now capture COVID-19 vaccine administration information in the screening tool on the Chart Summary using the ADD VACCINE and ADD SCREENING buttons (see callouts 1 and 2).
Select ADD SCREENING to record whether patient has consented to the vaccine as part of the screening process (see callout 3). Select ADD VACCINE to record offsite vaccine administration details, such as Status Date, Type, and Dose # (see callout 4).
Please note that offsite vaccination information entered in the screening tool will flow to the Health Maintenance page and vice versa. However, onsite vaccination information must be captured in the MAR before it will flow to the screening tool on the Chart Summary.


Suspended Regimens Removed from Regimen Status
Users managing admixtures found it difficult to determine what regimens needed to be fulfilled and administered for the day as suspended regimens were still being factored into the regimen status that displays on the admixture list.
Now when a regimen is suspended, the drugs in that regimen will no longer display in the patient's Admix and Nursing Care > MAR pages, as well as the Worklist Queues > Admix page.
Additionally, the status of the suspended regimen (i.e. planned, partially planned, or unplanned) will no longer be considered when displaying the overall status for the day.
For example: a patient is on a regimen that has been suspended. Prior to the regimen being suspended, the admixtures were partially planned. The patient also has an order for a drug that is not a part of a regimen. If the drug outside of the regimen has been planned in admix, the status will show as planned. The status of the suspended regimen will be ignored.

Vaccine Lot # and Expiration Date Prepopulate in the MAR
To decrease potential transcription errors and duplication of work, the lot # and expiration date for a vaccine entered manually or populated from Lynx on the patient's Admix page will now carry over to the Nursing Care > MAR. Select Admin Details from the immunization listed and scroll to Immunizations Details section to view the prepopulated information (see callouts 1 and 2).

Printed Orders Include Practice Location Information
When printing orders from Worklist Queues > Orders Queue, the orders will now print with Location Name, Location Address, and Location Phone (see callout 1). This area is populated with the information saved for your practice under ADMIN > Locations. Please note that if you do not have a Printing Name saved for the location (see callout 2), the system will use the Name of your location instead (see callout 3).


Admixture Label Enhancements
For the safety of those handling drugs and for the safety of the patient, iKnowMed Generation 2 now provides an easy way for users to add hazardous text warnings to admix labels.
The Bag Details window includes the option to add WARNING: CHEMOTHERAPY or WARNING: HAZARDOUS DRUG to the label (see callout 1). Saving these changes will display the text as part of the Bag Instructions (see callout 2).
Furthermore, Total Volume and Admin over fields have been removed for oral drugs as they are irrelevant, and the Bag Instructions field has also been renamed to Instructions for oral drugs making the label easier to read (see callout 3).
Lastly, the View Bag Details window in Admix appeared blank if only a Pharmacy Location was entered and saved. This is now fixed, and the View Bag Details window will display all fields, including those completed and those not.


Number of Treatments Displays on Admixture Queue Report
As requested by several practices, the Admixture Queue Report now shows a count of the Number of treatments ordered on a particular day (see callout 1). Please note that two orders combined into a single bag count as one treatment.

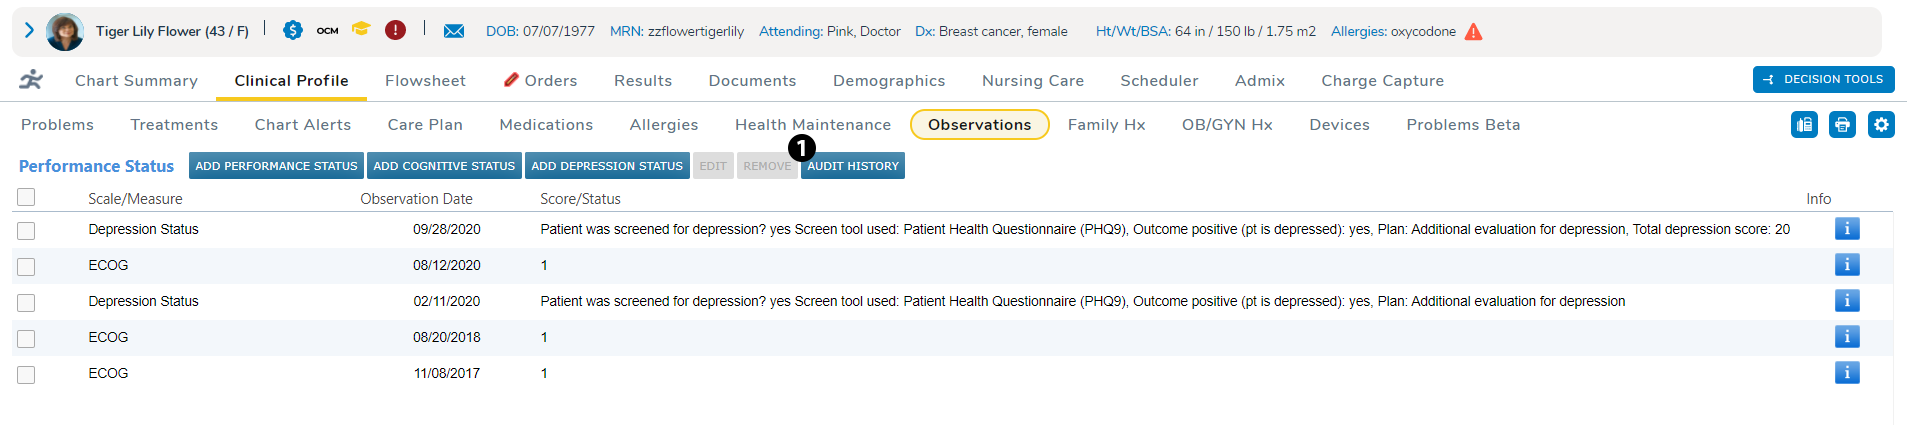
Audit History Available for Performance Status
Practices can now view who makes changes to a patient's performance status using the new AUDIT HISTORY button on the Clinical Profile > Observations page (see callout 1). This audit trail will display what was changed, as well as the date/time of the change and the user that made the changes.
Interval Summary Viewable for Users with View Permission
Prior to this release, users with only View permission for the Chart Summary Library were unable to see the Interval Summary in a patient's chart. Now, users with this View permission can view the Interval Summary in both the production and READ ONLY environments, which is an essential feature when iKnowMed Generation 2 experiences downtime.
Notes Signed in Documents No Longer Appear in Notes Review Worklist Queue
Several practices requested that clinical notes already signed in the Documents tab by the assigned note reviewer be removed from Worklist Queues > Notes Review. We have implemented this suggestion, and now when a note reviewer opts to sign the clinical note from the Documents tab, the system will remove that note from the Notes Review worklist queue.
New Alert for Practice Preferences Changes
There are several areas in Practice Preferences that require you to log out and back into iKnowMed Generation 2 for changes to take effect. Now, after updating one of those areas and saving your changes, an alert will display noting the successful change, as well as instructing you to log out and back in to see the update.
Associate Clinical Trial with Region or Location
Prior to this release, iKnowMed Generation 2 only allowed a clinical trial to be associated with a practice, which was insufficient for larger practices with multiple sites. Now, research teams can associate a clinical trial by region or location using the Select By Region/Location option when adding a new or editing an existing clinical trial (see callout 1). These choices will then display in a new Region/Location column in the Practice Information table (see callout 2).


Filter Charge Capture Report by Region
Practices can now filter the charge capture report by region using a new Regions option in the charge capture report and unreleased charges widget (see callout 1). All regions associated with your practice will display, allowing you to view charges associated a single region or multiple regions.

External Messages Updates
FIXED: Users reported that selections made in the Select Addresses portion of the External Messages filter in the Message Center were not saving session to session. This is now fixed, and selections will save until updated by the user.
Billing Window Prepopulates Attending and Seen By Fields
FIXED: Prior to this release, if a provider selected EDIT under the Billing Code column of the Visit List, the Attending and Seen By fields were blank in the Specify Billing Code window. This is now fixed, and these fields will always be prepopulated with the provider’s name to match the Rendering Provider.
Provider’s NPI Displays on Printed Orders
The provider's National Provider Identifier (NPI) will now display on imaging orders printed from the patient's Flowsheet and Order History, as well as from the Orders Queue as required by the Centers for Medicare & Medicaid Services.
Patient’s Allergy Information Displays on Printed Orders
All active patient allergies will display with patient demographic information on printed orders when printing from the patient's Flowsheet and Order History, as well as from the Orders Queue. This will prevent accidental allergic reaction at the time of order fulfillment.
Merged Status Removed from Demographics
The Merged option in the Patient Status drop-down on the Demographics page has been removed. This status can now only be used by the chart merge program to mark charts as merged and no longer active. This will prevent users from marking a patient as Merged without performing a chart merge.
CCDA Batch Report Displays Practice Name as Author
Prior to this release, the Author section of the CCDA report was populated with Interface, Lynx. This has been updated and the Author field will now display your practice's name to clarify where the batch came from when sharing with treatment partners, such as the local hospital.
Prescriptions No Longer List APP as Supervisor
Prior to this release, prescriptions by an APP that requires a designated supervisor sometimes listed the attending APP as the supervising physician. This has been updated, and the prescription will always use a physician instead.
Changing Insurance Auth No Longer Requires Cosignature for Rx
For prescriptions that require insurance authorization, there is no longer a requirement for the ordering provider to sign the order again in the Sign Orders queue.
Ability to Add Custom, External Links
In the Links menu in the top banner, it is now possible for a practice to provide up to 3 custom links for users that go to external websites, such as the state PDMP (see callout 1).
These custom links and their labels can be entered by a user with Admin permissions in Practice Preferences > Other Features (see callouts 2 and 3).


Placer Group Number Sent with OLIF
In this release, there is a new option to send a Placer Group Number with lab orders sent from the Orders I/F queue. This allows the LIS to simplify and more accurately group multiple orders into a single accession. This feature applies only to practices with OLIF (Outbound Lab Orders Interface) enabled.
When this feature is enabled, iKnowMed Generation 2 generates a Placer Group Number that is sent with orders to the LIS. The same Placer Group Number is sent for all orders for the same patient, perform date, perform location, and ordering provider. If an order is added after the initial orders are sent to the interface, the system checks for existing orders matching those criteria, and reuses the same Placer Group Number for any additional orders. The Placer Group Number is sent in the ORC-4 field of the HL7 ORM message which is sent to the practice LIS.
Please be aware that LIS installations for different customers have different configurations and rules for grouping orders. Before turning this feature on, it is important to coordinate with your LIS vendor to implement any needed rule changes to support the use of the Placer Group Number. Turning on this functionality, even for test purposes, could be ignored by the LIS or could cause issues with sending orders, therefore caution is needed. In addition, LIS vendors may charge the practice for making configuration changes, including changes for this new feature. Contact your LIS vendor for more information.
We encourage practices to reach out to the Lab Interface team iKMG2OLIFDirectExchange@usoncology.com to ensure the proper configuration and coordination in both iKnowMed Generation 2 and your LIS.
