April 2021
In this update, we've added important changes surrounding Depression Status, the Admix Worklist Queue,Advance Care Planning, the Johnson & Johnson COVID-19 vaccine, and a number of other areas of iKnowMed Generation 2.
Depression Status Changes Align with CMS Quality Measure Updates
Effective January 2021, CMS released significant updates to the depression screening measure that impact both the MIPS and OCM programs. These updates included the removal of two follow up options for patients with a positive depression screening to ensure that clinicians take action to treat or further diagnosis those patients.
Those options are Additional evaluation for depression and Suicide Risk Assessment. iKnowMed has been updated to reflect these changes in version 3.0.22.
Additional Evaluation for Depression
When documenting a patient’s depression status in Clinical Profile > Observations, you will notice that the Additional evaluation for depression option has been removed from the Plan section in iKnowMed version 3.0.22 as it is no longer valid for OCM and MIPS participants.
Suicide Risk Assessment
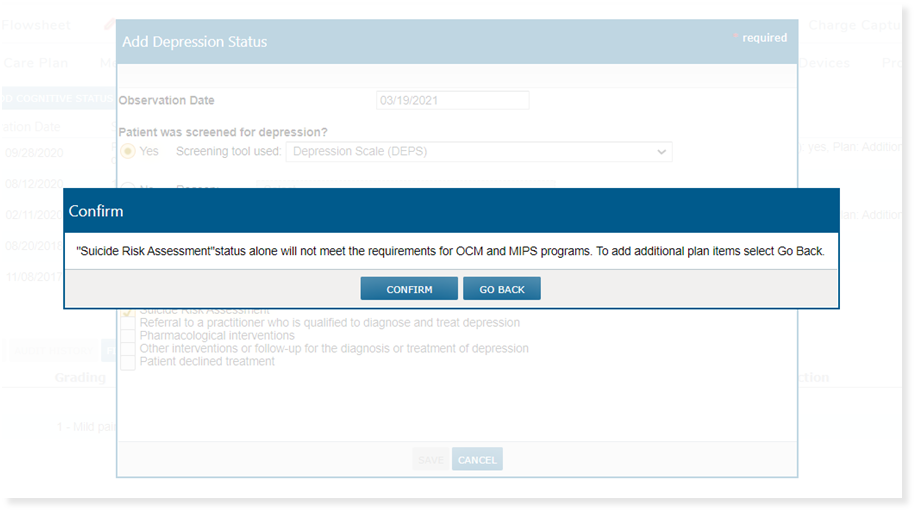
You will also notice that when documenting a patient’s depression status in Clinical Profile > Observations, choosing the Suicide Risk Assessment option and saving your changes results in the appearance of a new confirmation window notifying you that this option alone will not meet CMS requirements for MIPS and OCM programs.
You have the option for CONFIRM these changes and have it save to the patient’s chart, or you can click GO BACK to return to the previous screen and select an additional Plan option (see image below).
Correcting Previous Entries
Users can still view and edit previous depression screening entries for their patients. This allows you to correct all entries starting in January 2021 to meet the MIPS and OCM requirements. Be sure to select the acceptable Plan options as outlined above.
Admix Worklist Queue Updates
To provide more flexibility for how Worklist Queues > Admix can be used, the following enhancements were made in iKnowMed version 3.0.22:
-
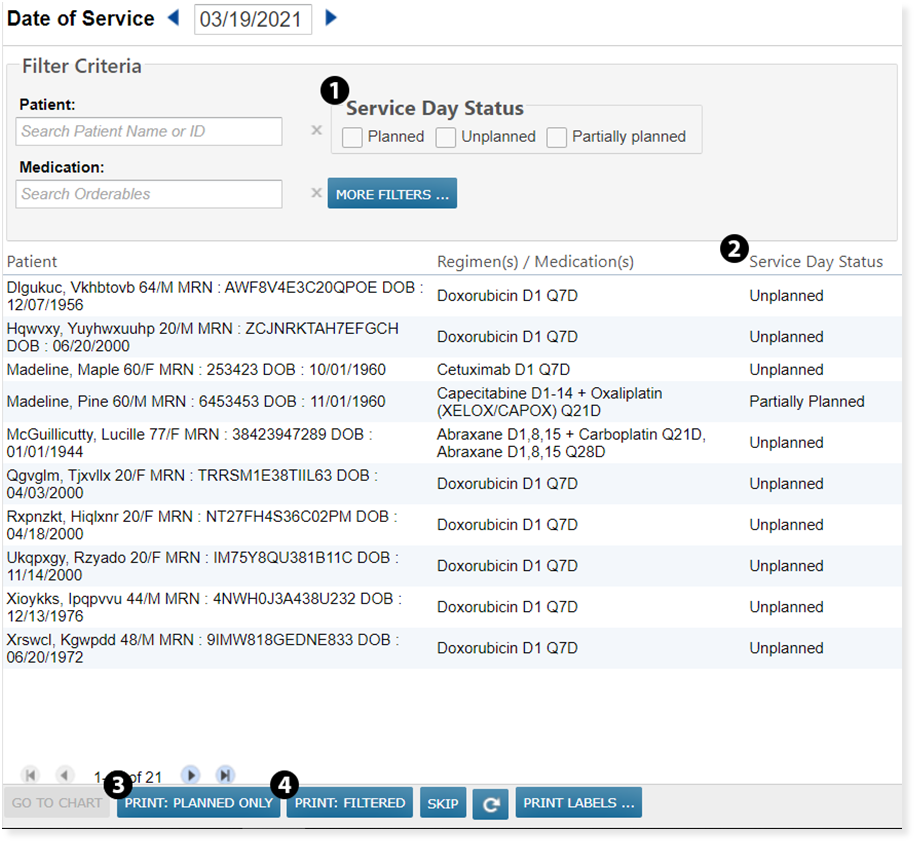
The Status section on the landing page has been renamed to Service Day Status for clarity, as this feature filters by the status of the entire service day, not each individual order (see callout 1). The table was also updated to reflect Service Day Status for consistency (see callout 2).
-
The PRINT REPORT button has also been renamed. The button is now labelled as PRINT PLANNED ONLY to reflect that only orders with an admixture status of planned will appear in the report (see callout 3). There is also a PRINT FILTERED button that will print a report based on the filters applied to the page (see callout 4).
-
Additional information has been added to the printed report:
-
Spacing was added in the Regimen column between the name of the regimen and the name of the treatment group.
-
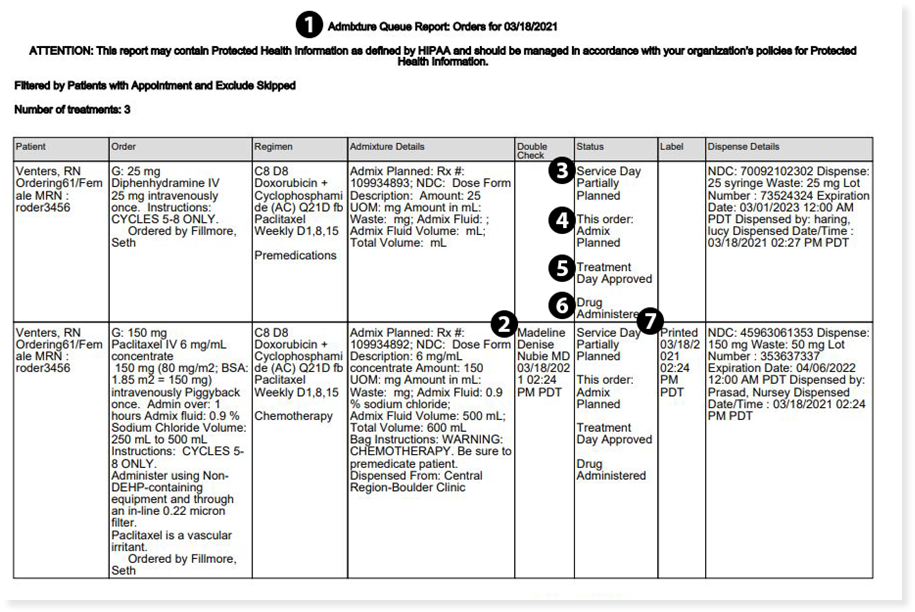
The Double Check column displays the date and time of the double-check, as well as the name of the user who did the double-check (see callout 2).
-
In the Status column the following details have been added:
-
The report is now be titled, Admixture Queue Report: Orders for MM/DD/YYY (see callout 1).
-
The status that currently displays is the status of the collection of orders for the day, so the words Service Day will appear before the display of the status (see callout 3).
-
A new status appears below the Service Day status in the column to denote the admix status of the order in focus. This status is labelled as This order: and displays the status as Admix Planned or Admix Skipped (see callout 4). For unplanned orders, This order: status will not display in the column.
-
Below the This order: status, another new status appears for Treatment Day approval. If the treatment day is approved, the column displays Treatment Day Approved (see callout 5). If it has not been approved, the Treatment Day status will not appear in the column.
-
Lastly, below the Treatment Day approval status, a new Drug Administered status will appear. If the drug has been administered to the patient, the column will display Drug Administered (see callout 6). If it has not been administered, the Drug Administered status will not appear in the column.
-
-
-
The Label column will display the most recent date and time the label was printed (see callout 7). If the label was not printed, this column will be blank.
New Advance Care Planning and Social & Behavioral Health Code Types in Billing Screen
In order to make certain codes more easily accessible to our users, we have created two new code types in the E/M section of the billing code selection screen.
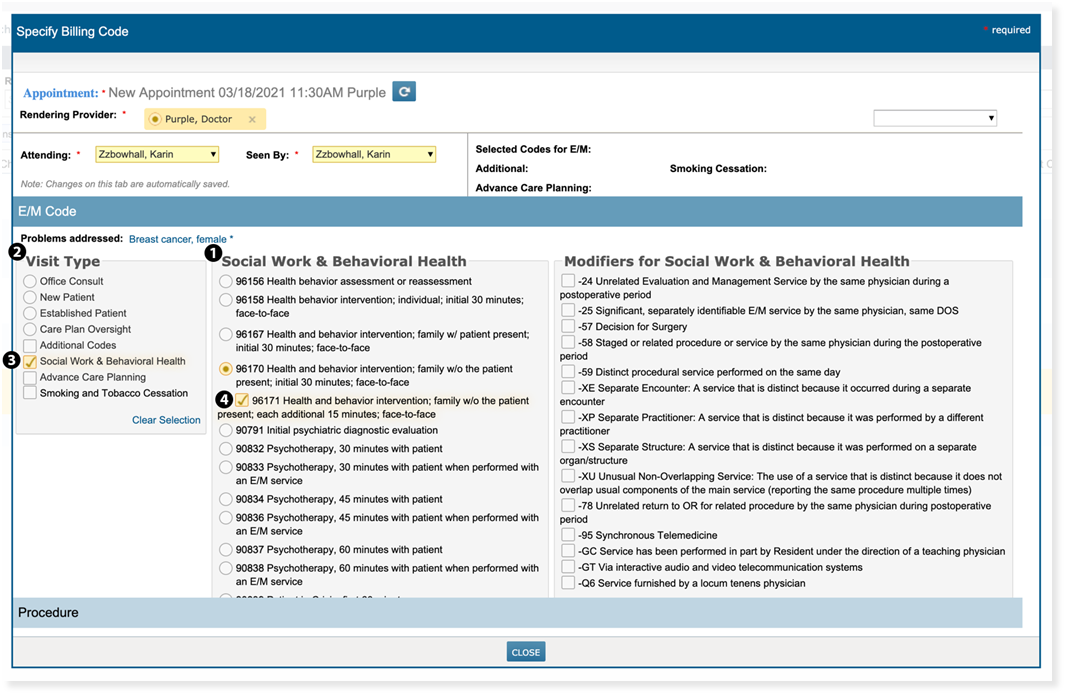
The Social Work & Behavioral Health section contains the most commonly used codes that social workers need to add for their visits (see callout 1). This section allows users to bill for their visit without having to go into the Procedure section to add their codes. The Associated Problems in the E/M section will apply to the codes selected under Social Work & Behavioral Health. Users can select codes from this code set or add them in addition to codes from the other codes listed under the Visit Type section (see callout 2).
To access these codes:
-
Open the Billing Code Selection screen from the Visit List, Unfinished Charting, or Documents > Note > Billing.
-
Check the box next to Social Work & Behavioral Health (see callout 3).
-
Select a code using the radio buttons. If your selection has a time extender code, it will be accessible as a sub-menu item when you click on the primary code (see callout 4).
-
Once you’ve selected your codes you may close the window.
-
You will now see the codes you selected on the Visit List or Unfinished Charting instead of the word, Procedure.
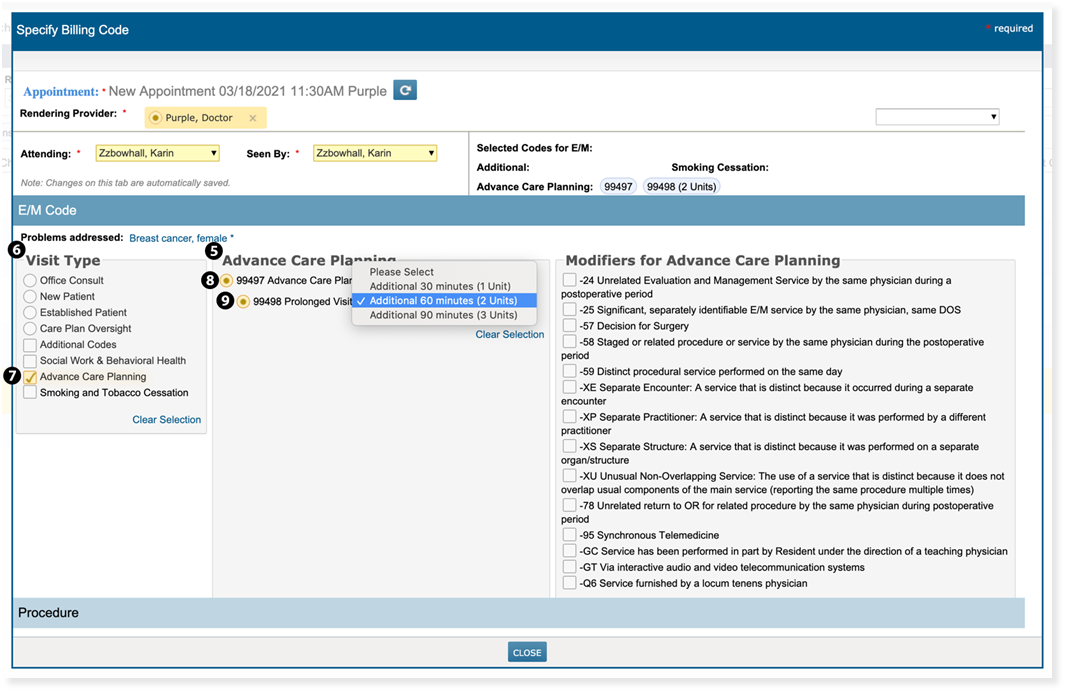
The Advance Care Planning section contains the primary and add-on codes for ACP billing (see callout 5). This section allows users to bill for their visit without having to go into the Procedure section to add their codes. The Associated Problems in the E/M section will apply to the codes selected in Advance Care Planning. Users can select codes from this code set or add them in addition to codes from the other codes listed under the Visit Type section (see callout 6).
To access these codes:
-
Open the Billing Code Selection screen from the Visit List, Unfinished Charting, or Documents > Note > Billing.
-
Check the box next to Advance Care Planning (see callout 7).
-
Select the primary code 99497 using the radio button (see callout 8).
-
Once you have selected the primary code, a drop down will appear below it to allow you to add up 90 more minutes of billable time (see callout 9).
-
To add additional minutes, select 99498 and use the drop down to select the number of additional minutes you would like to add on to the visit.
-
You will now see the codes you selected on the Visit List or Unfinished Charting instead of the word, Procedure.
Practice Preference to Support Using AMA Time on Billing Screen
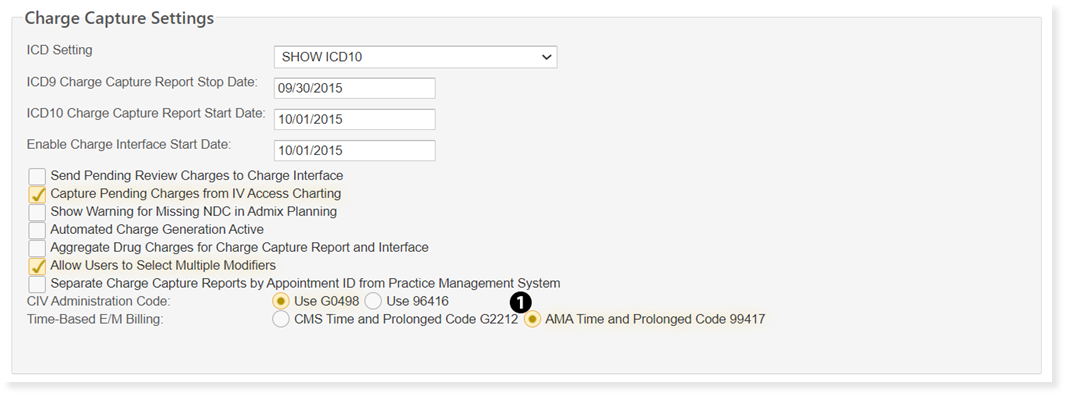
Prior to the current release, New Patient and Established Patient E/M codes used CMS time and CMS prolonged code G2212. To allow practices and their revenue cycle teams the option to use AMA time, we added a Practice Preference that allows the billing screen to display different time values in the code descriptions and drop downs.
NOTE: iKnowMed defaults to CMS time, so after this release you will not see any changes to the screens or codes unless you turn on the preference for AMA time.
To turn on the preference:
-
Go to Admin > Practice Preferences.
-
Under the Charge Capture Settings section, choose the AMA Time and Prolonged Code 99417 option from the Time-Based E/M Billing setting (see callout 1).
-
SAVE your changes.
This preference has a backwards compatibility that ignores the preference when the appointment already has a prolonged code from the opposite setting associated with it. If your practice chooses to toggle this setting from CMS to AMA time or vice versa, any prolonged codes that are already associated with the appointment will remain.
This means when the user opens the Billing Code Selection screen, if a prolonged code has been selected prior to changing the practice preference, the screen will ignore the practice preference and display the codes and descriptions for the code set corresponding to code set associated with the prolonged code. For example:
-
Patient A already has a 99215 and 1 unit of G2212 charted for their visit. G2212 corresponds to CMS time.
-
Patient B has a 99205 charted for their visit but no prolonged code. 99205 is used in both AMA time and CMS time.
-
If the practice preference is toggled to use AMA time and a user goes back to the billing screen to review what was charted, Patient A will still show CMS time because a prolonged code in CMS units was already selected and the system will ignore the practice preference to preserve previously charted codes. Patient B does not have a prolonged code and the screen will honor the change in the practice preference and AMA time will now be displayed on the screen next to the already selected 99205 code.
Johnson & Johnson COVID-19 Vaccine Updates
Prior to this release the Janssen (Johnson & Johnson) COVID-19 vaccine generated a generic vaccine G code when administered. The correct administration code for this vaccine is 0031A and will now be generated on the charge capture report when the Janssen COVID-19 vaccine is administered.
Practices can now also select the Janssen vaccine as an option in the COVID-19 screening tool when adding a new vaccine administration. The Janssen vaccine will show in the screening tool and the health maintenance page in the same manner as the Pfizer and Moderna vaccine.
Ability to Withhold Sensitive Lab Results as Part of the 21st Century Cures Act
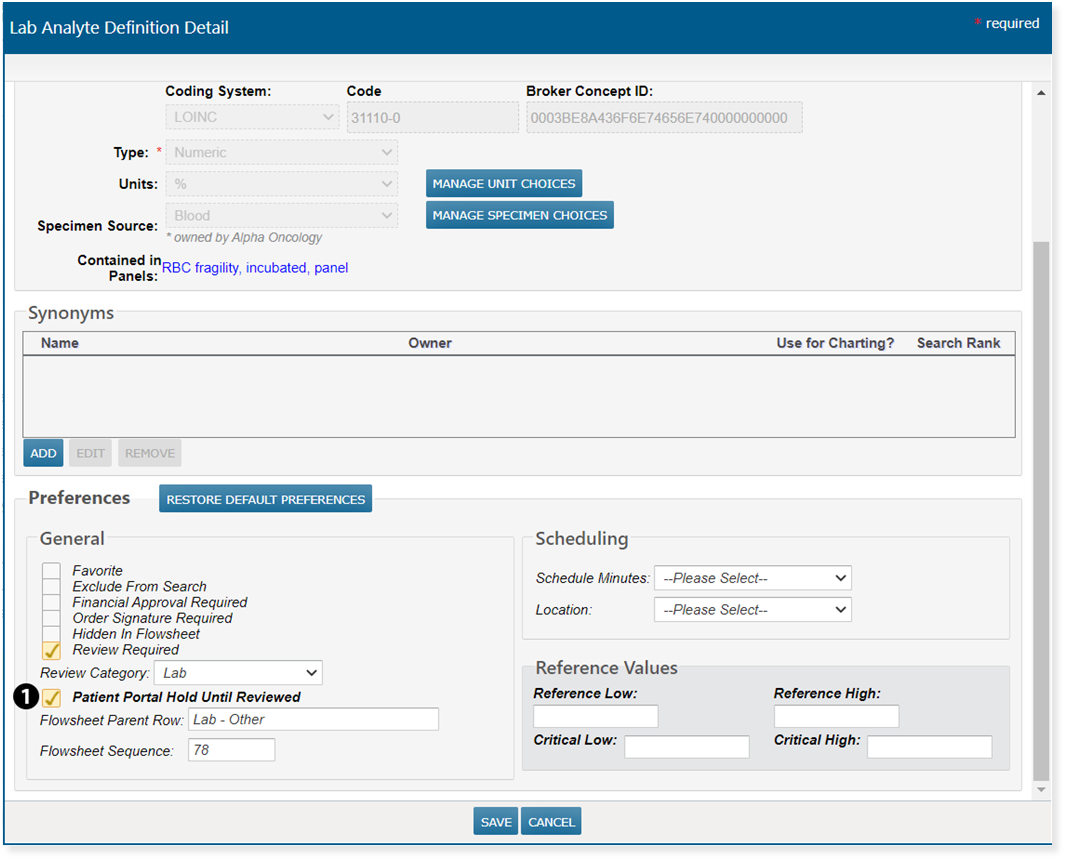
In support of the information blocking provision of the 21st Century Cures Act, in iKnowMed version 3.0.23, all lab results will be automatically released to the patient portals, unless marked as needing physician review prior to release. In preparation for that change, the version 3.0.22 release allows practices to mark the labs that should be withheld from the patient portal until the physician reviews them.
To withhold a type of result:
-
Go to Manage > Labs/Imaging & Services.
-
Select the type of result that needs to be withheld and click the EDIT button.
-
Under the General section, check the box for Patient Portal Hold Until Reviewed (see callout 1).
-
SAVE your changes.
Now when patient results are automatically released in the next version of iKnowMed, these types of results will be held back until the physician conducts a review and releases the results to the patient portal.
New Clinical Note Macro Displays Author of the Note
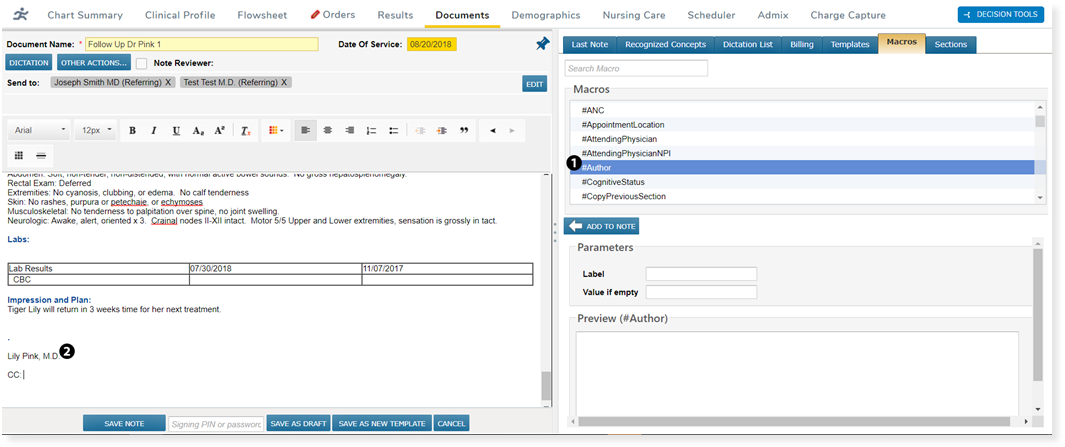
A new clinical note macro is available. The #Author macro can be used to display the note’s author on the note (see callouts 1 and 2). The author's first, middle, and last name, along with their credentials, will appear based on the information saved in their user profile (see callout 2). If another user is later assigned the Author role, the note will then display that person’s name and credentials once the note is refreshed.
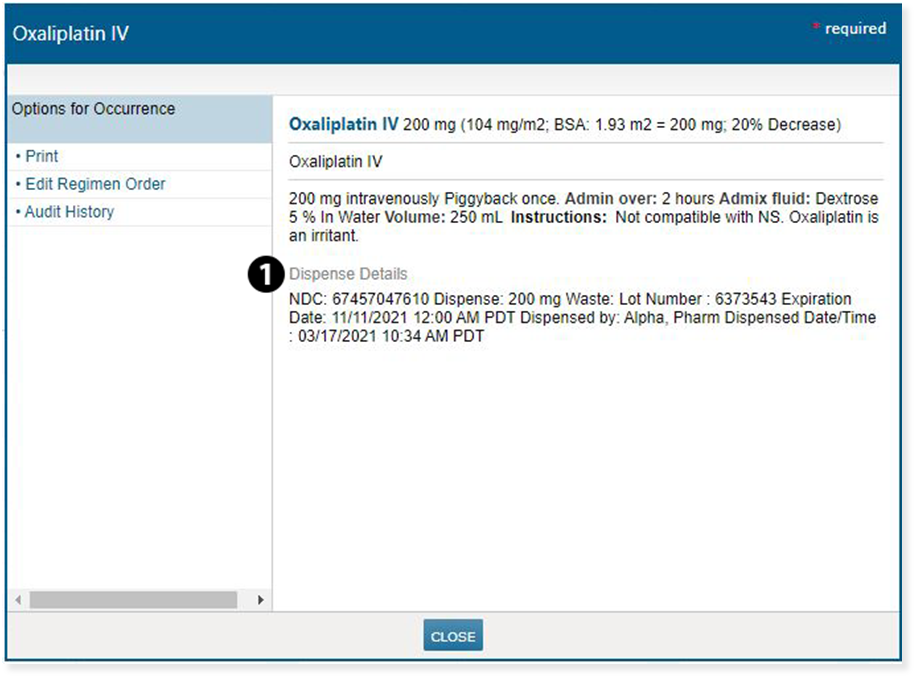
View Dispense Details on the Flowsheet
Dispense details on administered medications will now be available from the patient's Flowsheet. This will provide billing staff with a more easily accessible way to locate details on an order than what is provided on the Charge Capture Report.
To view this information:
-
From a patient's Flowsheet, click on a cell where a drug order exists.
-
See the new Dispense Details section that appears below the existing content to view the information (see callout 1).
NOTE: The Dispense Details section will only appear if the dispense details have been completed.
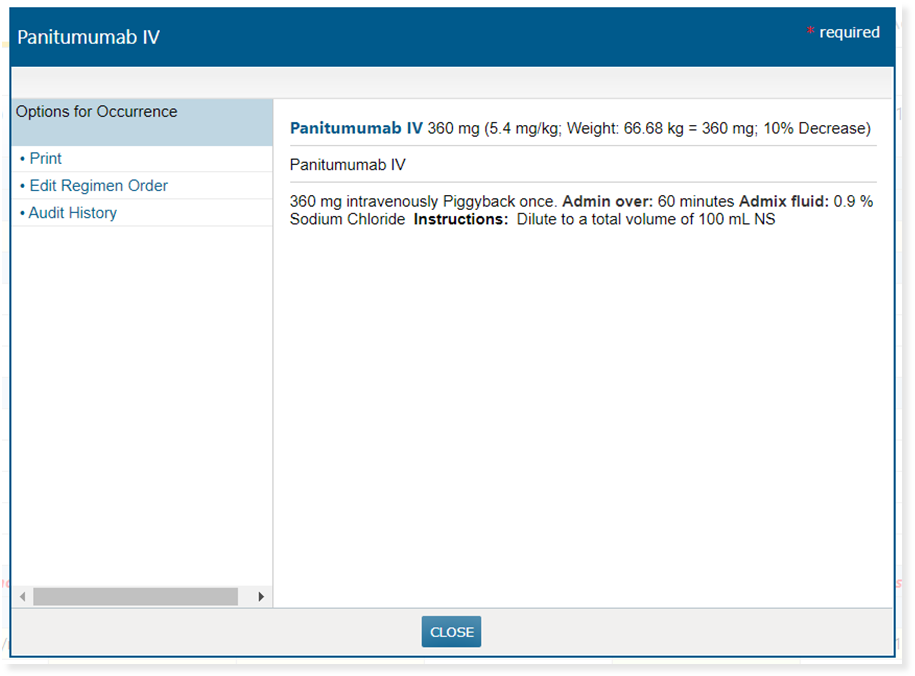
Percentage Change to Drug Dose Displays with Other Order Details
When a drug dose is edited using the Percentage change portion of the dose calculator, the percentage changed will now display everywhere the full detail of the saved order displays. This can help clinicians better understand a patient's course of treatment.
NOTE: This update does not apply to any drug doses edited prior to the 3.0.22 release.
Reports to Consistently Display Date, Time, and User ID
An important part of recordkeeping includes an accurate audit trail of when information is created, edited, or removed from a report and who carried out those actions. In version 3.0.22, several reports in iKnowMed have been updated to more accurately reflect the date, time, time zone, and user ID to help track these changes.
The following reports have been updated:
-
Flowsheet > Reports > Patient Access Report
-
Flowsheet > Reports > Audit Note
-
Flowsheet > Reports > Regimen Lab Summary
-
Flowsheet > Reports > Scheduled Orders Report
-
Flowsheet > Reports > Clinical Profile Report
-
Flowsheet > Reports > Regimen Cycle Summary
-
Clinical Profile > Observations > Adverse Events > Audit History
-
Patient chart > Chart Summary > Release of Information dashboard widget > Select the "i" icon
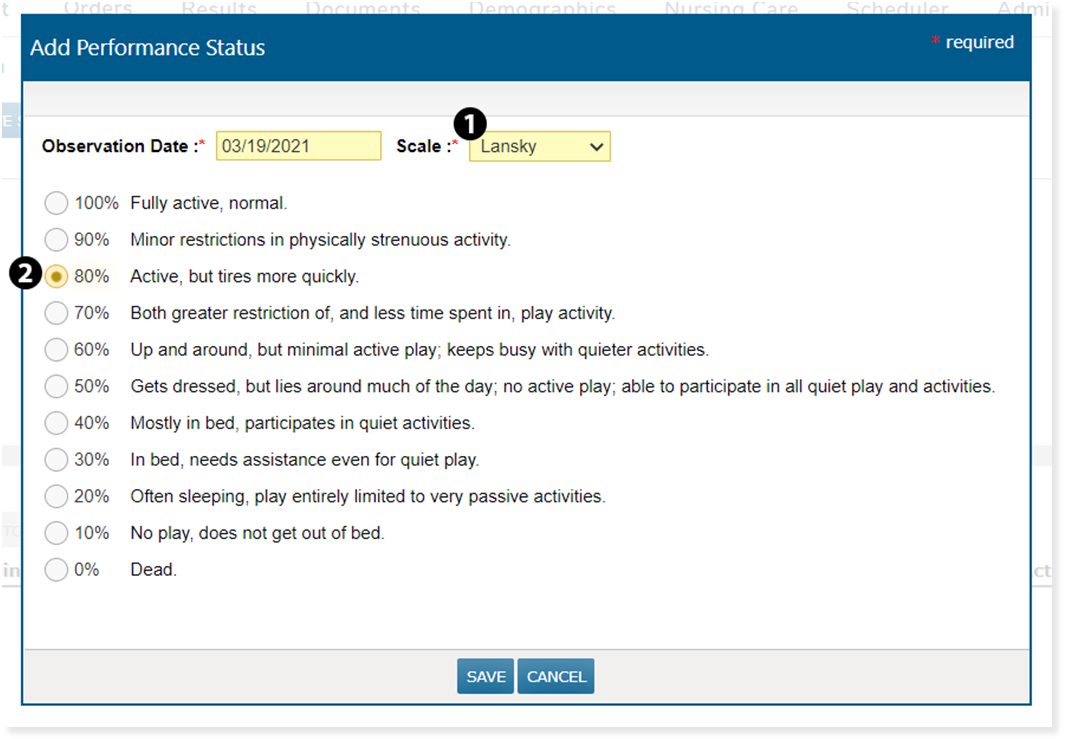
Lansky Scale Added as Performance Status for Patients 16 Years and Younger
The Lansky Scale is a new performance status scale added to iKnowMed version 3.0.22 and is to be used for patients 16 years and younger. This is an age dependent performance status, so once the patient turns 17, the scale will no longer be available for documentation.
Previous entries of the scale will be visible and available for updates if needed; however, new entries using the scale cannot be created once the patient turns 17 years old.
To use the Lansky Scale:
-
Go to a 16-year-old (or younger) patient’s Clinical Profile > Observations.
-
Click the ADD PERFORMANCE STATUS button.
-
Choose an Observation Date and from the Scale drop down, select the Lansky option (see callout 1).
-
Select a score from the scale and SAVE your changes (see callout 2).
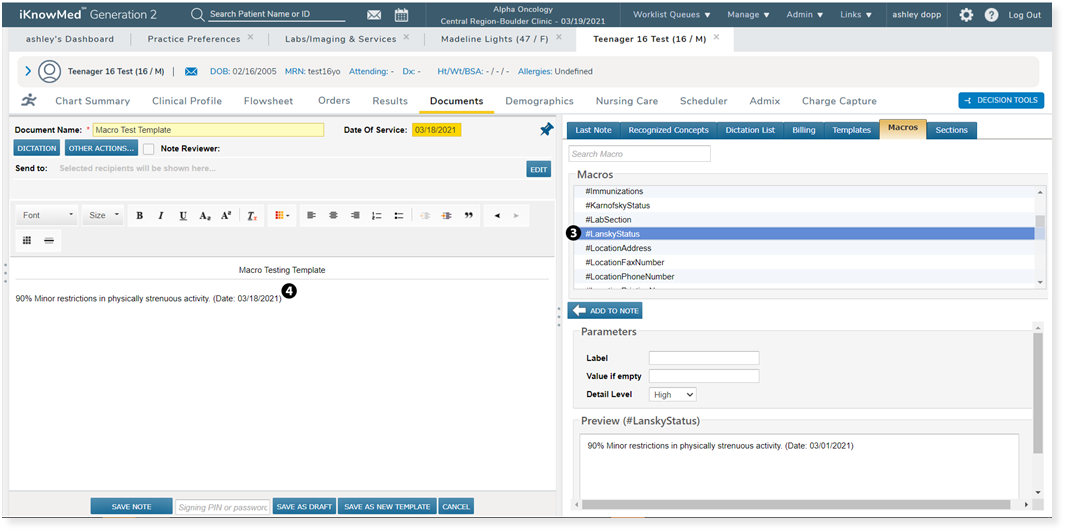
To further support the use of the Lansky Scale, a new macro has also been added to iKnowMed. This macro called, #LanskyStatus allows users to bring the documentation of the Lansky performance status into their clinical notes (see callouts 3 and 4).
Add Medications to a Regimen Faster Using Streamlined Process
It is common for physicians to add drugs to a patient’s treatment regimen. Users requested a way to do this more efficiently, particularly in cases where the drug being added should not be added to any of the treatment groups already in the regimen.
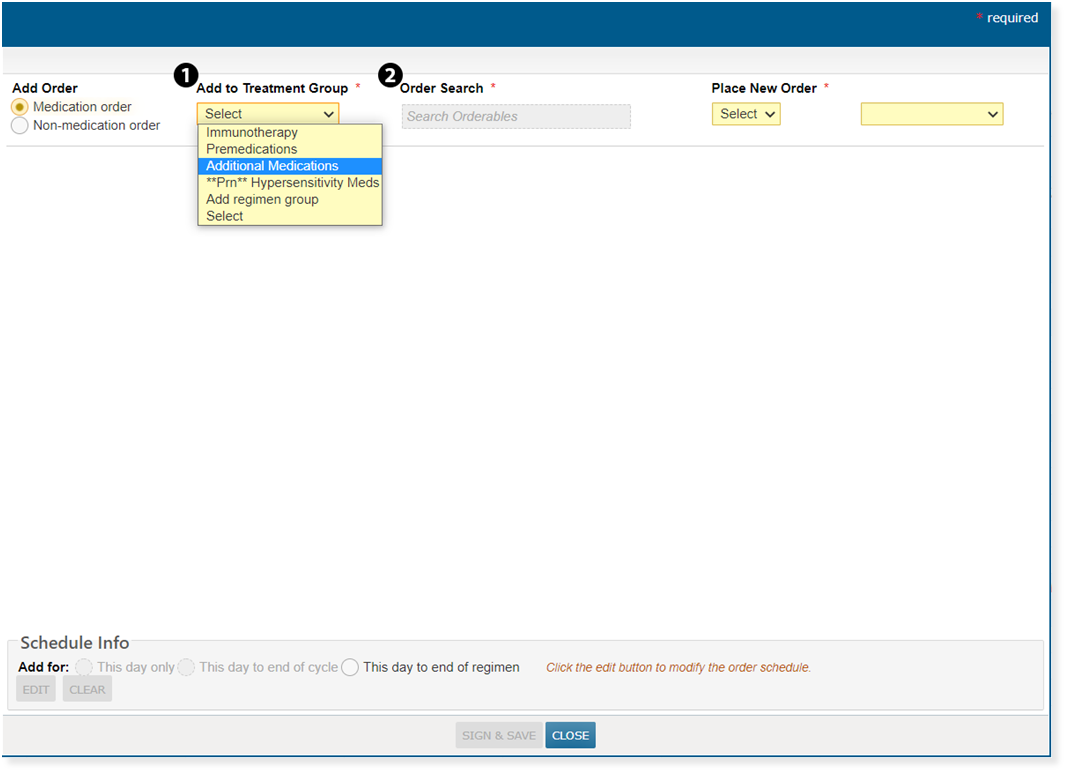
To streamline this process, the Additional Medications treatment group will always be an option, without searching, when adding the order. Users can also still search for and select a different treatment group if desired.
To quickly add a medication to a patient’s regimen:
-
From the patient’s chart, go to the Flowsheet.
-
Click the regimen cycle day header and from the pop-up choose Add an order.
-
From the Add to Treatment Group drop down, select the new Additional Medications option (see callout 1).
-
Search for and added the needed medication using the Order Search field (see callout 2).
-
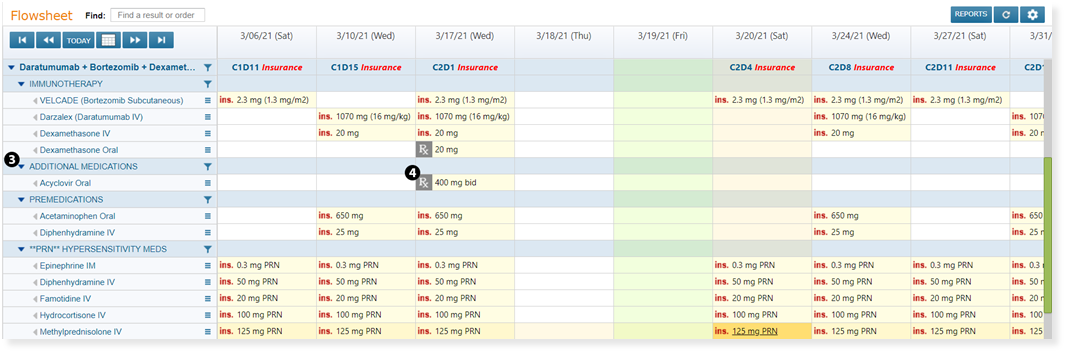
Once the medication details are completed and the drug is saved to the regimen, an Additional Medications treatment group will be added to the regimen.
-
If the regimen already contained a **PRN HYPERSENSTIVITY MED section, the Additional Medications section will appear just above it.
-
If the regimen did not contain a **PRN HYPERSENSTIVITY MED section, the Additional Medications section will be added to the bottom of the regimen (see callouts 3 and 4).
-
Selected BSA Calculation Method Used to Fulfill Formula-Based Orders
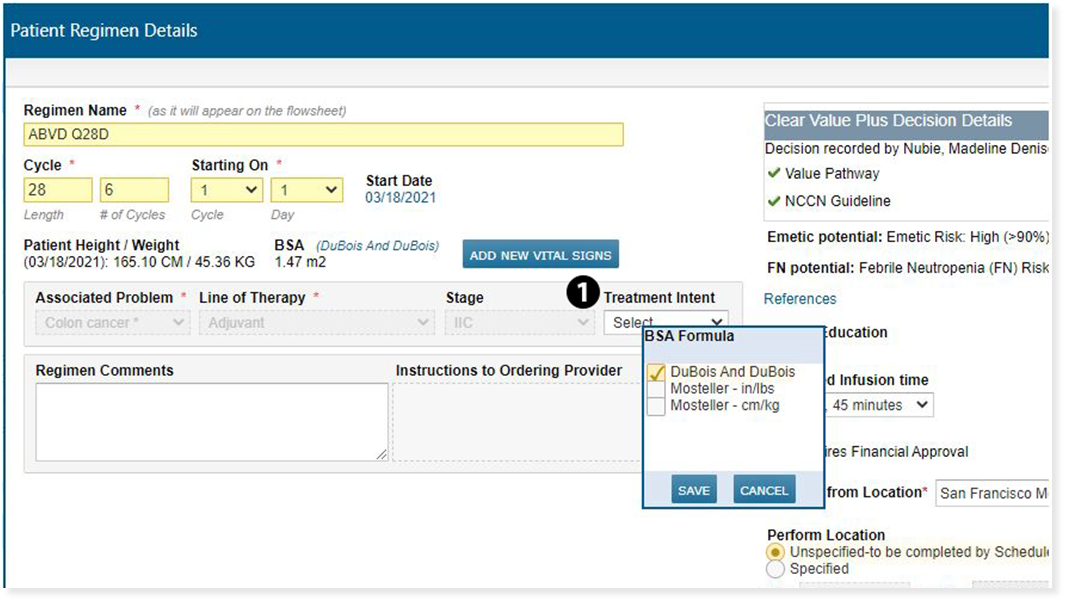
Prior to this release, if the BSA calculation method was changed while ordering a regimen, or a clinical trial regimen used a BSA calculation method that differed from the practice preference, the expected BSA was not always used in the regimen orders. Instead, the BSA calculations were defaulting to the method chosen in Practice Preferences.
This is now fixed, and when a user overrides the BSA calculation method in Practice Preferences, the order will use the selected method to calculate the proper dosage (see callout 1).
Pain Care Plan Displays in Correct Order
Prior to this release, users viewing a patient’s Pain Care Plan on the Clinical Profile > Care Plan page reported that the plans appeared out of order with newly added plans appearing on the second page. This is now fixed, and the Pain Care Plan will display in reverse chronological order by default and will respond accordingly if the results are sorted using the Date of Service option on the table.
New External Messages Users See Messages Upon First-Time Access
In iKnowMed version 3.0.21, we noted that newly created direct exchange users with permissions to External Messages had to log out and log back in to see their messages on their first entrance to External Messages. This is no longer the case, and in version 3.0.22, a newly created direct exchange user with permissions to External Messages can now see their messages on their first entrance to External Messages.
Empty Macros Retained Until Clinical Note is Finalized
Prior to this release, empty macros were removed from the clinical note before it was finalized if the user toggled from Show Final Copy to Reveal Note Structure. This is now fixed, and all macros in the template will continue to display until the user finalizes the note.
Quick Login Feature Extended to Other Users
Prior to this release, only users assigned a physician role in their user profile were able to use the quick login feature. This has been updated, and now all users with access to patient charts can use the quick login feature.
