Orders Queue Update
The new Orders Queue is more flexible and allows for the creation of role-based workflows – whether you’re a scheduler, nurse, pharmacist, or financial counselor. New status indicators and Update History section allow you to see where orders are in the process and the latest updates, when they were made, and by whom. This transparency makes it easier to track the order’s progress through completion.

NOTE: The queue must be turned on at the practice level.
Notes for Outbound Lab Interface (OLIF) practices
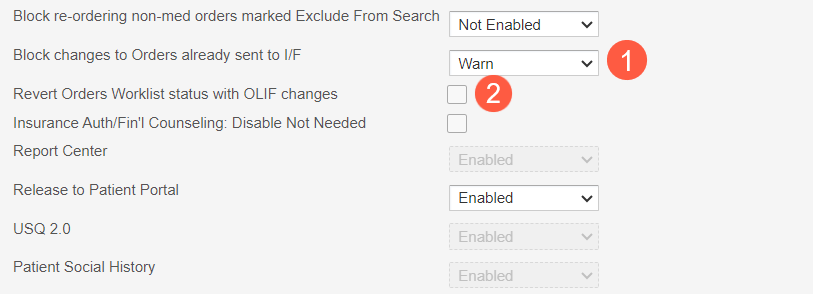
The Block changes to Orders already sent to I/F practice preference works in the Orders Queue as it does in the traditional Orders Queue (callout 1).
-
When the preference is set to No, you can change the Location Type, Perform Location, and/or Perform Date for any order already delivered to the Orders I/F queue without disruption.
-
When the preference is set to Warn, you will receive a message warning you that the order was already delivered to the Orders I/F queue. You must choose Override Warnings & Save to implement changes to the Location Type, Perform Location, and/or Perform Date or choose Cancel to stop the change.
-
When the preference is set to Block, you cannot change the Location Type, Perform Location, and/or Perform Date on any orders already sent to the Orders I/F queue. You will receive an error message informing you that the order was already delivered to the Orders I/F queue.
There is also a new preference for OLIF practices called Revert Orders Worklist status with OLIF changes (callout 2).
-
When this preference is turned off, the system will preserve the order statuses in the Orders Queue even if the order’s Location Type, Perform Location, and/or Perform Date is updated in the Orders I/F queue.
-
When this preference is turned on, any updates to an order’s Location Type, Perform Location, and/or Perform Date in the Orders I/F queue will revert all queue statuses for this order back to Not Started in the Orders Queue. This change will be captured under the Update History section of the order as part of the audit history.
Orders Queue Overview
To use the new Orders Queue:
-
Go to Worklist Queues > Orders Queue from the top navigation.
-
You’ll see the queue is now divided into three columns.
-
Start in the left column where the queue is organized by patients and pre-sorted and pre-filtered according to your preferences.
-
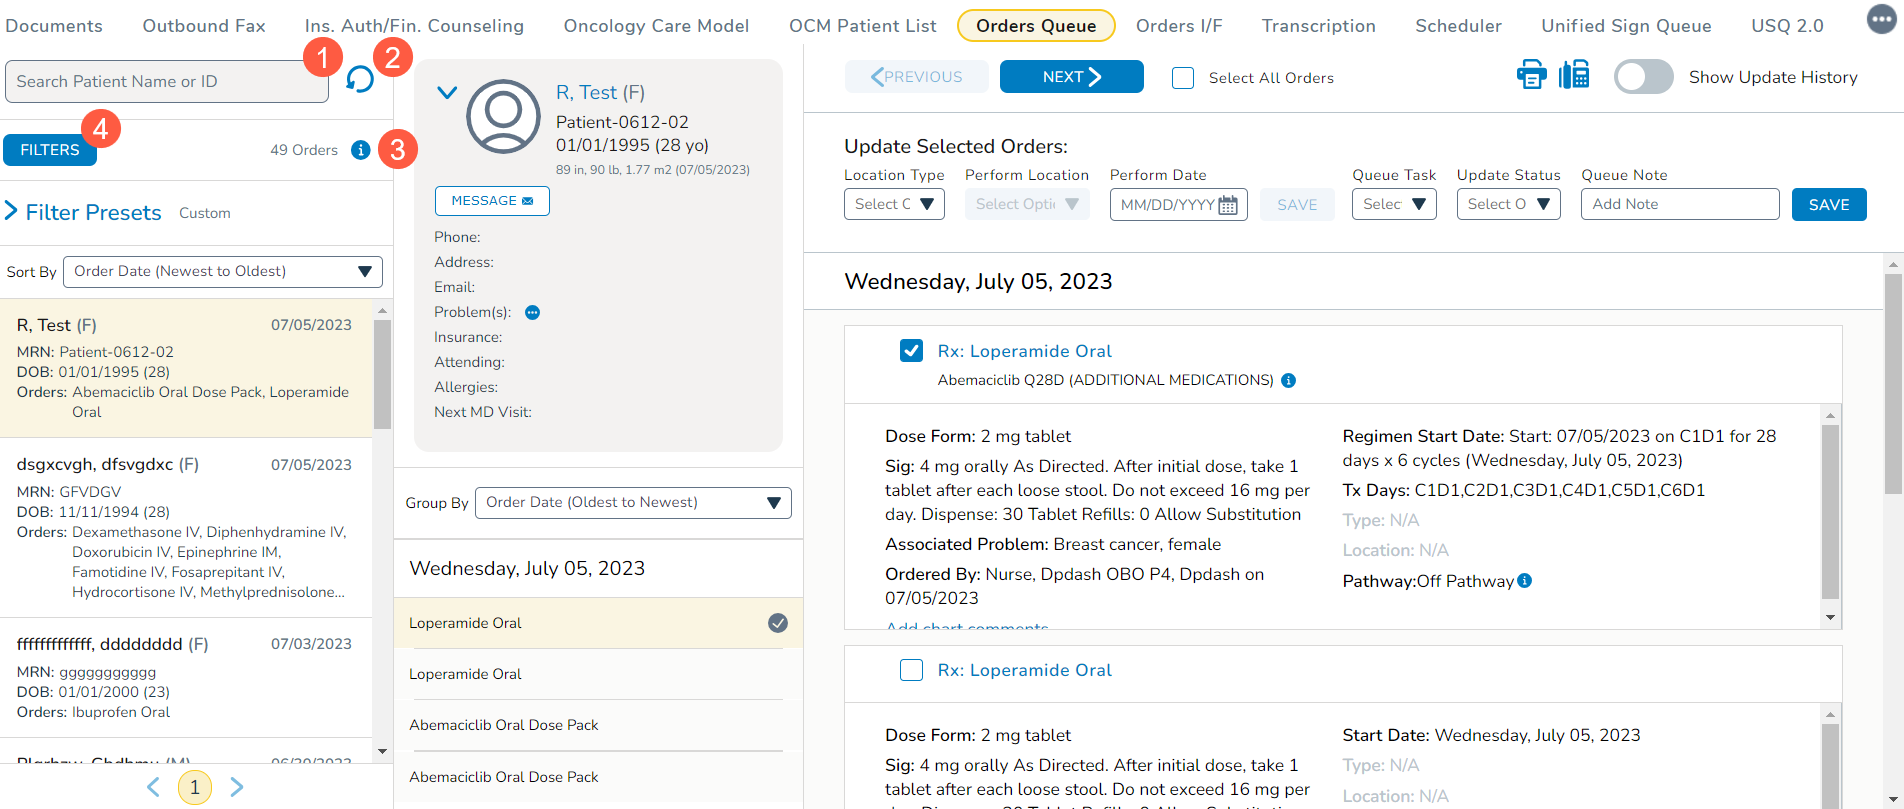
If you need to locate a particular patient, use the search box at the top of the list (callout 1).
-
If you need to manually refresh the list to view new or updated orders, use the refresh icon to the right of the patient search (callout 2).
-
-
Click the info button to see the current filter conditions applied to the list (callout 3).
-
You can change the filters by clicking the FILTERS button (callout 4).
-
This action will open a window where you can:
-
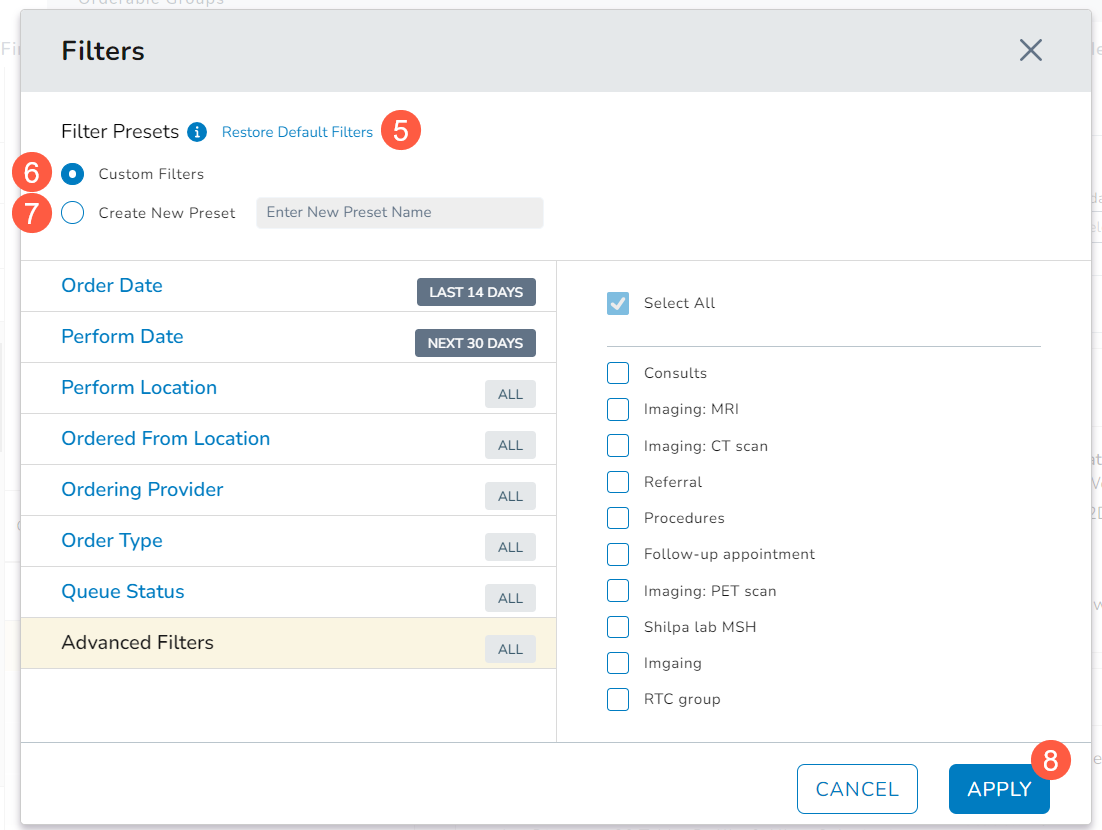
Restore Default Filters: return the queue to the original settings prior to you making any selections (callout 5). The default settings include:
-
Order Date: Last 14 days
-
Perform Date: Next 30 days
-
Perform Location: All
-
Order from Location: All
-
Ordering Provider: All
-
Order Type: All
-
Queue Status: All
-
Advanced Filters: All
-
-
Create Custom Filters that will be applied to the queue only for your current session (callout 6).
-
Create New Preset to customize your view for this session and save it to be used in future sessions. You must choose a unique name for this filter (callout 7).
-
The following information can be filtered in the queue:
-
Order Date: view orders from the date they were placed by selecting from All, Custom date range, Today, Last 7 Days, Last 14 Days, Last 30 Days, or Last 90 Days.
-
Perform Date: view orders by when they should be fulfilled by selecting from All, STAT/ASAP/Add-On, Next 14 Days, Next 30 Days, Next 90 Days, a Custom range, and/or Include Last 90 Days
-
Perform Location: select one, several, or all site locations where the order will be fulfilled
-
Ordered from Location: select one, several, or all site locations where the order was placed
-
Ordering Provider: select one, several, or all providers at your practice
-
Order Type: select one, several, or all order types, as needed
-
Queue Status: select orders by one, several, or all tasks and statuses (e.g., Scheduling Not Started or Pharmacy Dispensing Not Started)
-
Advanced Filters: select one, several, or all advanced filters shown
NOTE: This filter will be prepopulated with options, but you may create and add your own options under Manage > Orderable Groups
-
-
-
Once you’ve selected all your filters, click Apply to view the filtered results (callout 8).
-
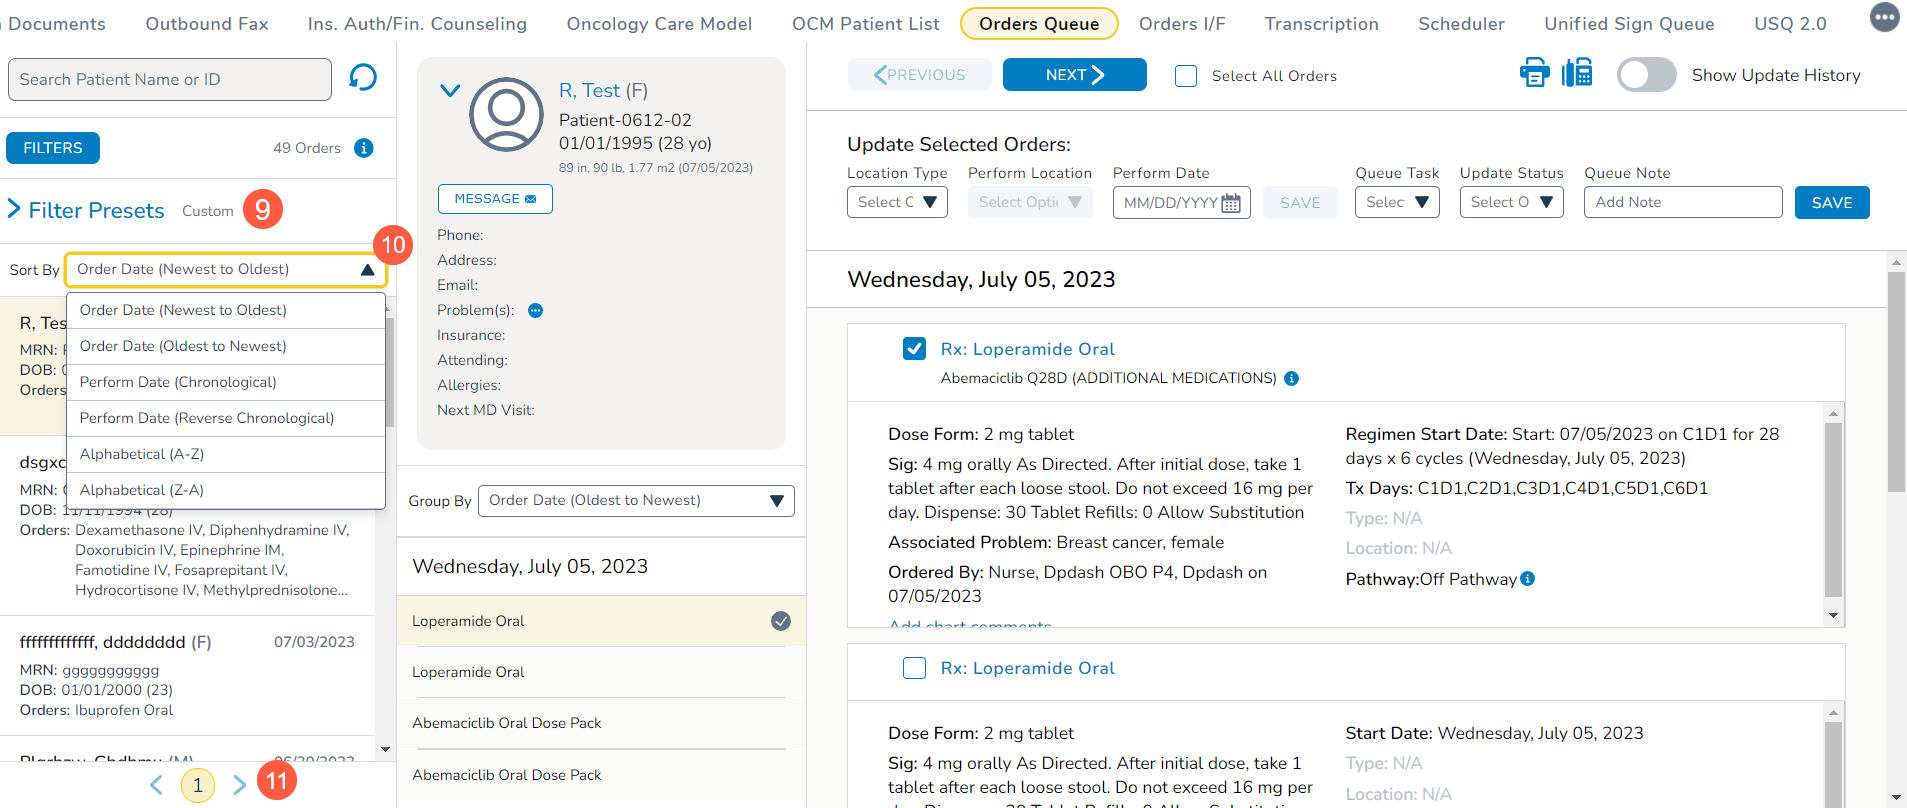
To view all your preset filters, click Filter Presets below the FILTERS button (callout 9).
-
You may create up to 6 presets to support your workflows. Your presets can be applied, edited, or deleted from the Filter Presets area.
-
The list of patients that match your applied filter can be sorted using the Sort By option (callout 10). The patient list can be sorted by:
-
Order Date (Newest to Oldest)
-
Order Date (Oldest to Newest)
-
Perform Date (Chronological)
-
Perform Date (Reverse Chronological)
-
Alphabetical (A-Z)
-
Reverse Alphabetical (Z-A)
-
-
After filtering and sorting the list as needed, click on a patient to see more information in the middle column.
NOTE: If you have more than one page of patients, use the navigation options at the bottom of the list to view those patients (callout 11).
-
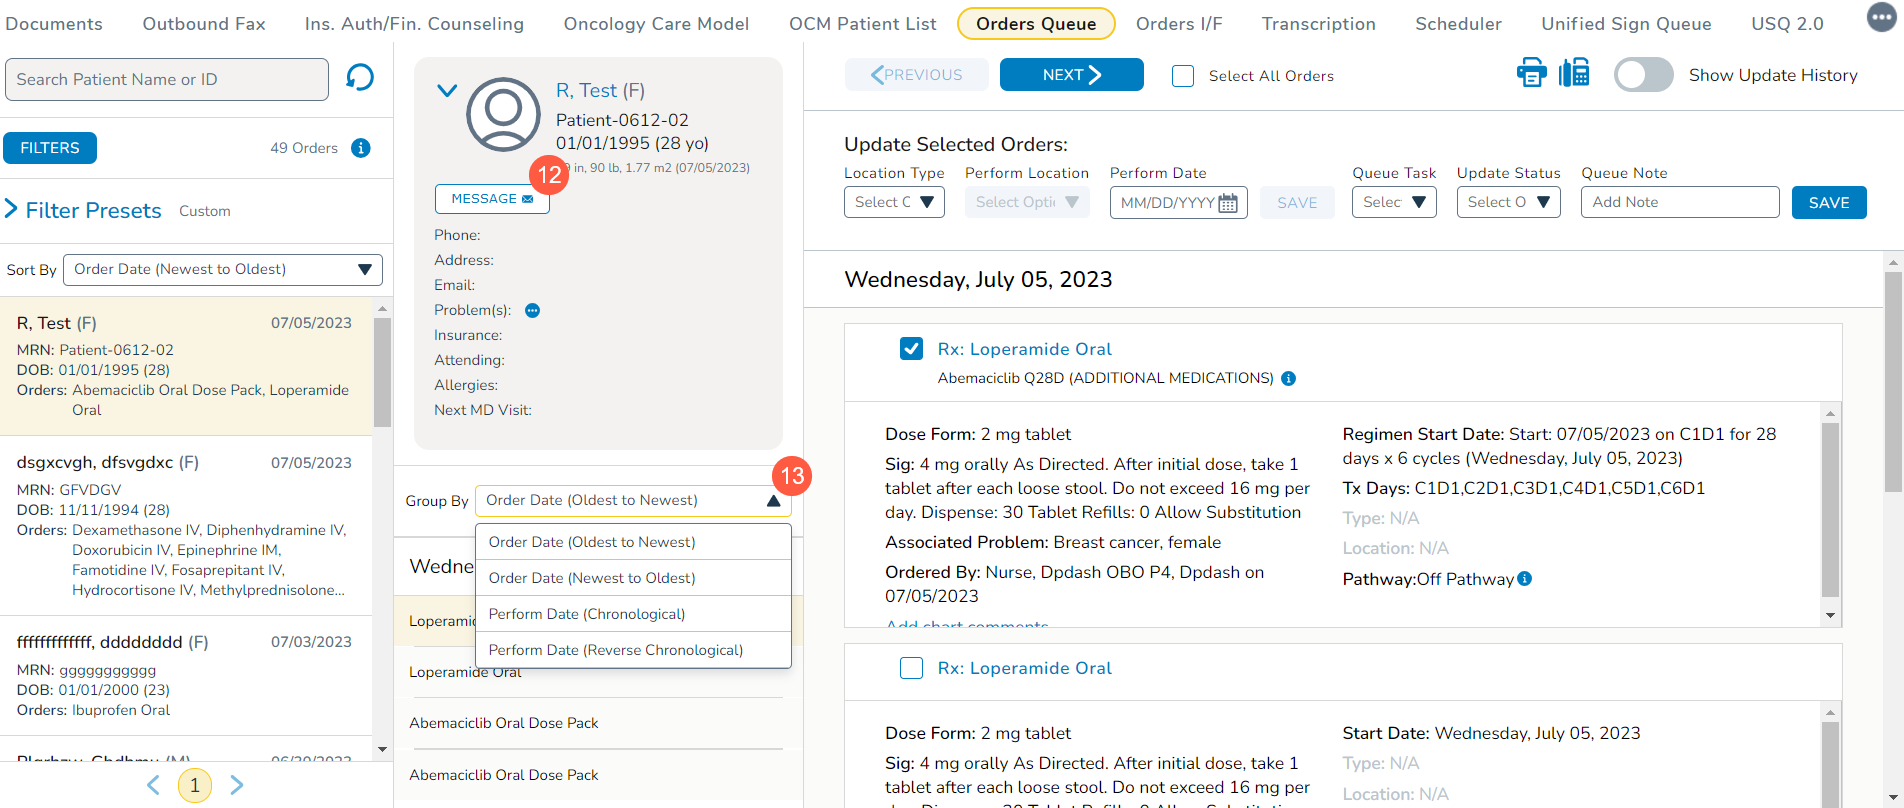
The top of the middle column displays information from the patient’s chart. You may also click the Message button to send a chart message regarding this patient’s order(s) (callout 12).
-
The order information in the middle column will be organized with STAT/ASAP orders appearing at the top and all other orders by date.
-
You can choose to reorganize these orders using the Group By option (callout 13). The orders can be grouped by:
-
Order Date (Newest to Oldest)
-
Order Date (Oldest to Newest)
-
Perform Date (Chronological)
-
Perform Date (Reverse Chronological)
-
-
After grouping the orders as needed, click an order to see the details in the right column.
-
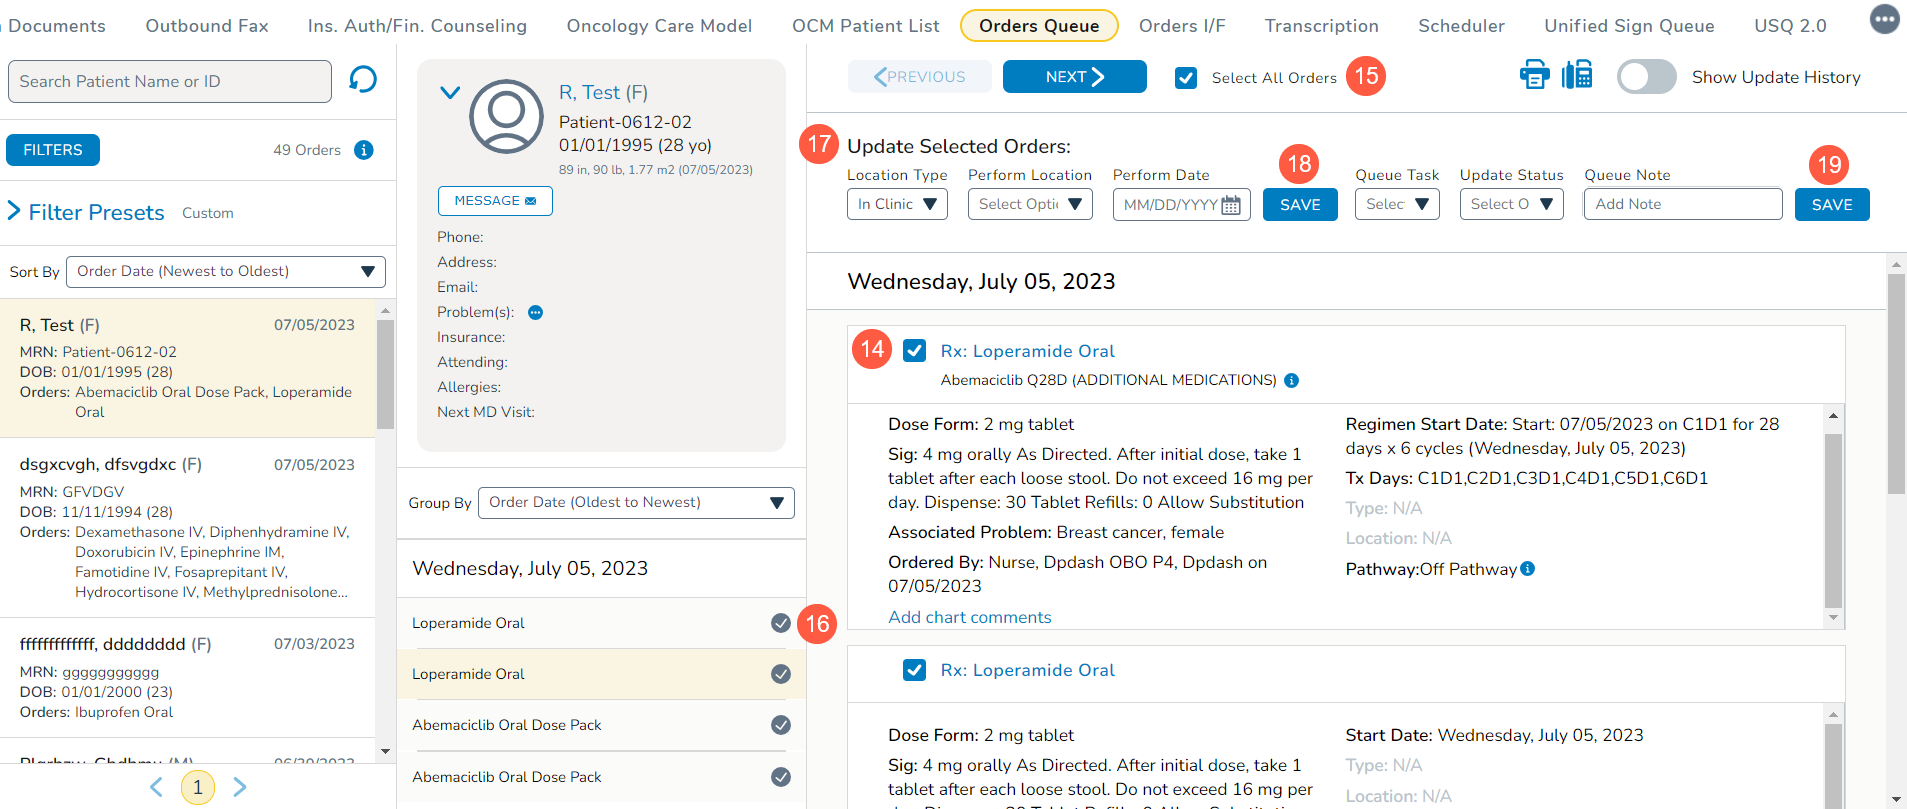
Select one or more orders using the checkbox next to each item to update selected orders (callout 14).
-
You can choose to update all orders using the Select All Orders option at the top of the column (callout 15).
NOTE: When selecting orders from the far-right column, review the corresponding checkbox in the middle column (callout 16). It is important to maintain an awareness of this when applying updates to ensure you’re changing the correct order.
-
The orders can then be updated under Update Selected Orders using the following options (callout 17):
-
Location Type: change the type of location where the order should be fulfilled by selecting either In Clinic or Out of Clinic.
-
Perform Location: change the location where the order should be fulfilled from a specific list of internal or external locations.
-
Perform Date: change the date for when the order should be fulfilled.
-
-
Click the Save button to apply your updates (callout 18).
-
You can also update the orders using:
-
Queue Task: select from Scheduling, Lab, Pharmacy Review, Pharmacy Dispensing, Research Review, Financial Review, or External Scheduling. These options allow users in separate roles to apply their actions/changes to orders simultaneously.
-
Update Status: select Not Started, On Hold, In Progress, Complete, or Not Applicable to denote where in the process the order resides.
-
Queue Note: add comments to one, several, or all orders. The information will then appear in the order(s) under the Update History section. You can continuously add notes as needed.
-
-
Click the Save button to apply your updates (callout 19).
-
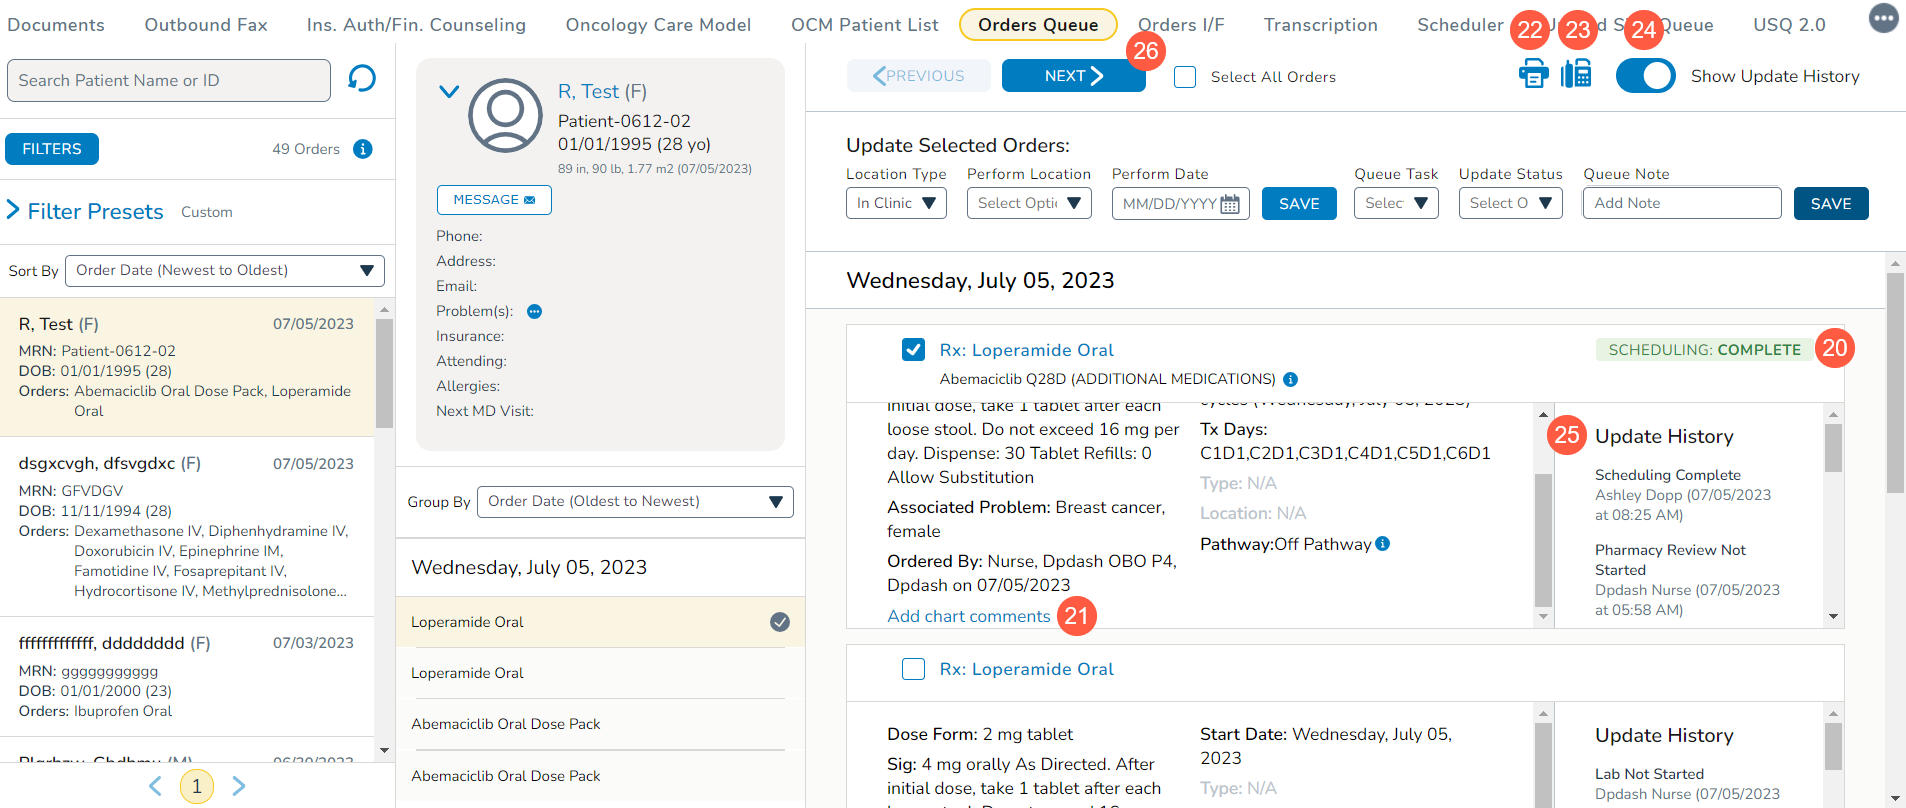
Whenever an order status is updated, the order will be marked with a colored indicator denoting what change was made; for example, Scheduling: Complete (callout 20).
NOTE: When an action is set to Not Started, an indicator will not appear. The indicator only displays for tasks set to On Hold or Complete.
-
If needed, add a comment to individual orders by selecting the Add charts comment link beneath the order details (callout 21). These comments will display wherever the order is viewed in the patient chart.
-
To print or fax any of these orders, click the corresponding icons at the top of the column (callouts 22 and 23).
-
You may also show or hide the historical changes to these orders using the Show Update History option (callout 24).
-
Turning this on will display the Update History section in each order so you can see how and when this order has progressed through each phase (callout 25).
-
Use the Next button to move on to the orders for the next patient (callout 26).