
June 2025 Release Notes
Version 3.51
Filters and Contents
Use the filters below to view items related only to the selected filter.
Prepare Now: Configure document settings for future release of all documents to patient portal
Changes are coming to Admin > Document Types to help practices control which documents are shared with patients and caregivers through the patient portals.
NOTE: These settings will be available immediately for configuration, but the full functionality will not be activated until July 26, 2025.
Updates to Admin > Document Types
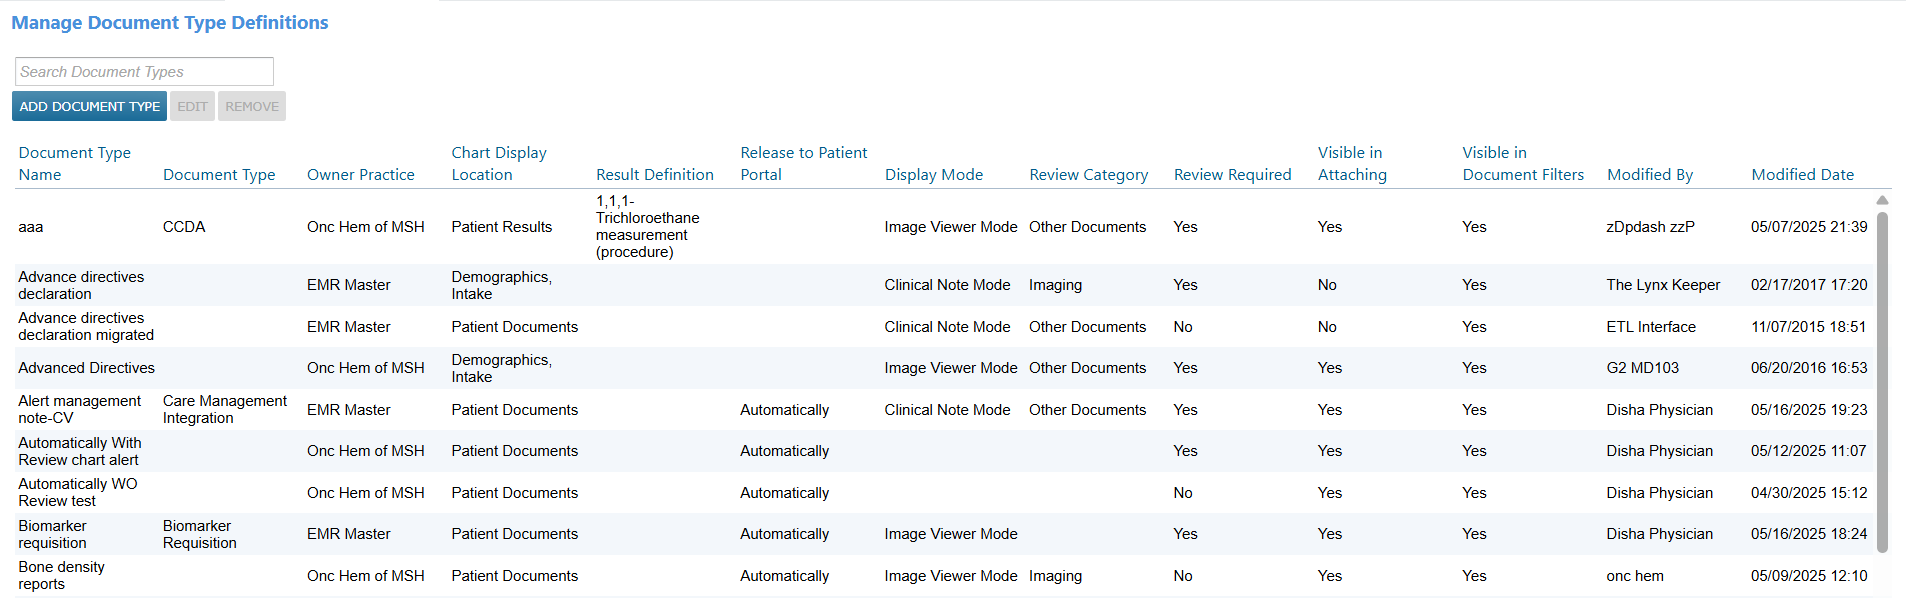
See key details on the Document Types table Feature
The table in Admin > Document Types now includes more information at a glance. There is no need to click “Edit” to view key details.
New columns include:
-
Document Type
-
Chart Display Location
-
Result Definition
-
Release to Patient Portal
-
Display Mode
-
Review Category
-
Review Required
-
Visible in Attaching
-
Visible in Document Filters
-
Modified By
-
Modified Date
Action Required: Configure document sharing settings by July 25, 2025
Practices must review and update their document type settings in Admin > Document Types by July 25, 2025.
Starting July 26, 2025, the system will begin using these settings to determine which documents are shared with patients and caregivers via the patient portals.
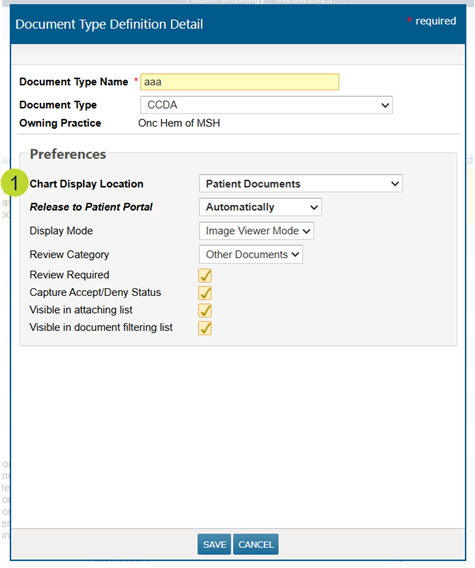
Step 1: Ensure documents appear in the Documents tab of the patient’s chart
To be eligible for portal sharing, a document must first appear in the Documents tab of the patient’s chart.
When adding or editing a document type, set the Chart Display Location to Patient Documents for any document type you want to be considered for portal release (callout 1).
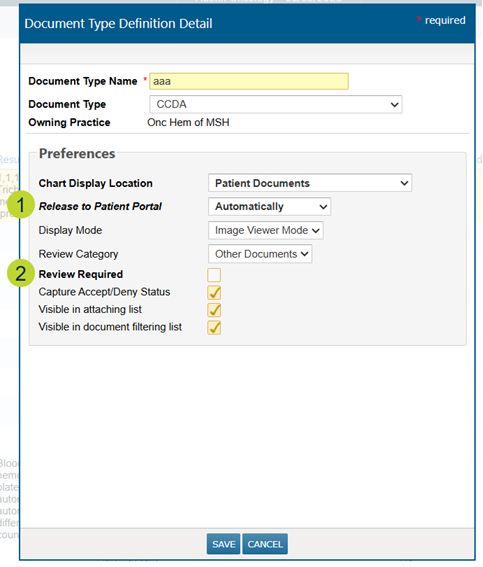
Step 2: Configure portal sharing behavior
Two key fields control how documents are shared from the patient’s chart to the portal:
-
Release to Patient Portal (callout 1)
-
Automatically (default): Document is released immediately.
-
Hold Until Reviewed: Document is held until reviewed.
-
Never: Document is never released.
-
If “Never” is selected, a reason must be entered to remain compliant with the Cures Act.
-
-
-
Review Required (callout 2)
-
Unchecked by default.
-
Check this box to require a review before the document is released.
-
How these settings work together
Document release from the Documents tab of the patient chart will be controlled by the “Release to Patient Portal” and “Review Required” settings, as well as the “Do not release results until review” chart alert:
| Release to Patient Portal | Review Required | “Do not release until review” chart alert | Result |
|---|---|---|---|
| Automatically | Unchecked | Inactive | Released to portal |
| Automatically | Unchecked | Active | Not released to portal |
| Automatically | Checked | Inactive | Released to portal |
| Automatically | Checked | Active | Requires review before release |
| Hold Until Reviewed | Unchecked | Inactive | Not released to portal |
| Hold Until Reviewed | Unchecked | Active | Not released to portal |
| Hold Until Reviewed | Checked | Inactive | Requires review before release |
|
Hold Until Reviewed |
Checked |
Active |
Requires review before release |
|
Never |
Any |
Any |
Not released to portal |
Orders Queue Enhancements
We’re making several improvements to the Orders Queue to streamline performance, improve reliability, and reduce workflow disruptions.
Retirement of the Orders Queue Legacy
To optimize overall system performance, we’re removing the Orders Queue Legacy. This eliminates the need for background processes that maintained two queues, reducing system delays and potential disruptions.
NOTE: Users can continue to leverage the filter for the Orders Queue Legacy “Processed” status in Orders Queue > Filters > Queue Status.
Smarter order status handling
We’ve refined the rules that determine when an order’s status resets in the Orders Queue to help preserve accurate order status tracking and minimize unnecessary rework.
Going forward:
-
Editing C1s from the patient’s Flowsheet or Order History tab will no longer reset an order’s queue statuses to “Not Started”.
-
Opening an order from the Flowsheet or Order History tab and clicking Save & Sign without making any changes will no longer reset the order’s queue statuses to “Not Started”.
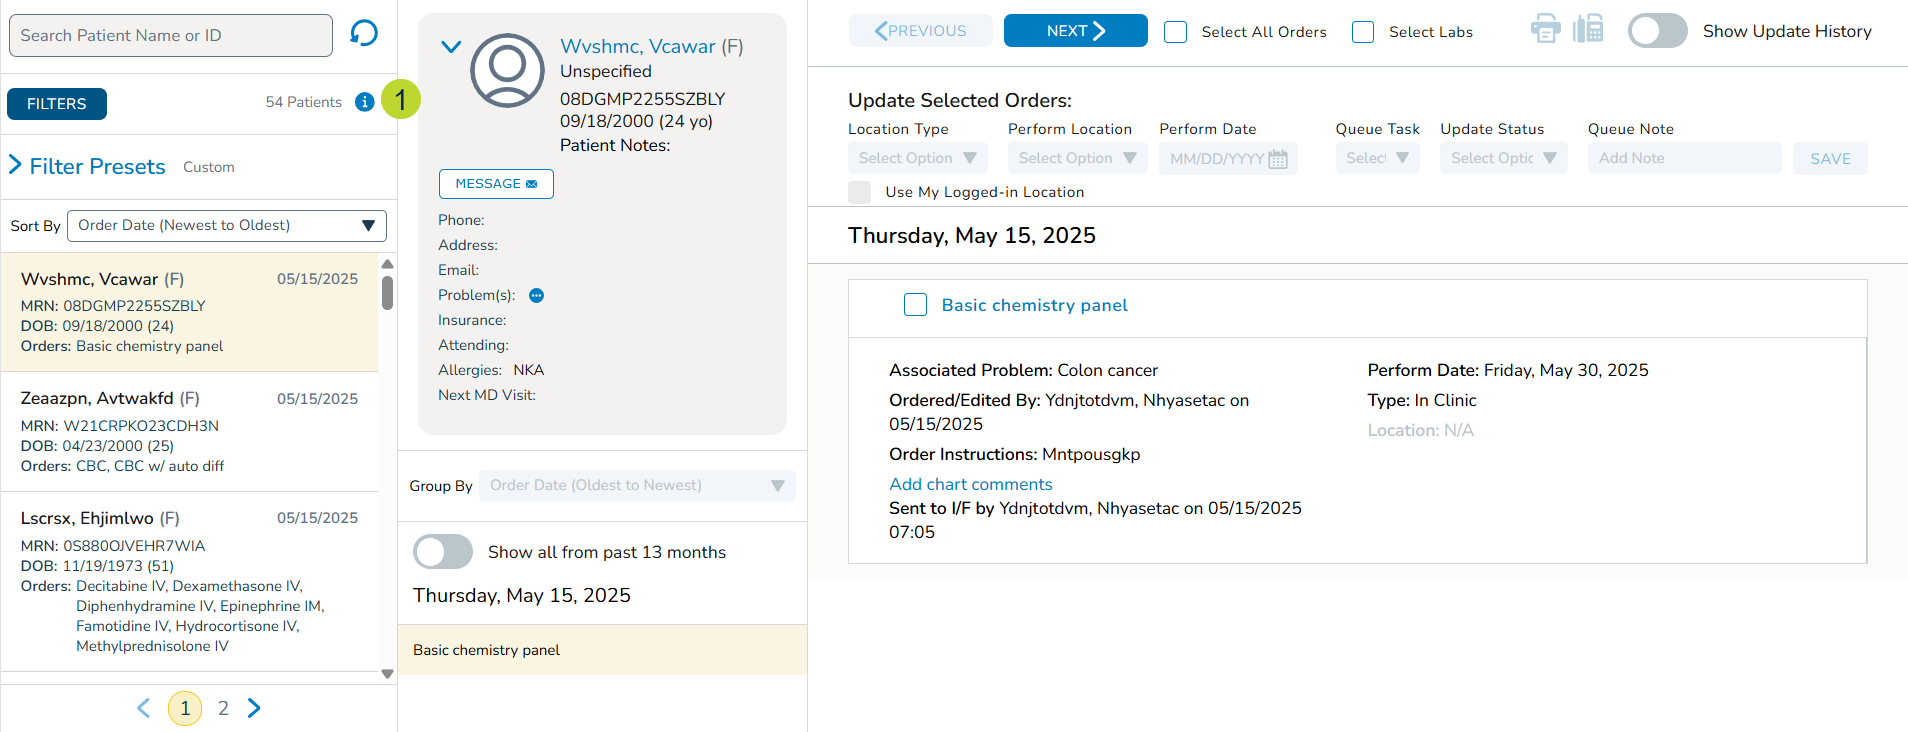
See the number of patients, not orders
You’ll now see the number of patients (instead of the number of orders) that match your current filter criteria displayed in the far-left column of the Orders Queue (callout 1). This change boosts queue performance, as retrieving the patient count is much faster than counting individual orders.
More reliable order display
We’ve improved a background process to more efficiently apply the default “Not Started” status to orders. This reduces the chance of orders being missing from the queue, especially during times of high system activity. You’ll now see orders appear in the queue more consistently, as expected.
Medications and Allergies full integration with Ontada Health e-Registration
Starting Thursday, June 26, 2025, the "Pending" status that was introduced in the Medications and Allergies tabs of the patient chart will become fully functional. This enhancement allows practice staff to electronically review, reconcile, and verify patient-submitted updates, eliminating the need for manual data entry.
How it works
Patients without reported medications or allergies
If a patient has not reported any medications or allergies through Ontada Health e-Registration, the Medications and Allergies tabs in their chart will display a message indicating that no information was submitted (see callout 1 for example).
This message will prompt staff to confirm that the patient has no known medications or allergies. To document this in the chart, simply check the box labeled “No Known Medication Allergies” or “No Known External Medications” (see callouts 2 for example) and click the Yes button.
Once selected, this information will be saved to the patient’s chart, ensuring accurate and complete documentation.

Patients with reported medications or allergies
When a patient completes the Medications & Allergies section of the e-Registration form, their responses will automatically populate the Medications and Allergies tabs in their chart. These entries will appear with a “Pending” status until reviewed by practice staff.
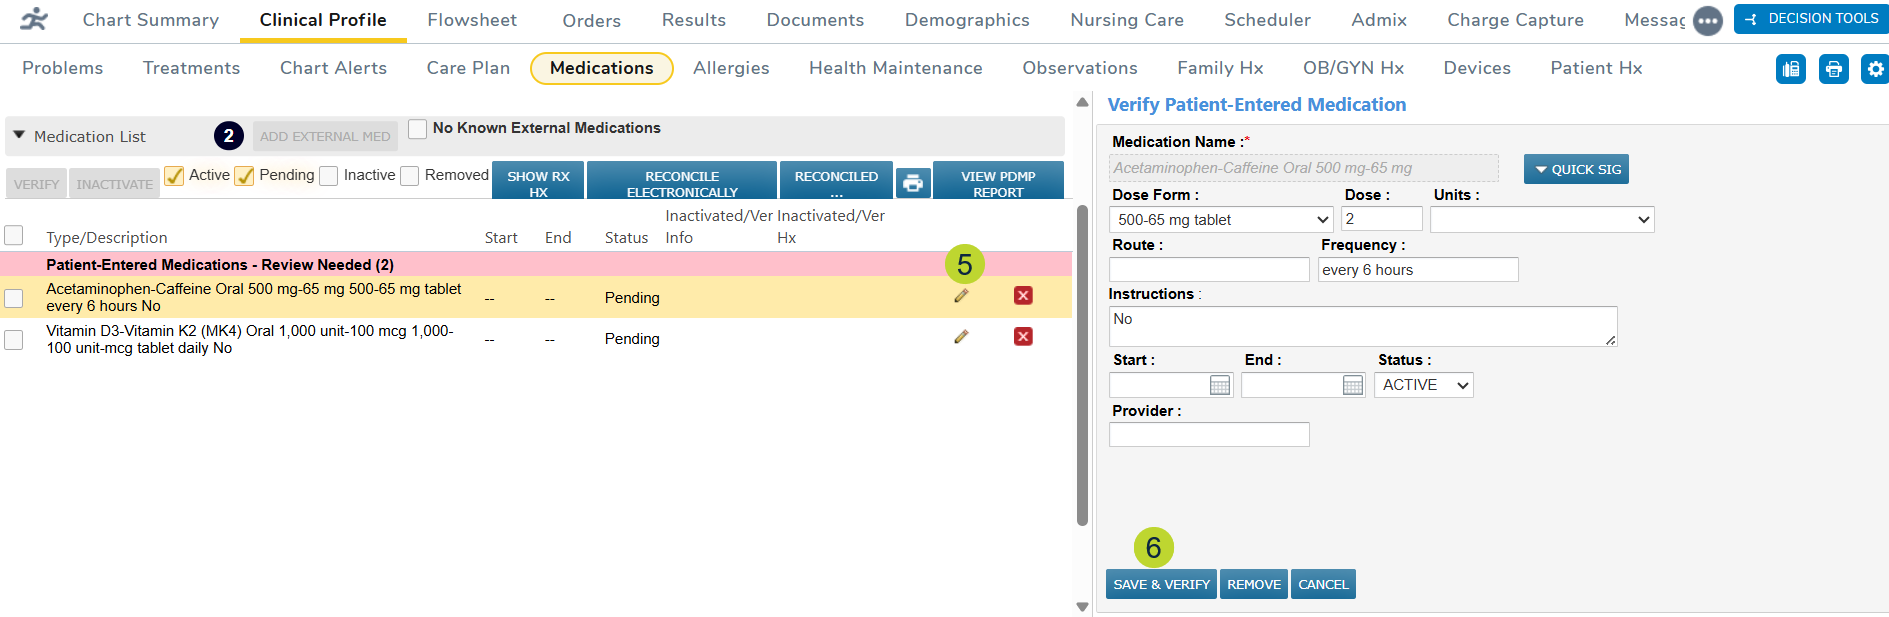
To review and reconcile pending medications:
-
Open the patient’s chart and navigate to Clinical Profile > Medications.
-
The Pending status box will be checked automatically (callout 1).
-
An alert will appear in the table to notify you that items need to be reviewed (callout 2).

-
If you wish to verify all items (including removals) in bulk, check the select all box or check the box next to each of the desired items (callout 3).
-
Click the Verify button above the table to enact all patient-reported changes (callout 4).

-
If you need to review or update any pending items before verifying them, click the edit icon (callout 5).
-
After confirming or updating the information, click Save & Verify (callout 6).
-
The status of the item will change to Active (callout 7).

-
Removed items will be marked with a red REMOVED BY PT badge (callout 8).
-
You may click the red box to remove item (callout 9) or open the item to view the details before clicking Save & Verify or Remove to remove it from the patient’s chart (callouts 10-11).
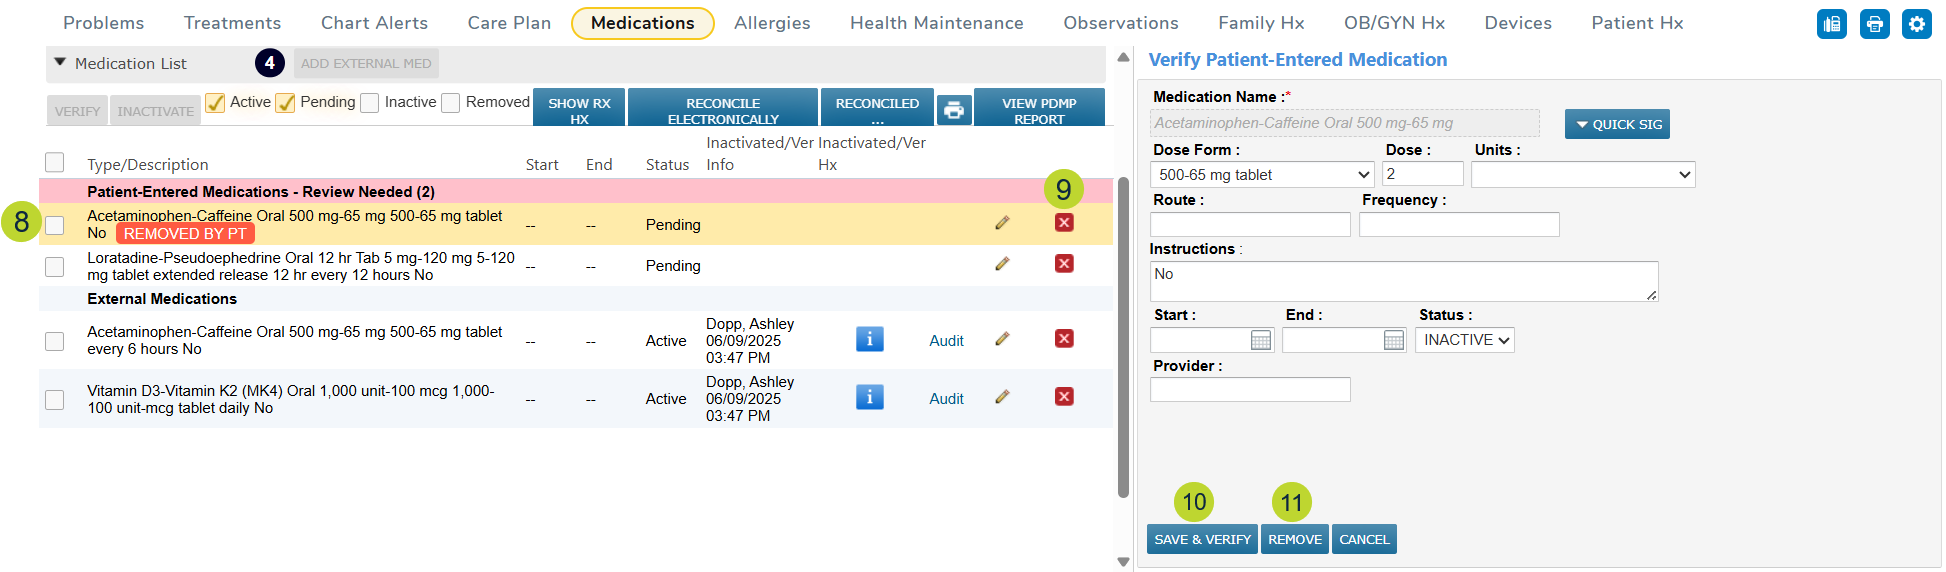
NOTE: Only external medications can be updated or removed in the Medications tab. For practice prescribed medications, you must continue to update or discontinue the prescription in the patient’s Flowsheet. Then, remove medication from pending status using the red box in the medications tab.
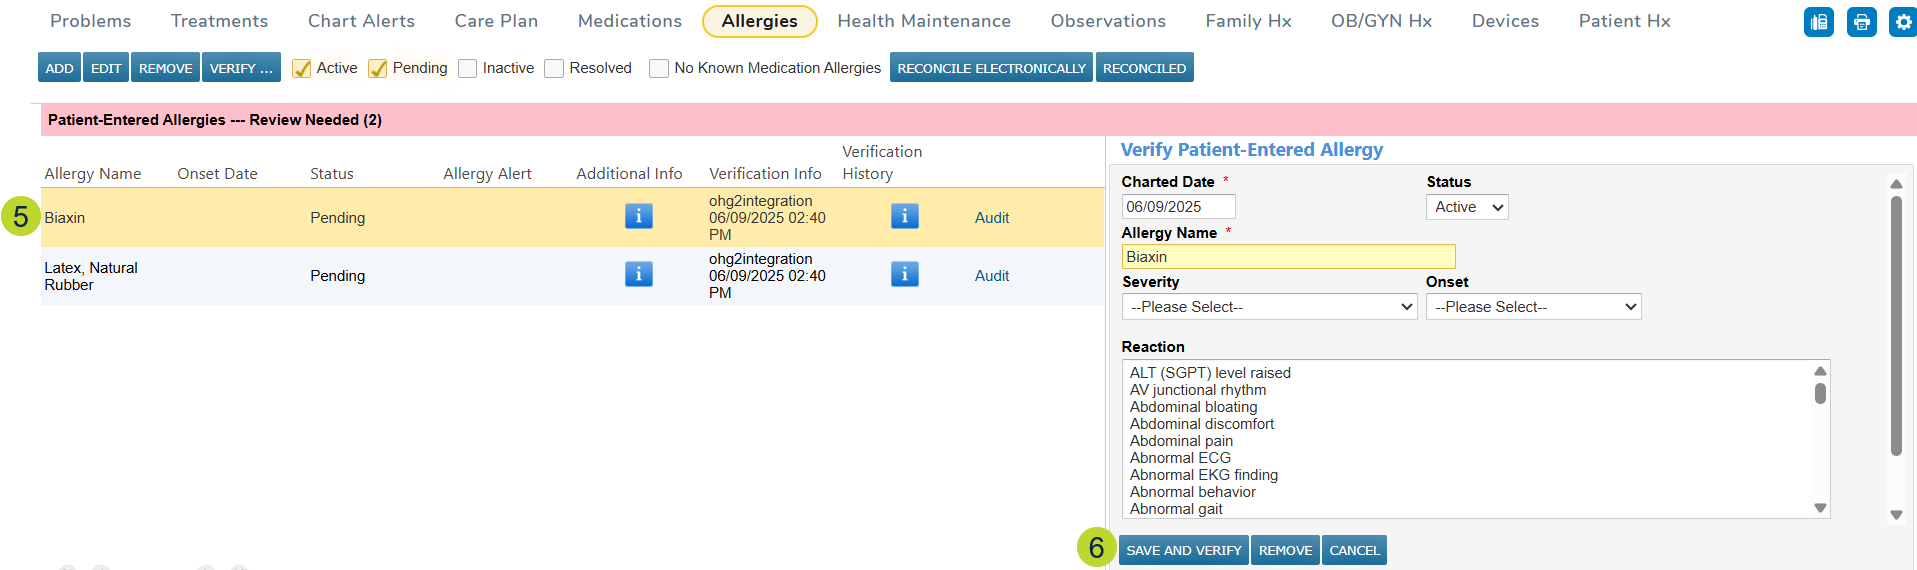
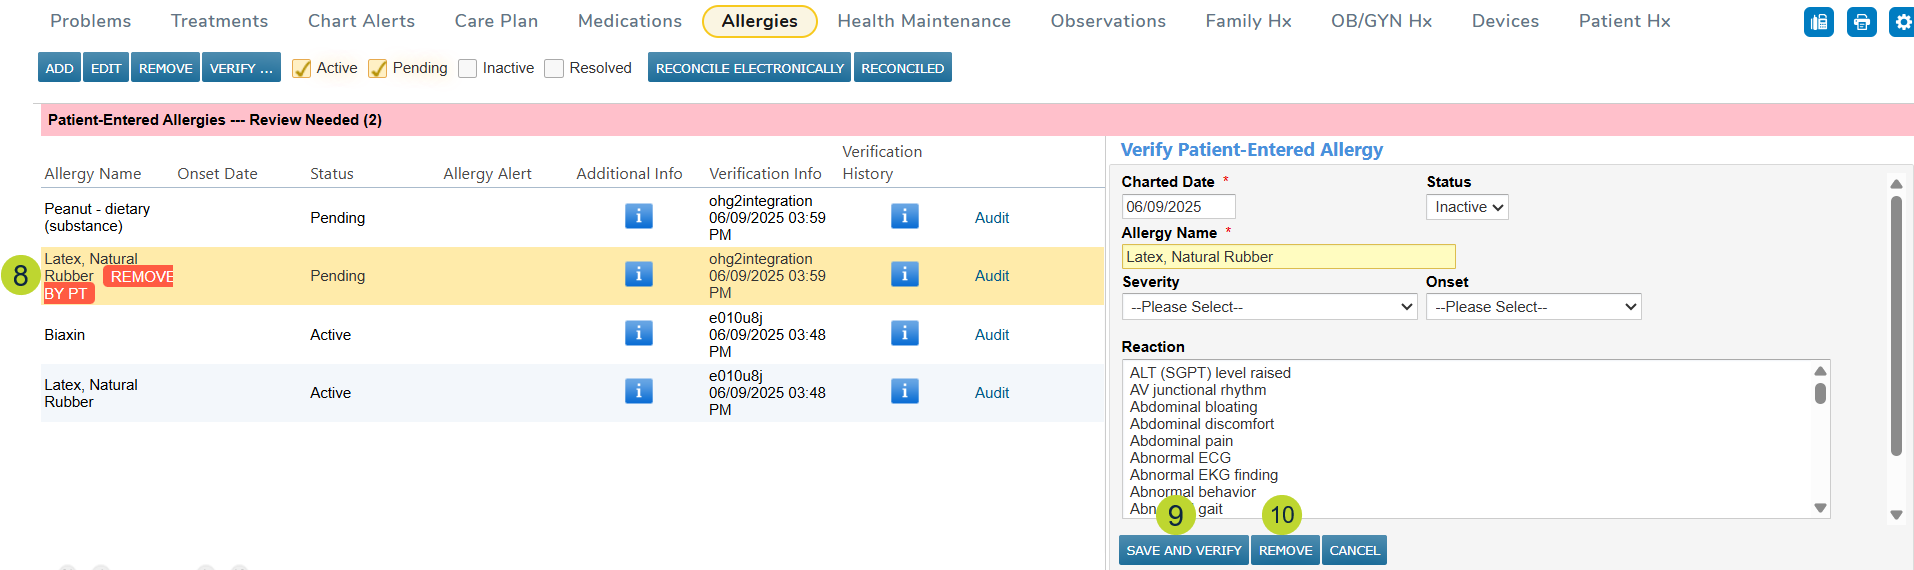
To review and reconcile pending allergies:
-
Open the patient’s chart and navigate to Clinical Profile > Allergies.
-
The Pending status box will be checked automatically (callout 1).
-
An alert will appear in the table to notify you that items need to be reviewed (callout 2).
-
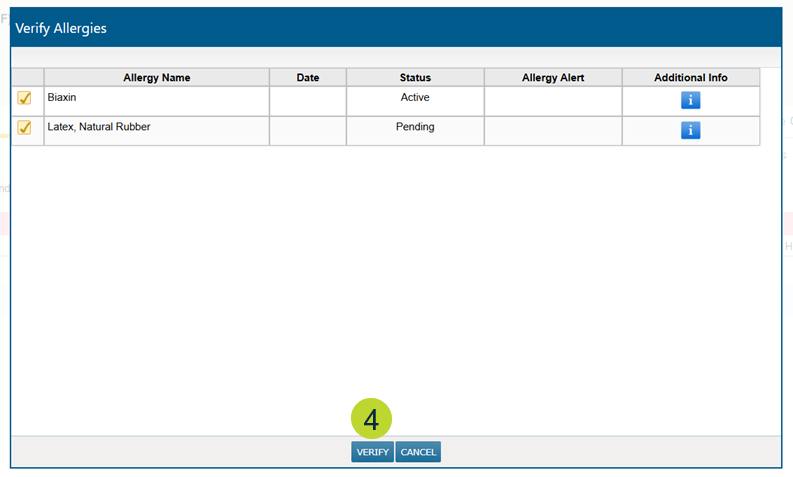
If you wish to verify pending items (including removals) in bulk, click the Verify button above the table (callout 3).

-
A window will appear where you can review all the changes. If it looks correct, click the Verify button to enact all patient-reported changes (callout 4).
-
If need you need to review or update any pending items before verifying them, click on the item (callout 5).
-
After confirming or updating the information, click Save and Verify (callout 6).
-
The status of the item will change to Active (callout 7).

-
Removed items will be marked with a red REMOVED BY PT badge (callout 8).
-
Click on the item to view the details before clicking Save and Verify or Remove to remove it from the patient’s chart (callouts 9-10).
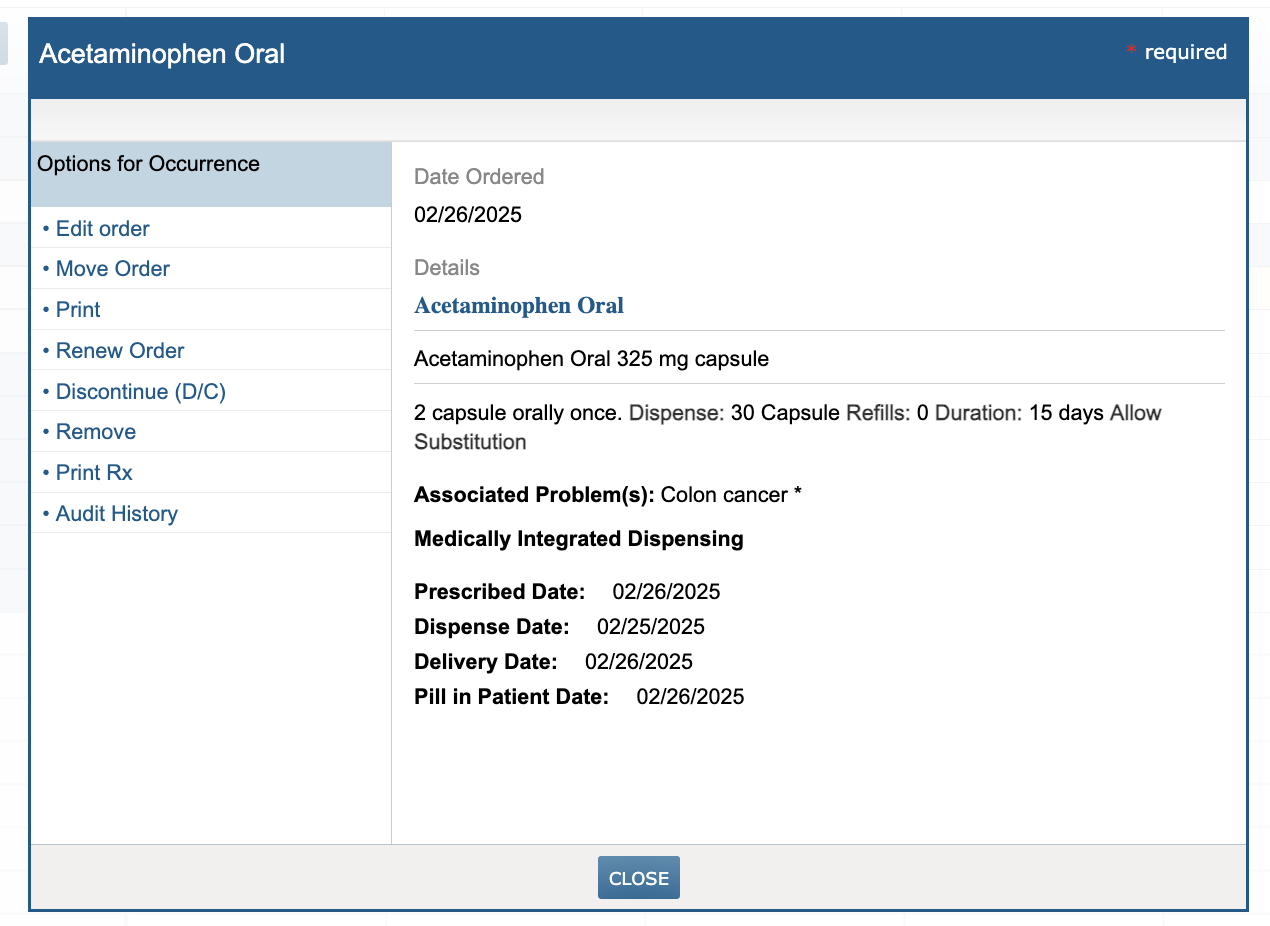
Enhanced visibility Medically Integrated Dispensing (MID) prescriptions
To provide greater transparency into a patient’s treatment journey, we’ve added new data points for electronic prescriptions filled by MID AccessPro, a medically integrated dispensing pharmacy tool.
The following dates will now be displayed in both the Flowsheet and the Order History tab:
-
Prescribed Date
-
Dispense Date
-
Delivery Date
-
Pill in Patient Date
These additions offer deeper insight into what the patient is being treated with and when the medication reaches them, supporting more informed clinical decisions and streamlined care coordination.
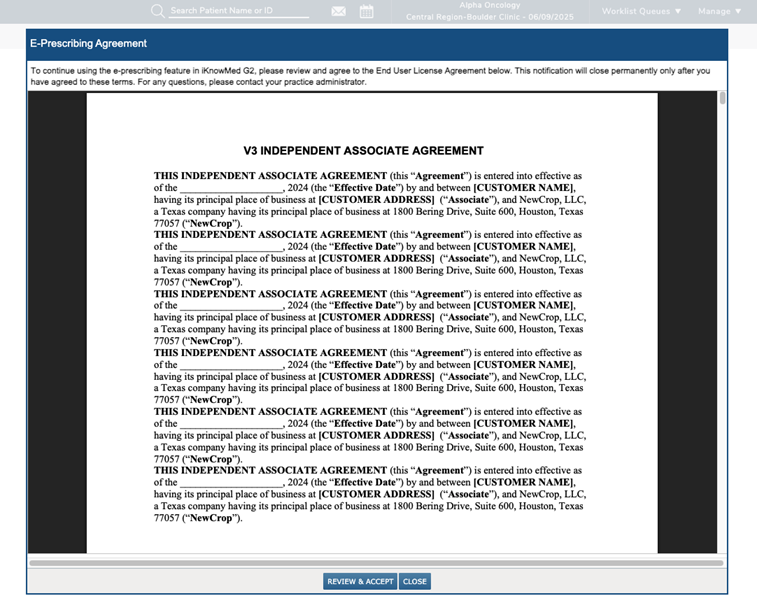
New e-prescribing end user license agreement prompt
Upon logging in after this release, all users from eRx-enabled practices, regardless of whether they have e-Prescribing or non-prescribing capabilities, will be required to review and accept a new end user license agreement from NewCrop.
While users may close the agreement to continue working, the prompt will reappear at each subsequent login until the agreement is marked as reviewed. Accepting the agreement is required to prevent the pop-up from recurring and to ensure continued access to e-prescribing features.
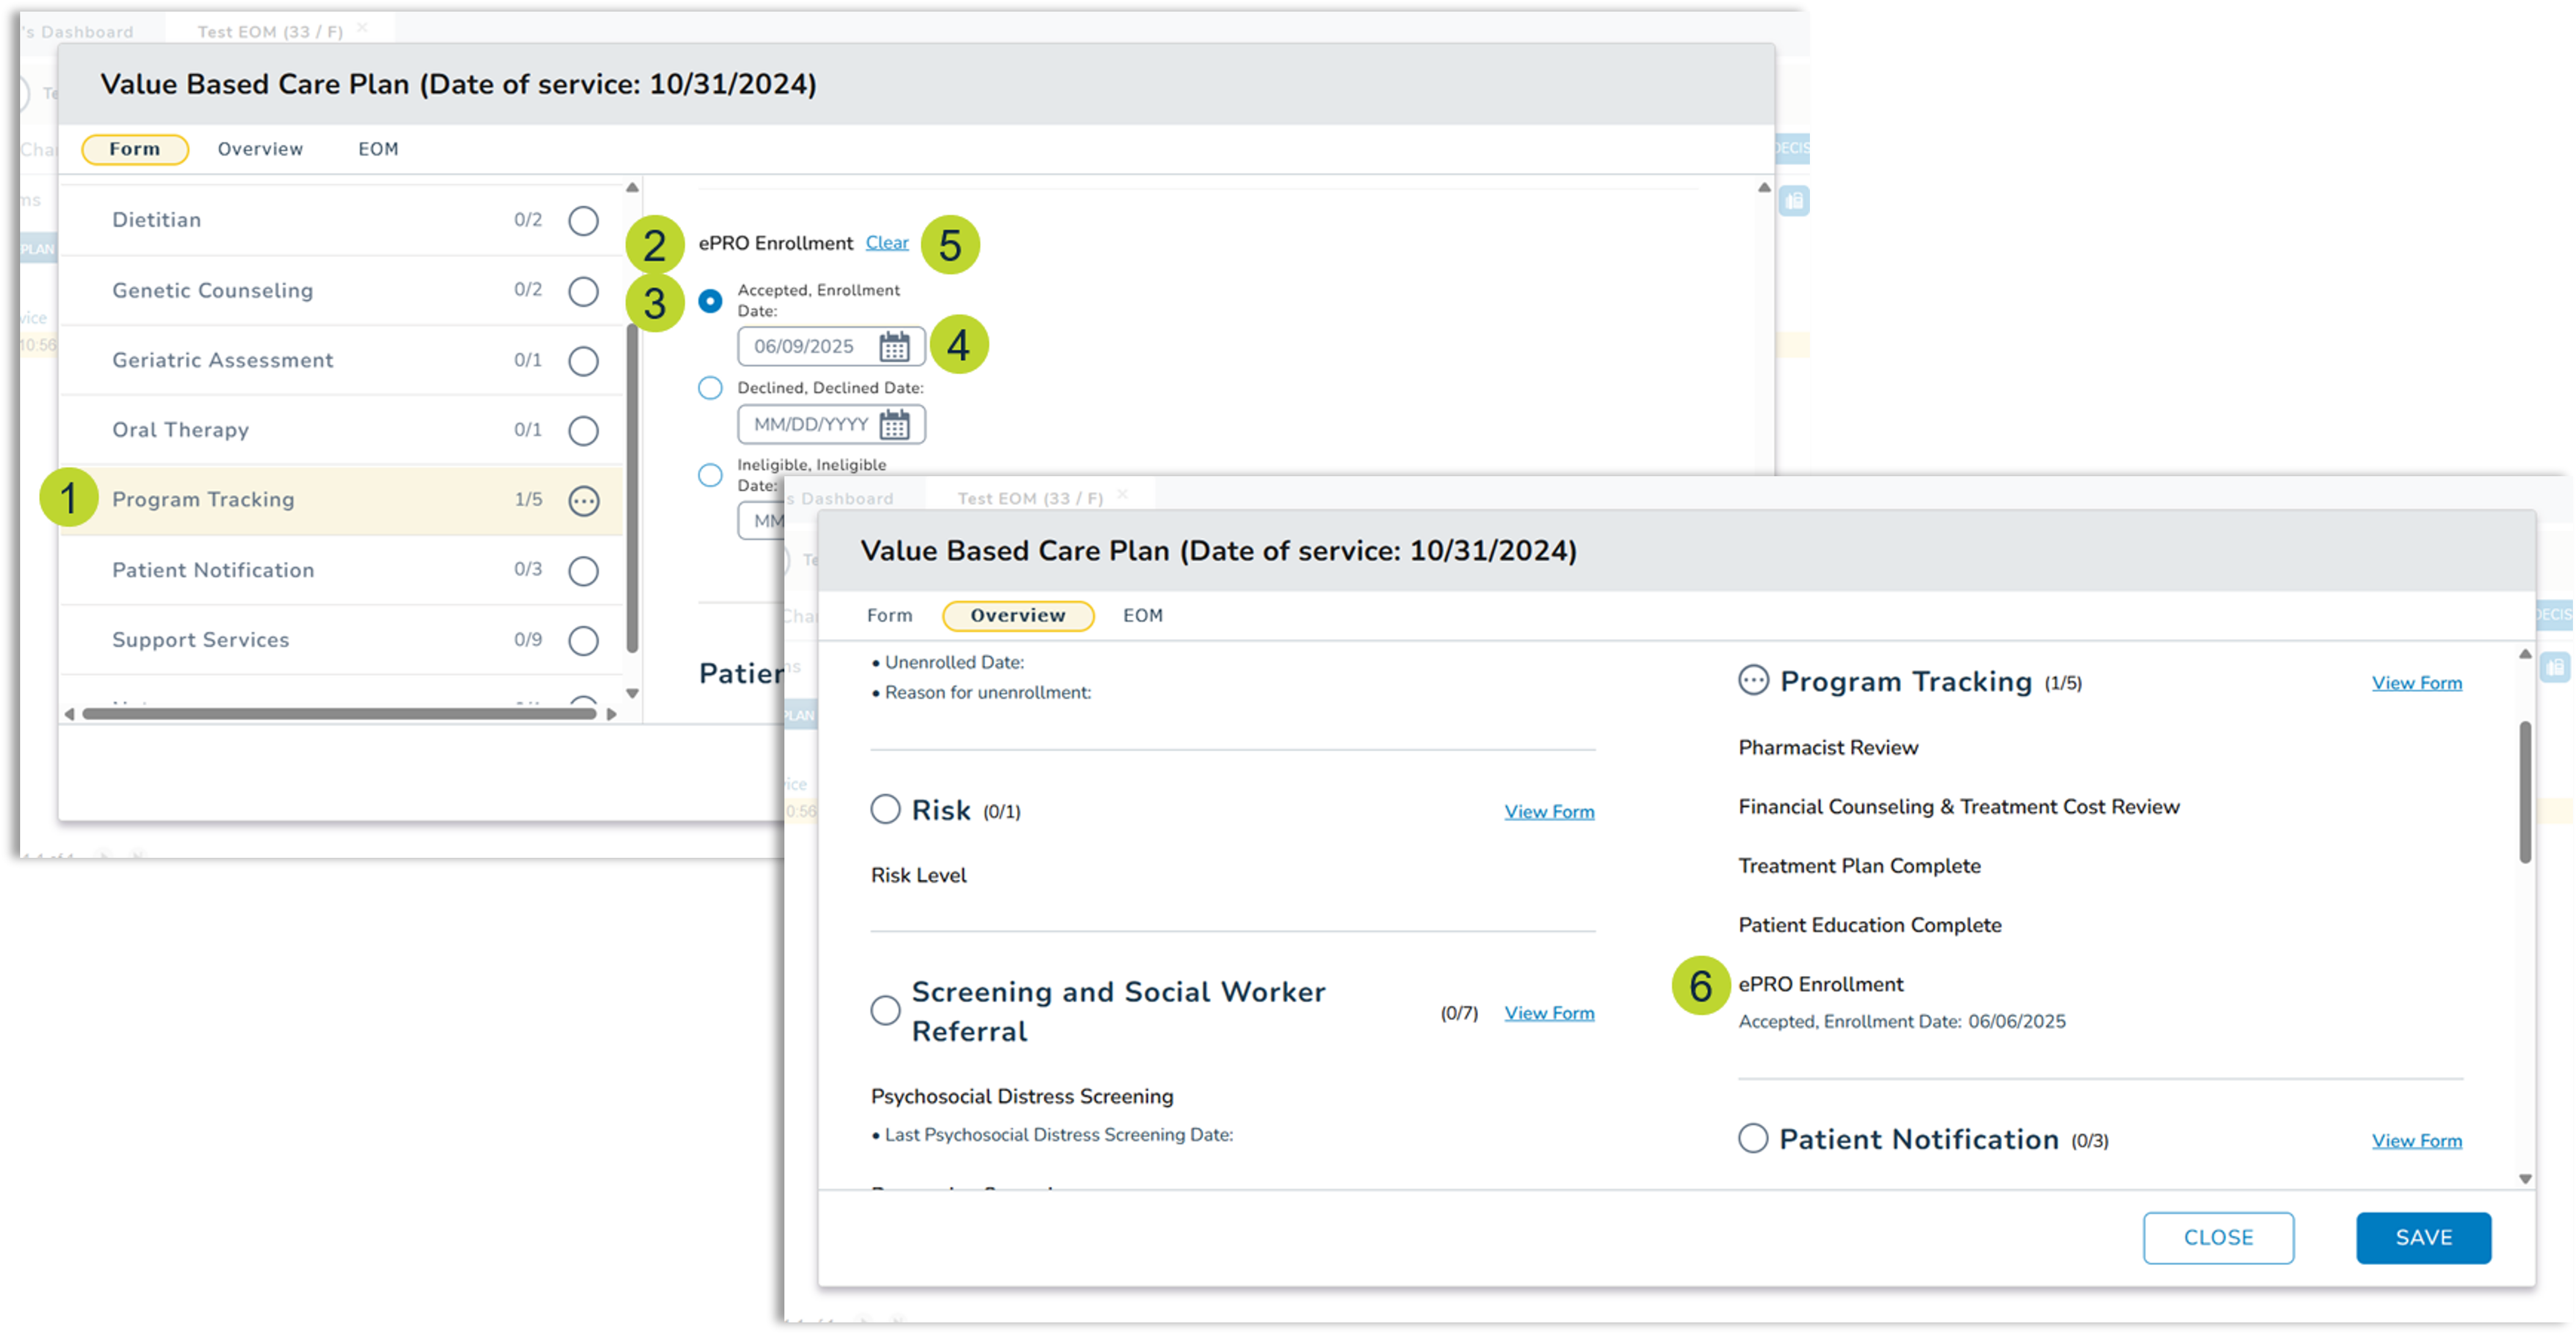
ePRO Enrollment Tracking in VBC Care Plan
We’re adding a new ePRO Enrollment section to the Program Tracking area of the VBC Care Plan to help practices track electronically reported patient outcomes, a key component of the Enhancing Oncology Model (EOM) program.
How to document ePRO Enrollment
-
Open a patient’s chart and navigate to Clinical Profile > Care Plan.
-
Create a new or open an existing VBC Care Plan.
-
Click the Program Tracking section and scroll to the new ePRO Enrollment subsection (callouts 1-2).
-
Select an enrollment status – accepted, declined, or ineligible (callout 3).
-
Add a date for the selection by clicking in the field or on the calendar icon (callout 4).
-
If you need to remove a selection, click “Clear” (callout 5).
-
Once a selection and date are entered, this information will automatically appear in the Overview section of the care plan under Program Tracking (callout 6).
-
Be sure to save your changes to add this information to the care plan.
Enhancements to CCDA export
The CCDA will be updated to improve the clarity and completeness of shared patient information.
Date of Death field
A new Date of Death field will appear in the CCDA if a patient status is set to “Deceased” and a date of death is recorded in the patient’s chart (callout 1).
Additional Care Team details
The Care Team field will include the credentials, role, Member ID/NPI number, and practice address and phone number for the patient’s attending provider (callout 2).
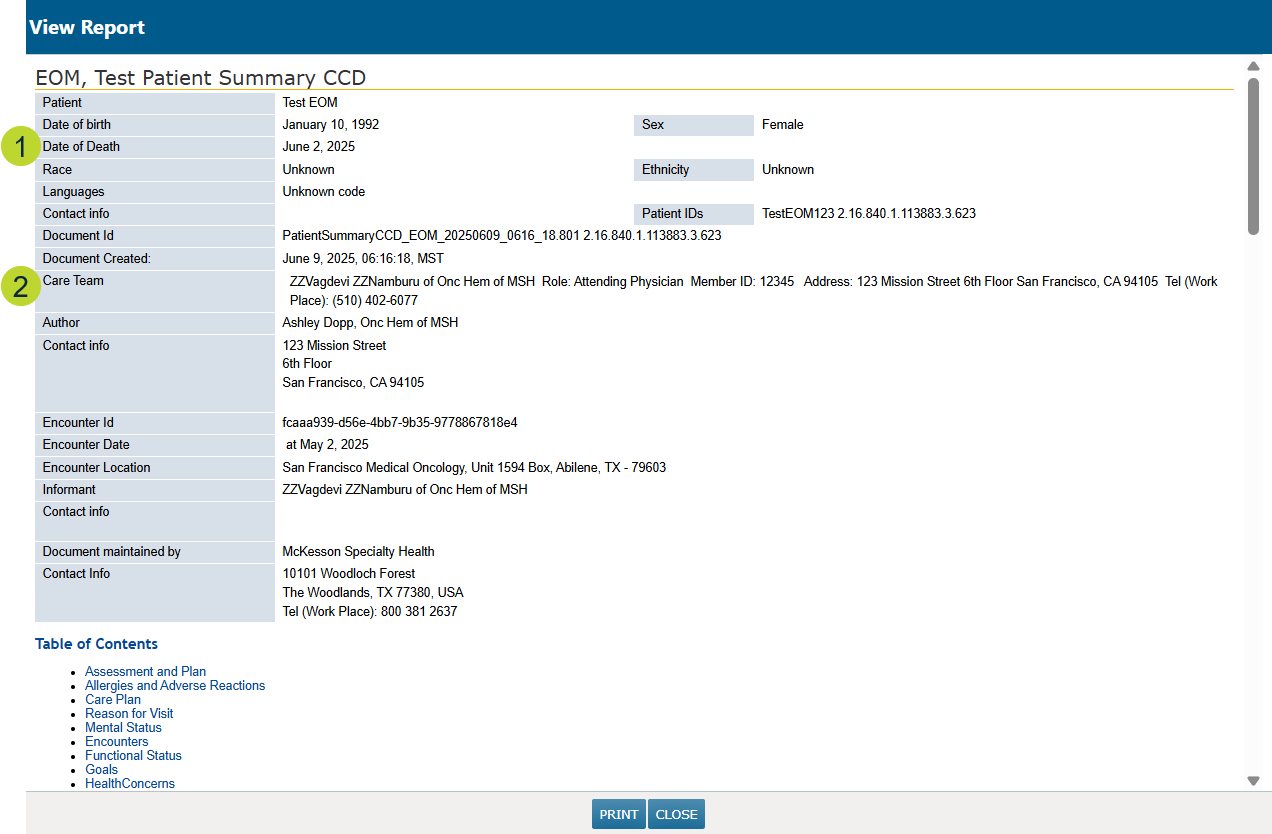
Export Patient Referral Note
The Release of Information widget on the Chart Summary tab of the patient’s chart will include a new Export Patient Referral Note (CCDA) option (callout 3). This file shows what an external partner would see if the CCDA were shared with them.

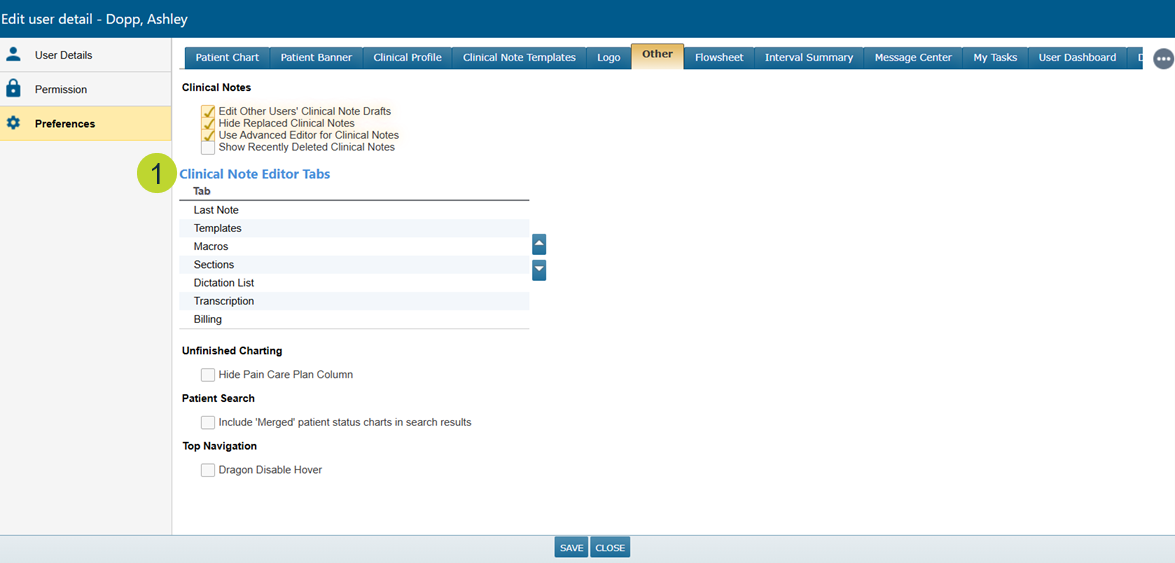
Organize tabs when documenting clinical notes
You can now rearrange the tabs in the clinical note editor, giving you more control over how these tabs display when creating a clinical note. This is especially helpful if you use features like AI Scribe as you can now choose whether the AI Scribe or Last Note tab appears first or set any order that works best for you.
How to customize your tab order:
-
Go to User > Preferences.
-
Select the Other tab.
-
In the Clinical Note Editor Tabs section, use the arrows to move tabs into your preferred order (callout 1).
-
Save your changes.
Fixes (A-Z)
Admin > Practice Preferences
Previously, clicking the Save button on the Order Preferences tab (even without making any changes) would unintentionally deselect the Practice Logo / Letterhead checkbox on the General Settings tab within Practice Preferences.
With this fix, saving from the Order Preferences tab will no longer affect the Practice Logo / Letterhead setting. Clinical notes generated after saving preferences will retain the selected logo as expected.
Fixes (A-Z)
Worklist Queues > eRx Message
Previously, some APPs and supporting clinicians were unable to approve or deny renewals on behalf of a physician in the eRx Message queue. This functionality has now been restored, and APPs and other supporting clinicians can approve or deny renewals as expected.
