Beta Project Resources
Ontada Health Beta Release Notes
We know that patient engagement is an essential part of delivering high-quality care. We’re making it easier for providers and practice staff to engage patients in iKnowMed while delivering a modern digital experience for patients with the Ontada Health patient portal.
Easily invite patients to join the Ontada Health portal
Once your practice’s access to Ontada Health is turned on, you can use iKnowMedSM Generation 2 to easily invite patients to join the Ontada Health portal.
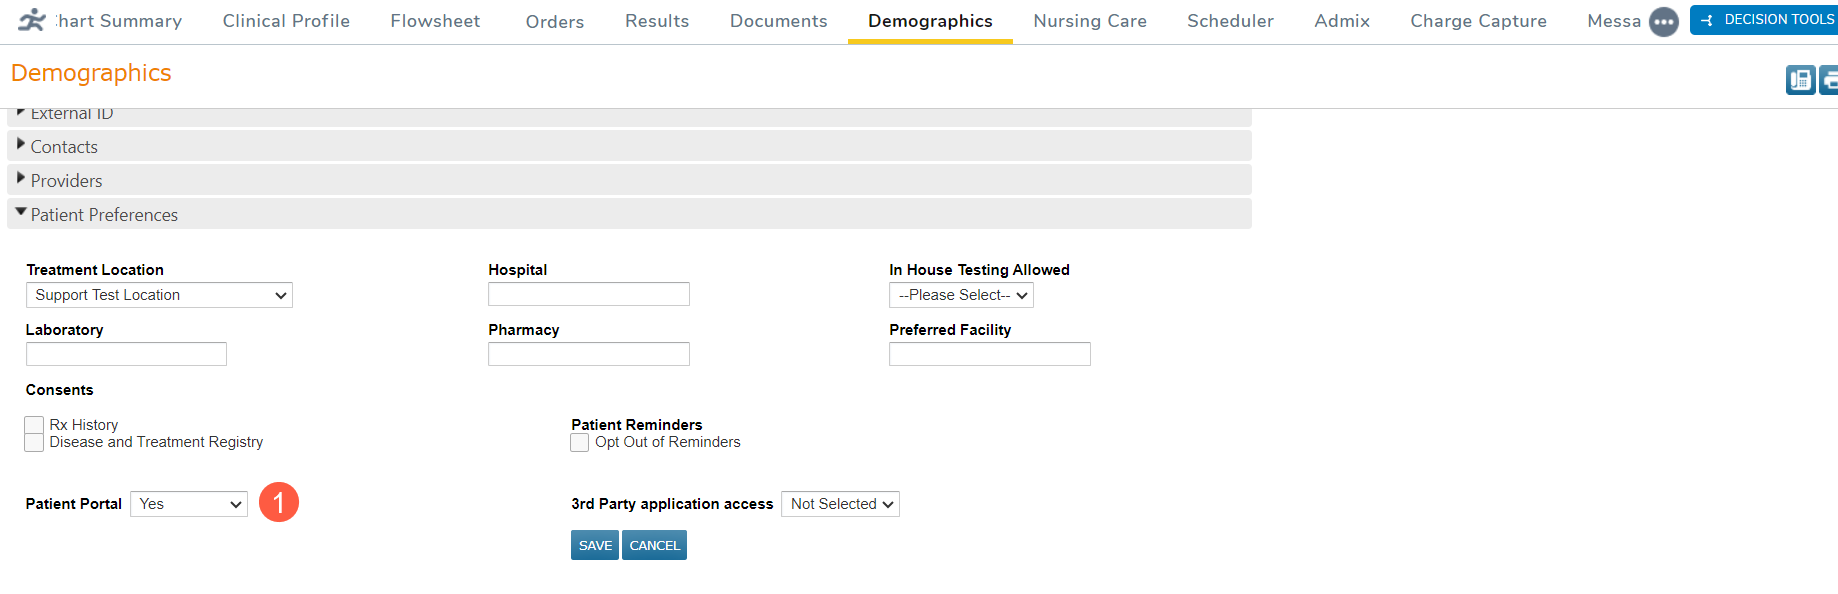
For new patients or patients not currently enrolled in a patient portal, go to the Demographics tab, and change their Patient Portal setting to Yes (callout 1).
For existing patients already enrolled in a patient portal, please contact your Ontada Account Manager for assistance manually inviting the patient to join Ontada Health.
Manage work across teams and team members
The Ontada Health General Queue provides a central queue for practices to manage tasks related to patient portal messaging, patient phone conversations, and completed health assessments, as well as managing tasks around those communications, recording time in tasks for specific activities, and completing all documentation across the front office, scheduling team, and care team triage.
How to use the General Queue
-
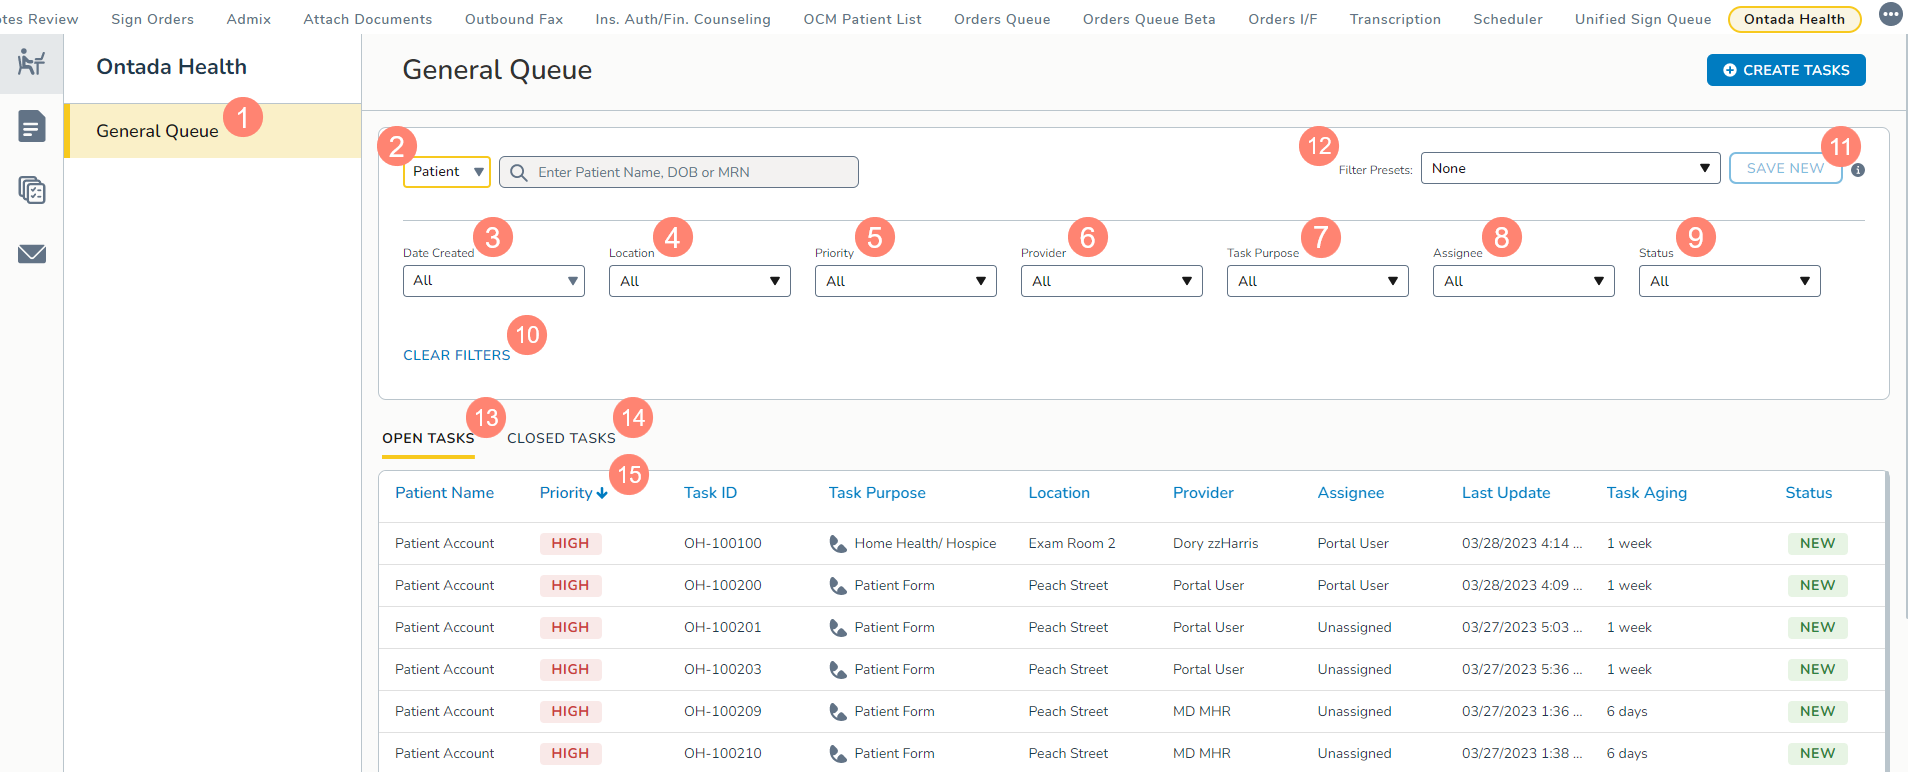
In iKnowMed Generation 2, navigate to Admin > Ontada Health.
-
Use the General Queue page to review and act on tasks (callout 1).
-
Use the drop-down to filter (callout 2) the list to view the most relevant information by:
-
Patient: use the drop-down to choose the patient option, then use the search bar to locate a patient by name, date of birth, or MRN.
-
Task: use the drop-down to choose the task option, then use the search bar to locate a task using a task ID.
-
-
Use the additional options (callouts 3-9) to filter the list by:
-
Date Created: filter the list by the task’s creation date. Choose from all, today, last 3 days, or last 7 days.
-
Location: choose one or more sites where the patient is treated.
-
Priority: choose one or more high, medium, or low task priorities.
-
Provider: choose one or more physicians treating the patient.
-
Task Purpose: choose one or more task categories from the list of your practice’s options.
-
Assignee: choose one or more practice employees assigned to the task.
-
Status: choose one or more statuses, such as New, or any other of your practice’s options.
-
-
Use the Clear Filters link to remove or reset the filters (callout 10).
-
You can keep the filtered view by saving it as a preset. Click Save New in the upper-right corner (callout 11).
-
You can save up to five presets and switch between them using the Filter Presets drop-down (callout 12).
-
These filters apply to both the Open Tasks and Closed Tasks pages (callouts 13, 14).
-
Only the Status filter does not apply to Closed Tasks.
-
-
Further refine your results by sorting each column. Click the column name to sort the information by ascending or descending order (see callout 15 for an example).
-
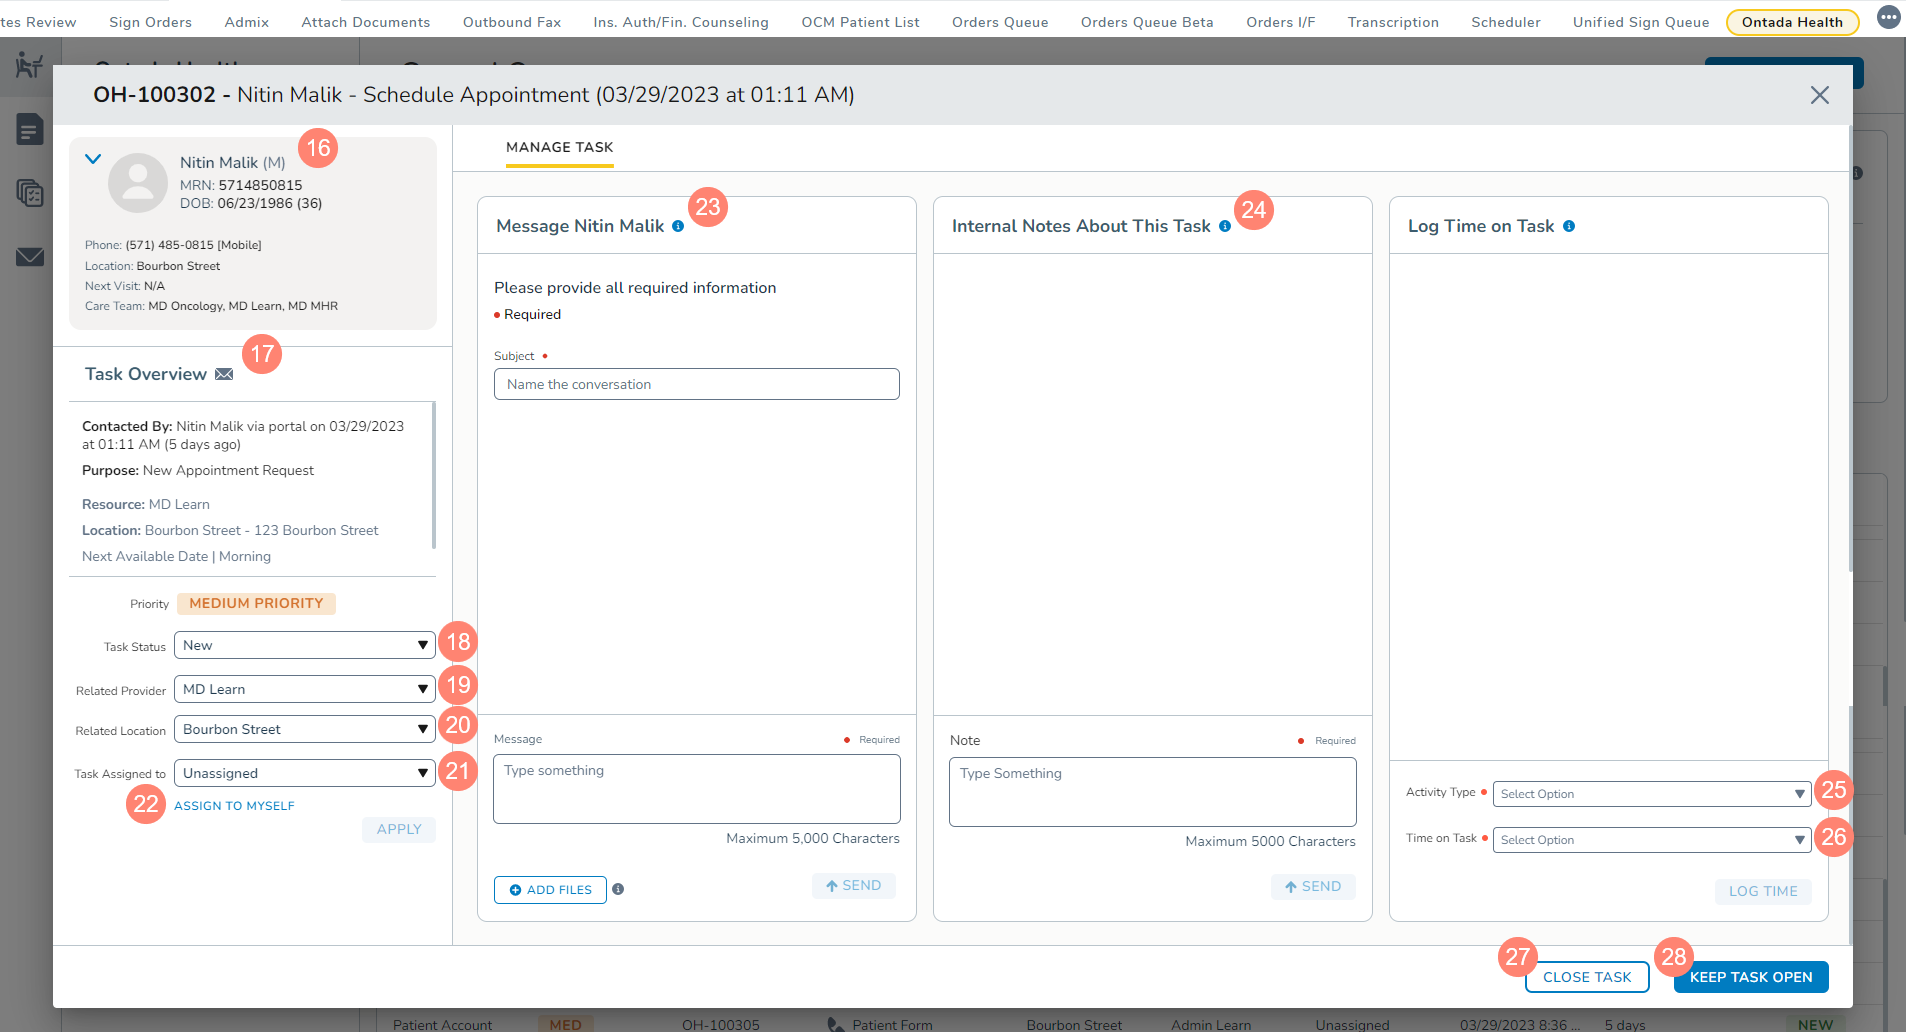
Click on a task to open it.
-
On the left-hand side of the screen, you can view patient information and a task overview (callouts 16 and 17).
-
At the bottom of the column, you can choose to update the Task Status, Related Provider, Related Location, and Task Assigned to (callouts 18-21). If the task is your responsibility, click Assign to myself (callout 22).
-
Click Apply to save any updates.
-
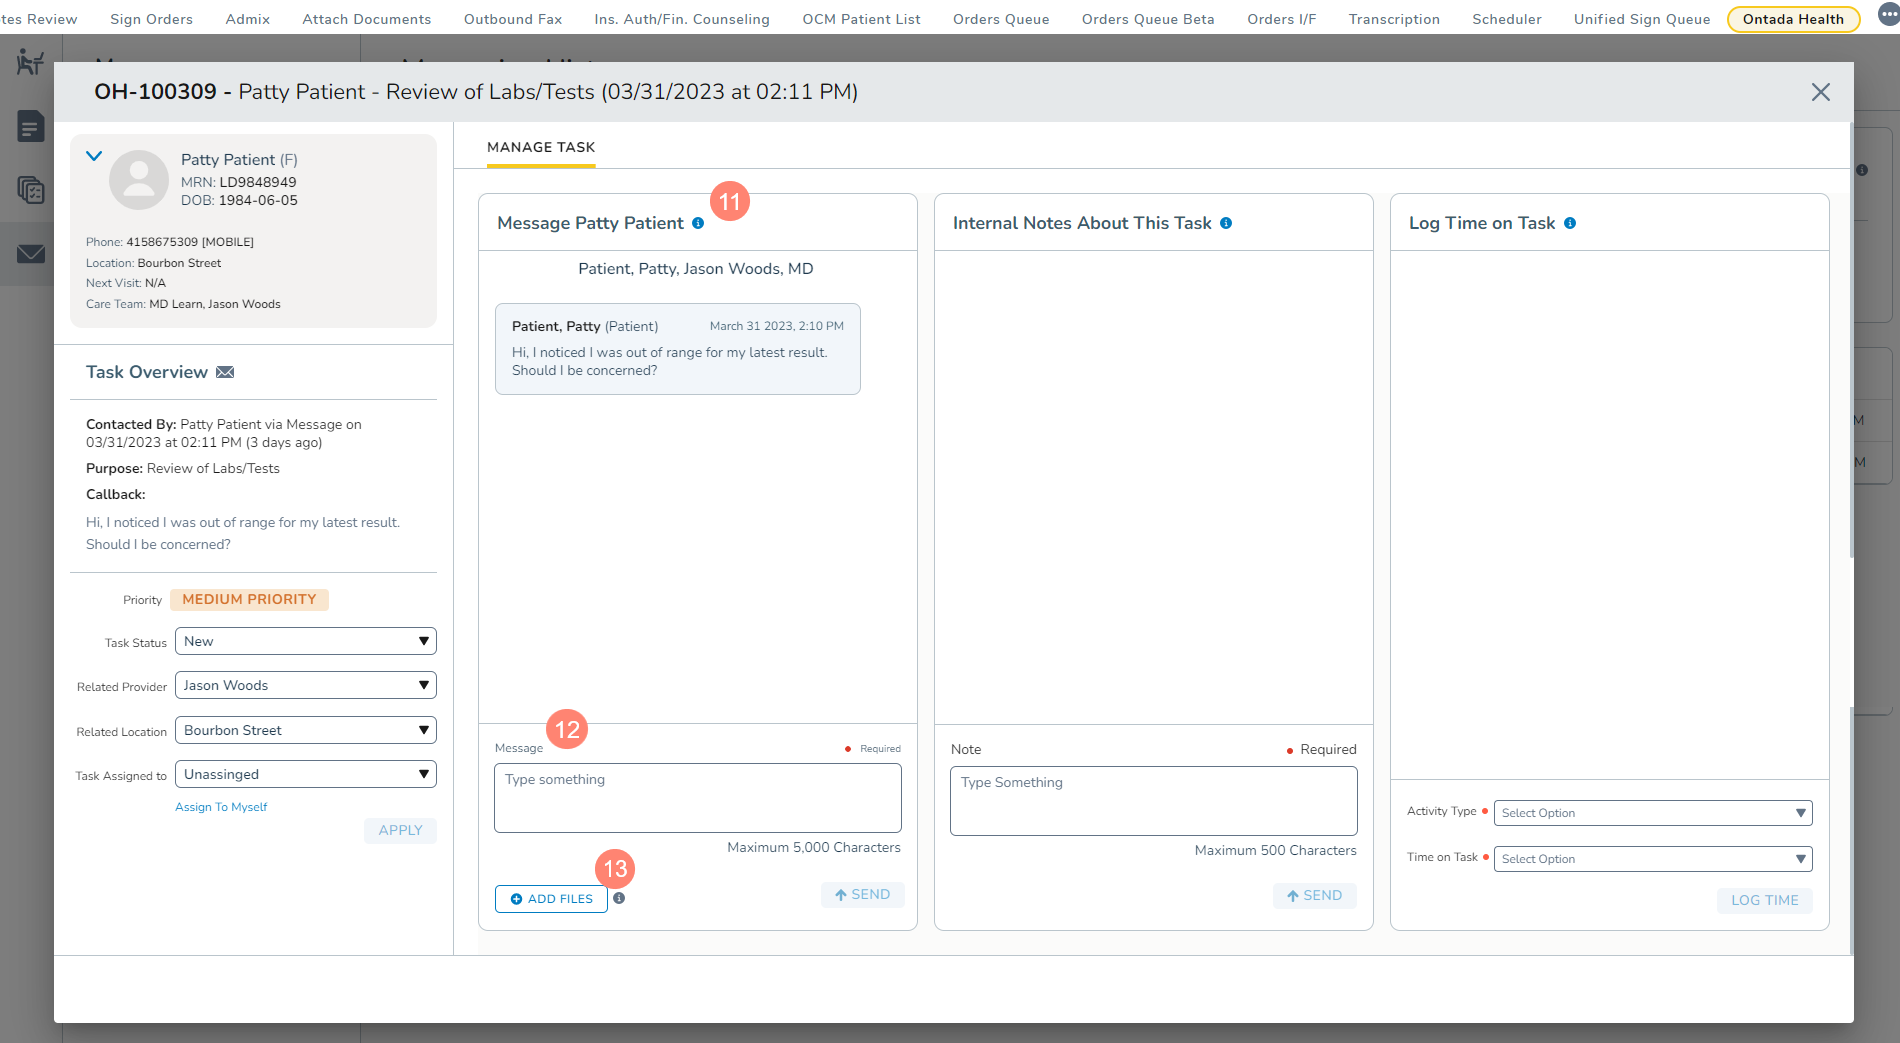
In the first column on the right side of the screen is the fully integrated messaging feature.
-
You can choose to message the patient, including the ability to upload any needed files (callout 23).
-
You can also add internal notes to this task using the text box in the middle column (callout 24).
-
Lastly, you can log the amount of time spent on this task. Use the Activity Type drop-down to choose an activity and the Time on Task drop-down to choose a length of time from 5-minute intervals (callouts 25, 26).
-
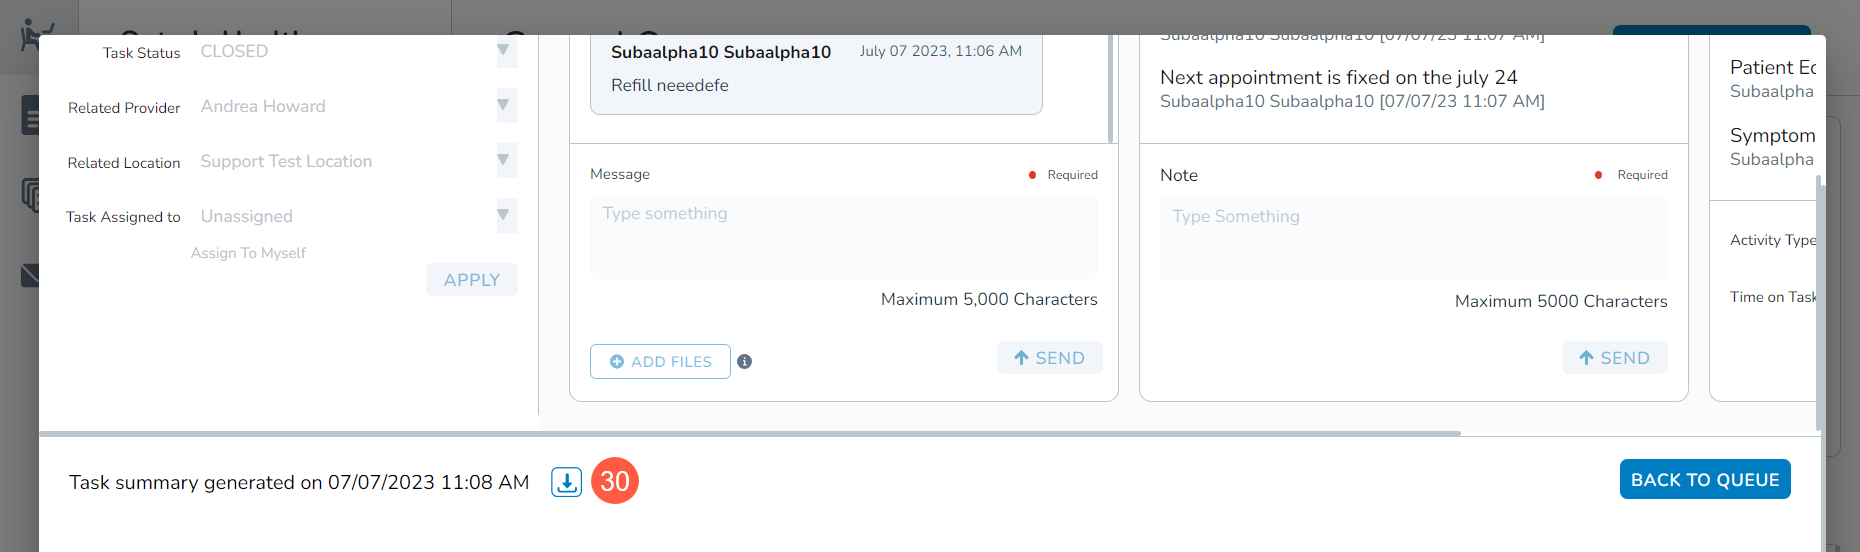
After updating all relevant information, click Close Task to complete it or click Keep Task Open to return to the queue while keeping the task available for updates (callouts 27, 28).
-
If you close the task, you can continue to enter the time you spent on the task, but all other options will be unavailable.
-
-
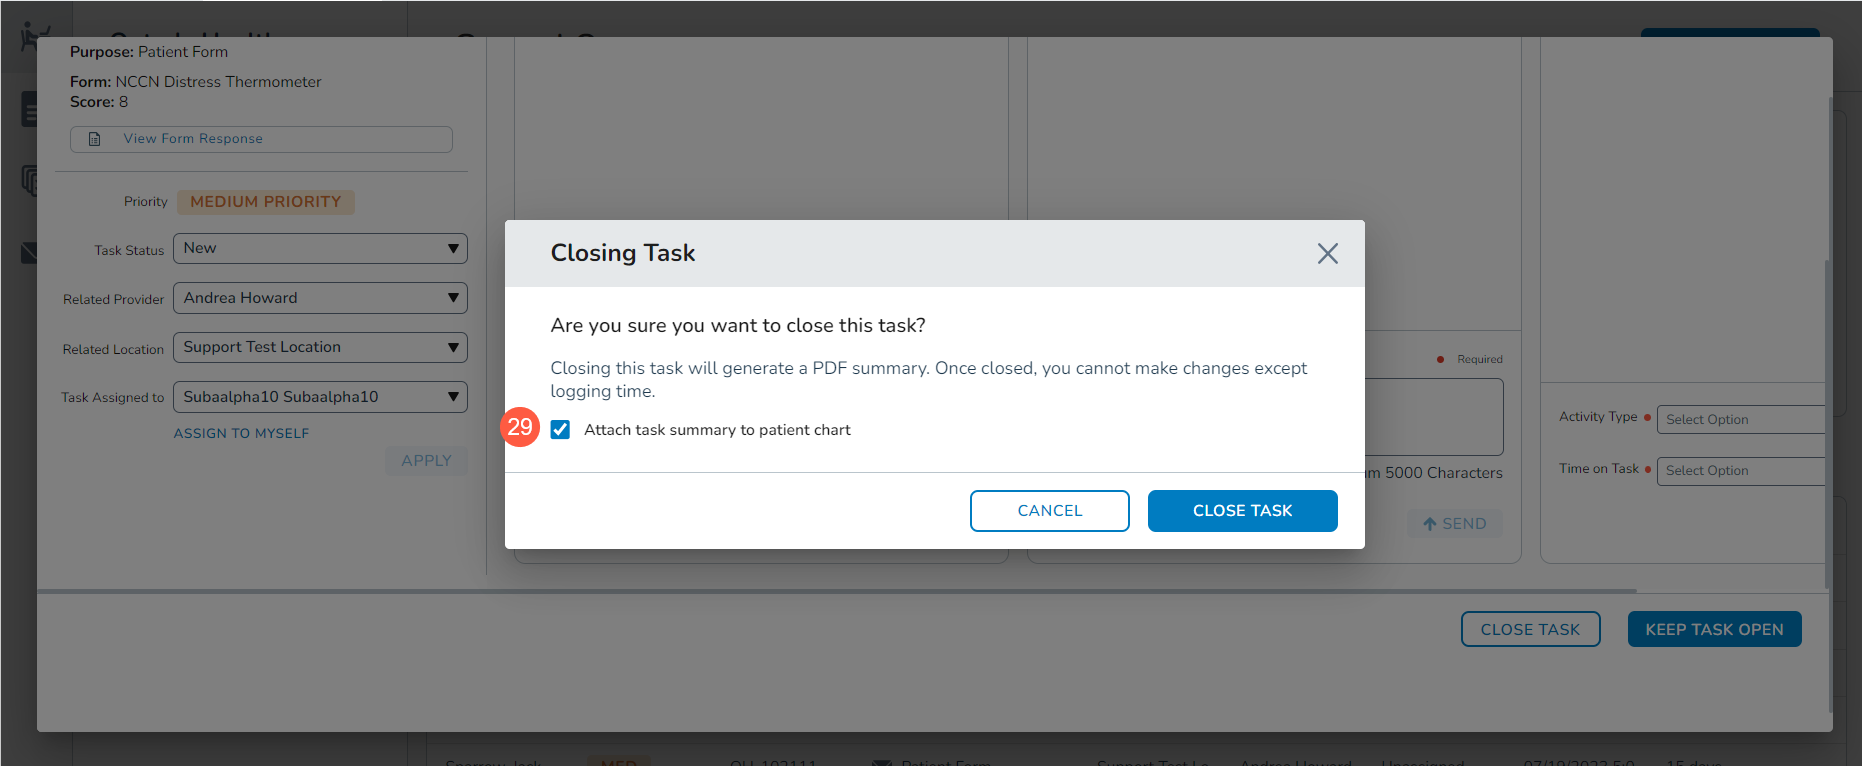
Upon clicking Close Task, a window will appear to confirm the action. A box in the window can be checked or unchecked if you’d like to automatically attach a copy of the task summary to the patient’s Documents tab (callout 29).
-
To officially close the task, click the Close Task button. This will attach the task summary to the patient’s chart and generate a PDF of the task summary for your records.
-
To download and view the PDF, go to the Closed Tasks tab, locate the item, click on it to open it in a new window, scroll to the bottom of the window, and click on the download icon (callout 30).
-
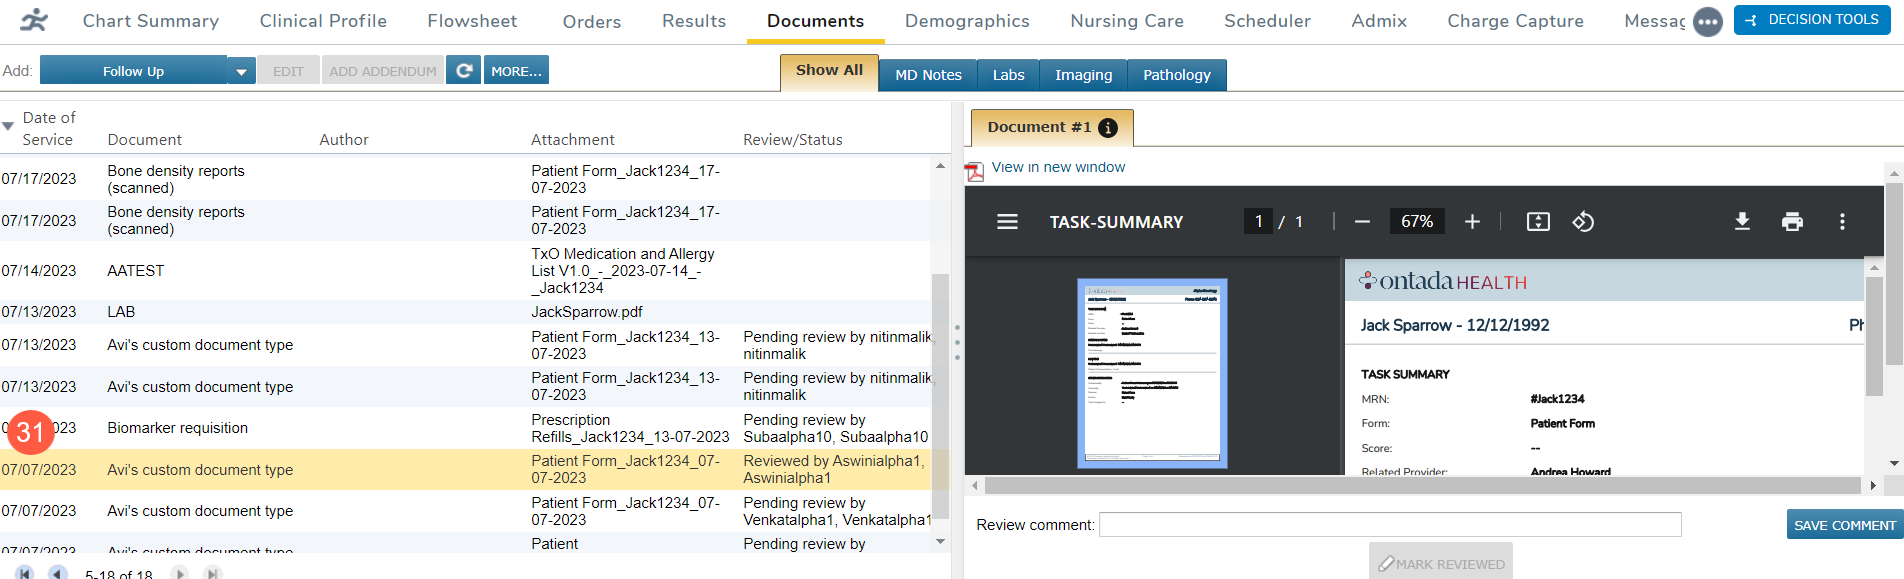
To view the task summary in the patient’s chart, go to their Documents tab and locate the item in the table (callout 31). Click on it to preview the PDF on the screen.
How to manually create a task
-
To create a new task for a patient (for example when a patient calls into the office with an issue), click Create Tasks from the queue's main page.
-
This will open a window where you can search for a specific patient using the search bar at the top of the page (callout 29). Enter a patient’s name, date of birth, or MRN to begin.
-
Use additional options (callouts 30 and 31) to add patients to the list by:
-
Provider: choose one or more physicians treating the patient.
-
Location: choose one or more sites where the patient is treated.
-
-
Once the list populates, click Select to choose a specific patient (callout 32).
-
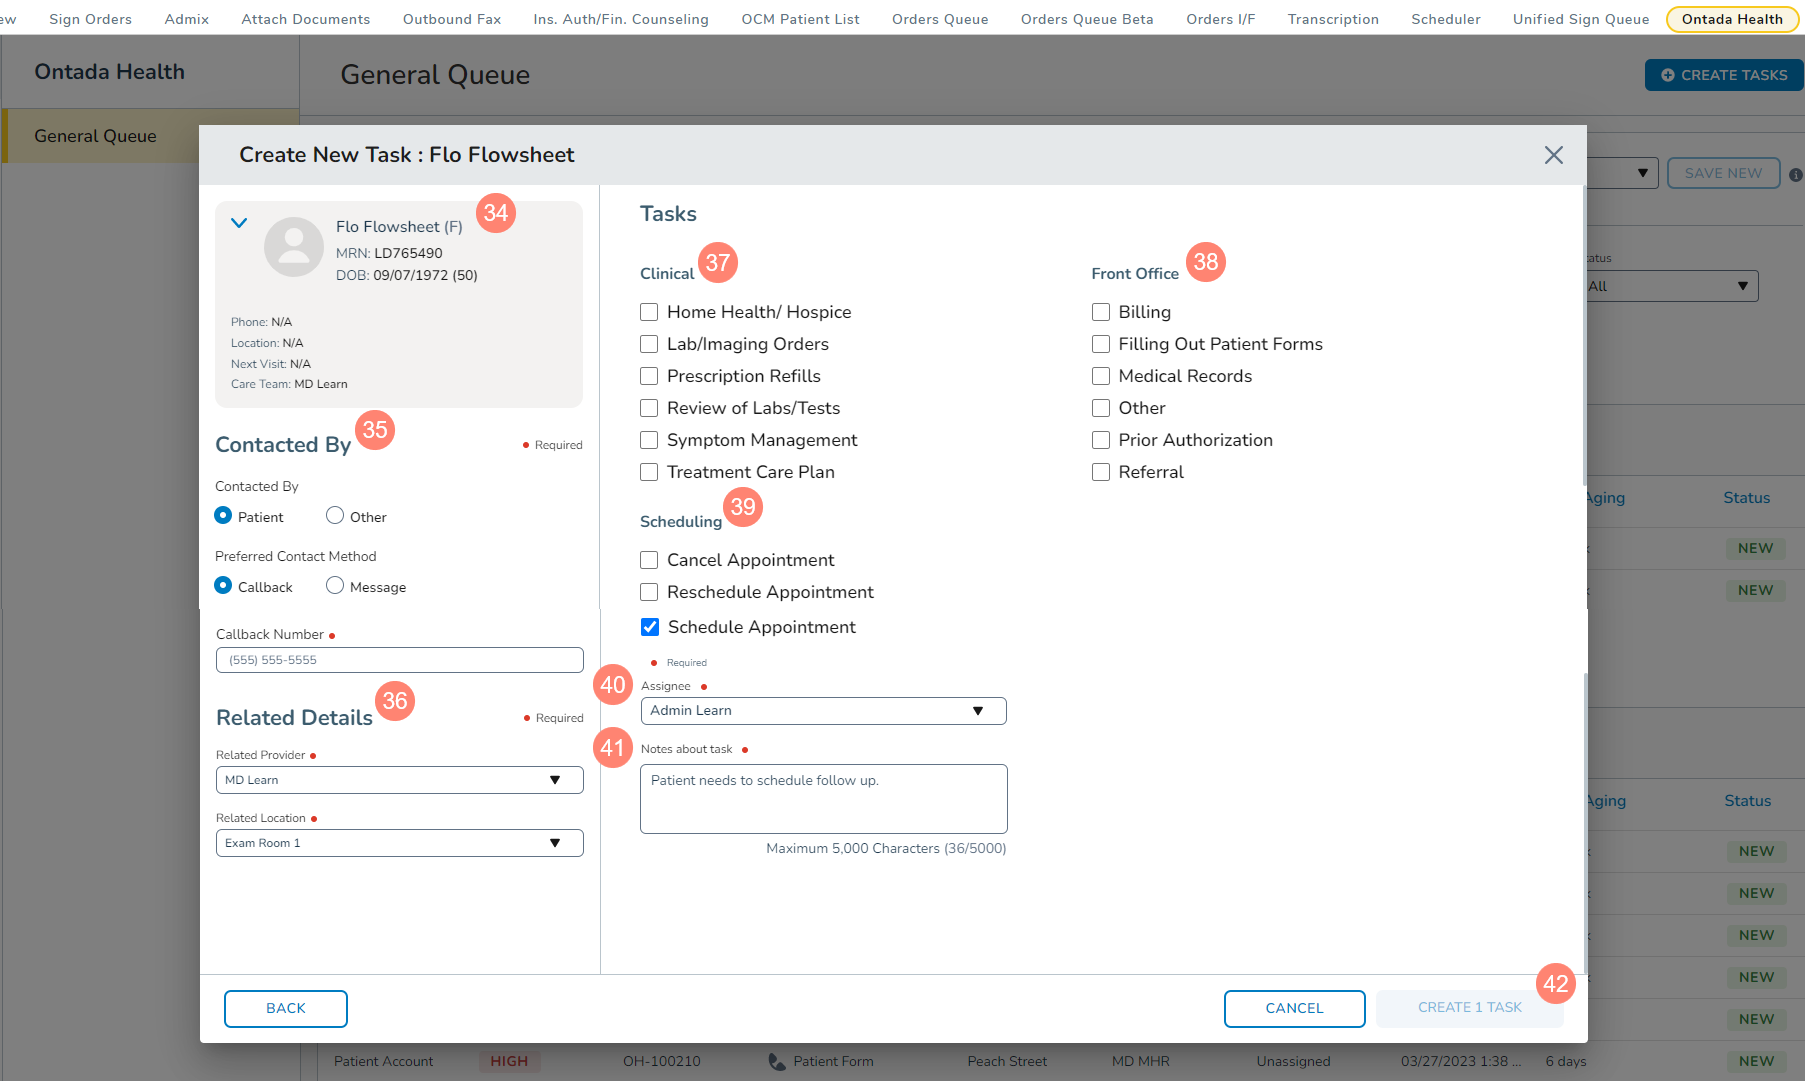
Click Create Task (callout 33) to select which tasks need to be completed for the patient.

-
On the left-hand side of the screen, you can:
-
View the patient’s information (callout 34).
-
Capture how contact was made with your practice and the best method to reply (callout 35).
-
Update the patient's Related Provider and Related Location (callout 36)
-
-
On the right side of the screen, choose one or more tasks from the Clinical, Front Office, or Scheduling categories (callouts 37-39).
-
Select an Assignee and enter notes, as needed, for each task (callouts 40-41).
-
Click Create Task (callout 42) to create the task(s) and begin the completion process.
-
If you choose more than one task, the system will create separate tasks for each one. This allows staff at your practice to work on items simultaneously without impacting each other's work.
Automatic task creation
The system will automatically create tasks for your practice when patients complete certain actions based on your practice configurations:
-
Whenever a patient sends a message or submits an appointment request (new, reschedule, or cancellation) in the portal, a task will automatically be generated and sent to your queue.
-
For the Patient Health Questionnaire (PHQ), you can customize when the system creates a task on your behalf based on the patient’s score. The results can be set to generate no task, low priority task, medium priority task, and high priority task.
-
For the NCCN Distress Thermometer, you can also customize when the system creates a task on your behalf based on the patient’s score. The results can be set to generate no task, low priority task, medium priority task, and high priority task.
Please contact your Ontada Account Manager to set up your PHQ and Distress Thermometer customizations.
Once a task is automatically created and appears in your General Queue, follow Step 10 in How to use the General Queue to manage the task.
iKnowMed-Integrated Patient Messaging Queue
No longer a separate application, we’re delivering patient messaging right in iKnowMed, centralizing patient communication. The patient messages queue allows you to search for and view all secure Ontada Health patient portal messages in one location. Practices can configure rules that drive the priority for all communication types in one central location.
Patient Messaging History
-
In iKnowMed Generation 2, navigate to Admin > Ontada Health.
-
Use the Messages page to view and manage messages with patients (callout 1).
-
Search for a specific patient using the search bar at the top of the page (callout 2). Enter a patient’s name, date of birth, or MRN to begin.
-
Use additional options (callouts 3-7) to filter the list by:
-
Date Created: filter the list by the date when the message was created. Choose from all, today, last 3 days, or last 7 days.
-
Location: choose one or more sites where the patient is treated.
-
Provider: choose one or more physicians treating the patient.
-
Task Purpose: choose one or more tasks assigned to the message.
-
Status: choose one or more statuses, such as New, or any other of your practice’s options.
-
-
You can keep the filtered view by saving it as a preset. Click Save New in the upper-right corner (callout 8).
-
You can save up to five presets and switch between them using the Filter Presets drop-down (callout 9).
-
Further refine your results by sorting each column. Click the column name to sort the information by ascending or descending order (see callout 10 for an example).

-
Click on a message to open the task screen where you can access the fully integrated messaging feature.
-
Review your message history, send a new message, and upload any needed files (callouts 11-13).
Send and manage online health assessments
You can now send digital online health assessments to patients through Ontada Health and have their responses integrated with iKnowMed. The assessments include the PHQ2, PHQ9, and NCCN assessments.
Use the Forms Queue to manage and send forms to one or more patients. This queue also displays the completion status of forms. Easily see what needs to be completed by patients and send email reminders to patients when forms are overdue.
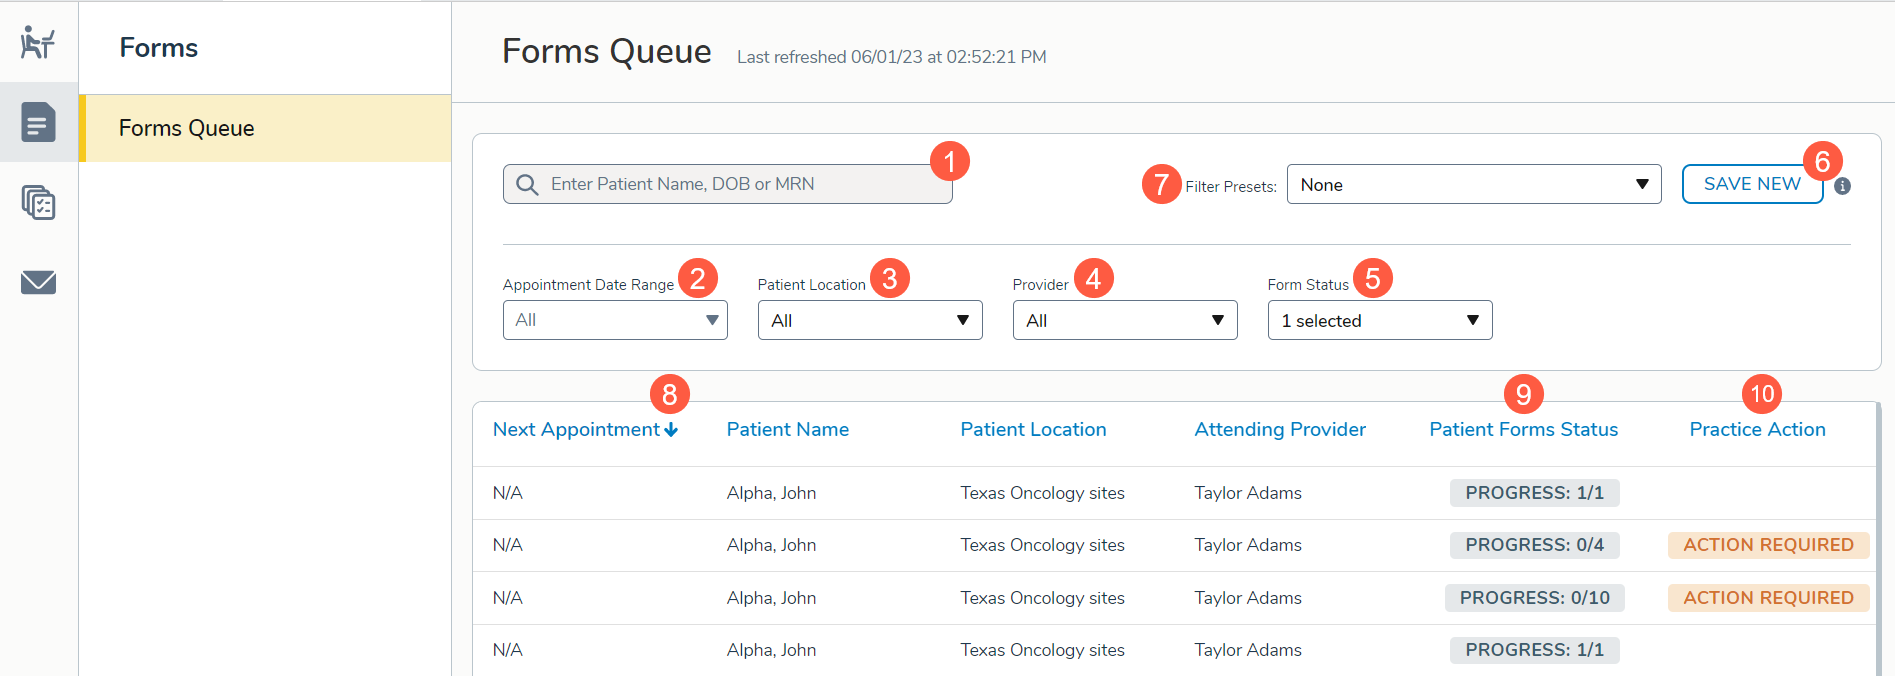
How to use the Forms Queue
-
Use the Forms Queue to review the status of patient forms.
-
Search for a specific patient using the search bar at the top of the page (callout 1). Enter a patient’s name, date of birth, or MRN to begin. Use additional options (callouts 2-5) to filter the list by:
-
Use additional options (callouts 2-5) to filter the list by:
-
Appointment Date Range: filter the list by patients’ appointment date from all, today, this week, or next week.
-
Patient Location: choose one or more sites where the patient is treated.
-
Provider: choose one or more physicians treating the patient.
-
Form Status: choose one or more statuses from In Progress, Needs Review, No Forms Sent, Not Started, or Reviewed.
-
-
You can keep the filtered view by saving it as a preset. Click Save New in the upper-right corner (callout 6).
-
You can save up to five presets and switch between them using the Filter Presets drop-down (callout 7).
-
Further refine your results by sorting each column. Click the column name to sort the information by ascending or descending order (see callout 8) for an example.
-
Use the Form Status column to denote where in the process the form resides (callout 9).
-
If any action is required by your practice, it will be denoted in the Practice Action column (callout 10).
-
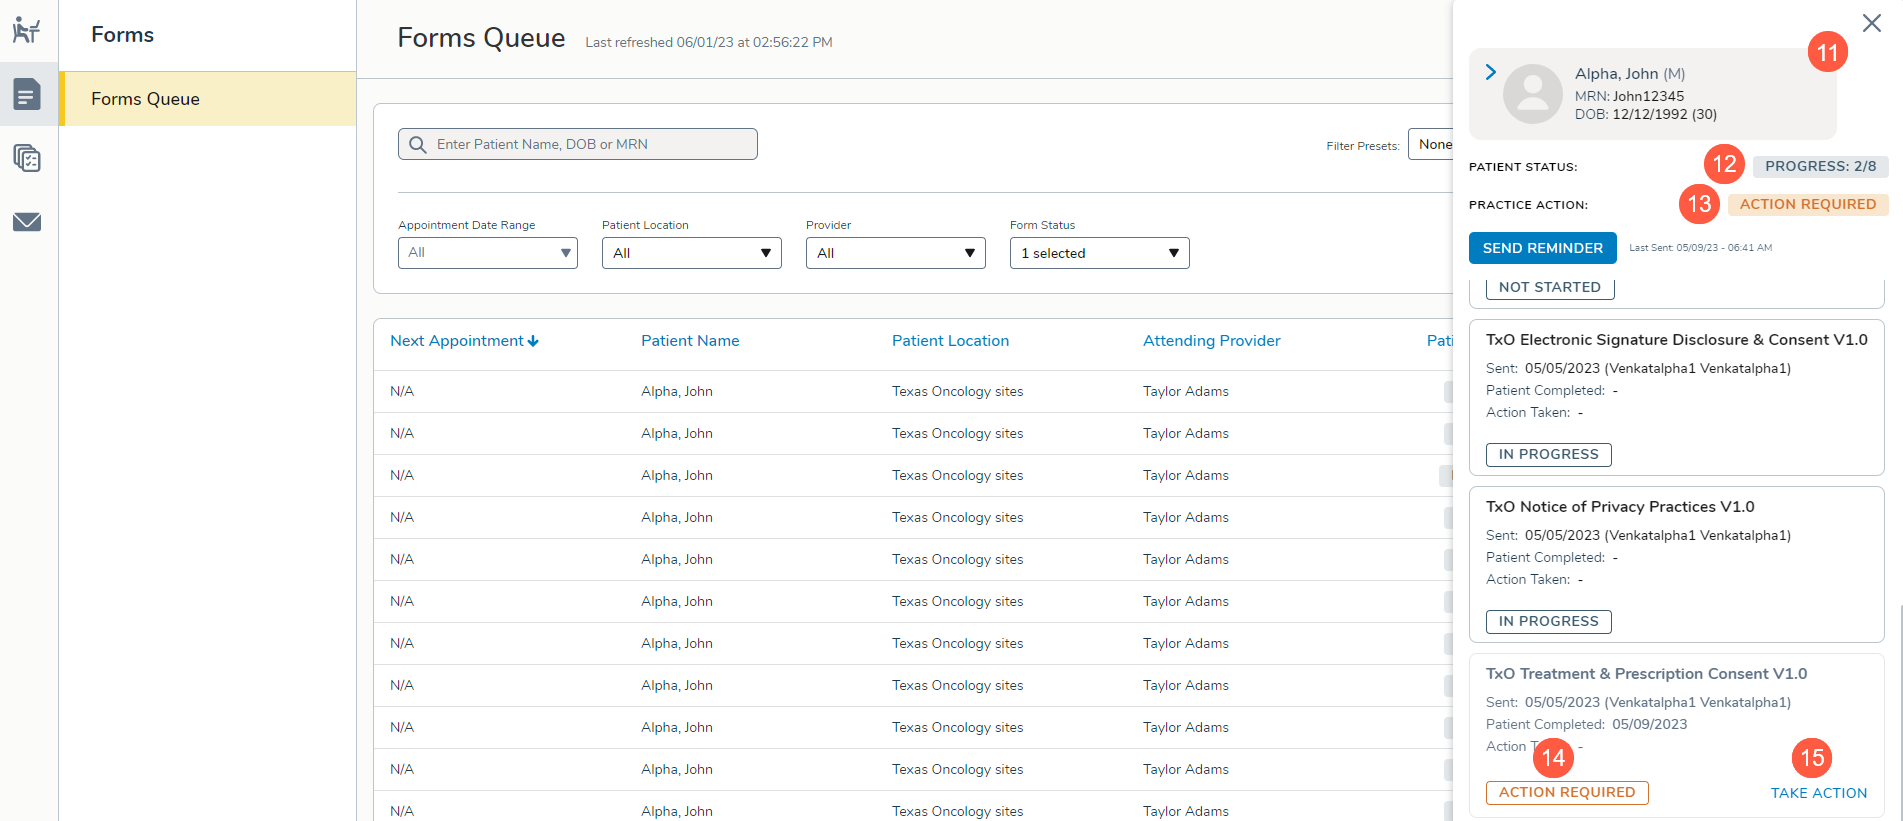
Click on an item in the list to view more details on the right side of the screen.
-
From here you can view the patient’s information (callout 11), the item’s overall status (callout 12), if any action is required by your practice (see callout 13 for example), and each form or assessment status (see callout 14 for example).
-
For example, for forms that need review, click Take Action (callout 15) to mark it as reviewed and update the form’s status to Complete in the queue.
How to use the Send Forms Queue
-
Use the Send Forms queue to send forms to patients or review when forms were sent to patients and by whom.
-
You can refine the list of sent forms by sorting each column. Click the column name to sort the information by ascending or descending order (see callout 1 for an example).
-
To send forms to a patient, click Send Forms in the upper-right corner (callout 2).

-
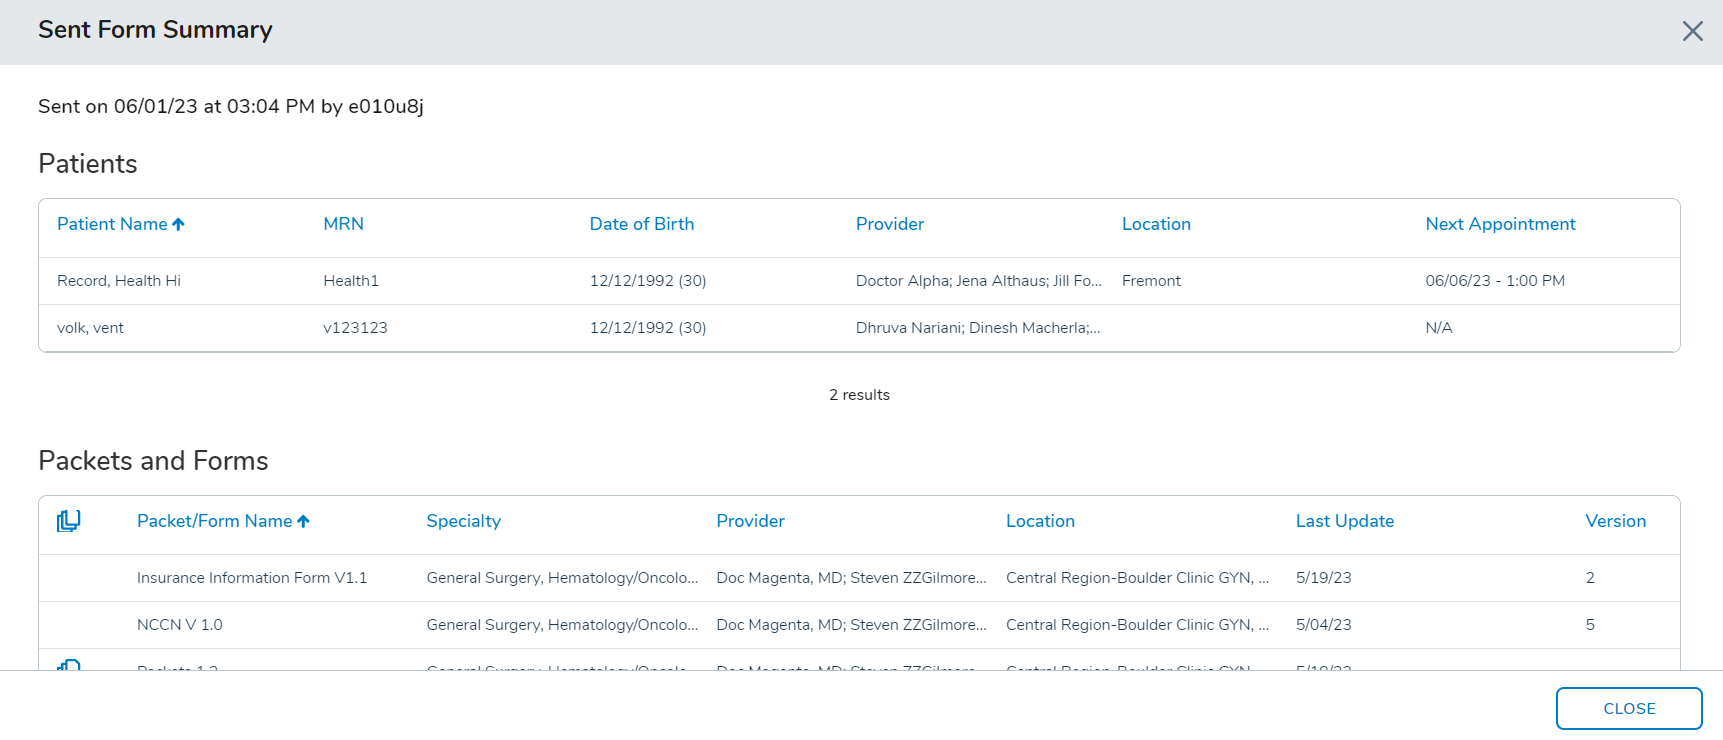
For items sent in bulk, clicking on an item will open more details in a pop-up window (see below). From here, you can see which forms and packets were sent, which patients received them, who sent them, and when they were sent.
Sending patient forms
-
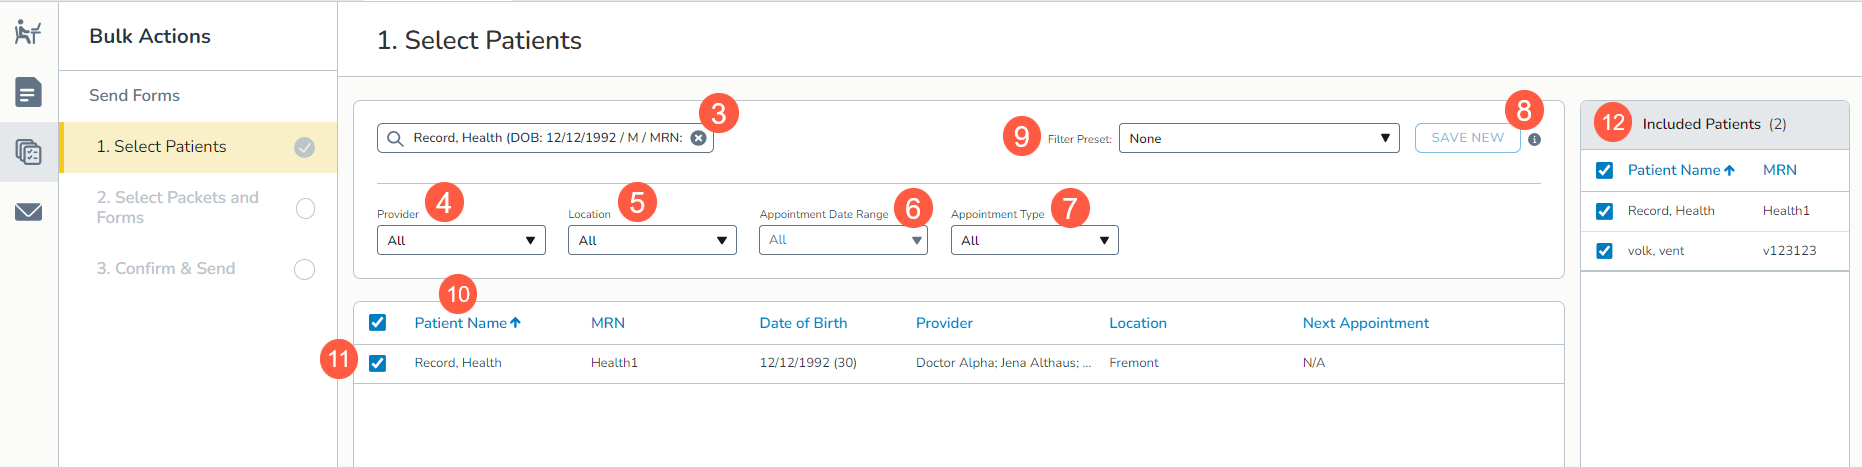
In the Select Patients section, search for a specific patient using the search bar at the top of the page (callout 3). Enter a patient’s name, date of birth, or MRN to begin.
-
Use additional options (callouts 4-7) to add patients to the list by:
-
Provider: choose one or more physicians treating the patient.
-
Location: choose one or more sites where the patient is treated.
-
Appointment Date Range: choose a date range for the patient’s next appointment from all, next 7 days, or next 14 days.
-
Appointment Type: choose from one or more appointment type.
-
-
You can keep the filtered view by saving it as a preset. Click Save New in the upper-right corner (callout 8).
-
You can save up to five presets and switch between them using the Filter Presets drop-down (callout 9).
-
Once the table populates, you can further refine the information by clicking on each column name to sort the information by ascending or descending order (see callout 10 for an example).
-
Select the checkbox next to the patient(s) that needs to receive forms (callout 11). They will be added to an Included Patients column on the right side of the screen (callout 12).
-
Patients can be added or removed from this list by checking the box next to each patient’s name in the column or in the main list.
-
Click Select Forms/Packets to move to the next step.
-
On the Select Forms and Packets page, search for a specific form or packet using the search bar at the top of the page (callout 13). Enter the form or packet’s name to begin.
-
Use additional options (callouts 14-18) to add forms to the list by:
-
Provider: choose one or more physicians treating the patient.
-
Location: choose one or more sites where the patient is treated.
-
Specialty: choose one or more specialties from your practice’s options.
-
Appointment Type: choose one or more appointment types.
-
Packet/Form: choose from packet, form, or both.
-
-
You can keep the filtered view by saving it as a preset. Click Save New in the upper-right corner (callout 19).
-
You can save up to five presets and switch between them using the Filter Presets drop-down (callout 20).
-
Once the table populates, you can further refine the information by clicking on each column name to sort the information (see callout 21 for an example).
-
Select the checkbox next to the form(s) to send (callout 22). They will be added to an Included Forms column on the right side of the screen (callout 23).
-
Forms can be added or removed from this list by checking the box next to each patient’s name in the column or in the main list.
-
Click Confirmation to move to the next step.

-
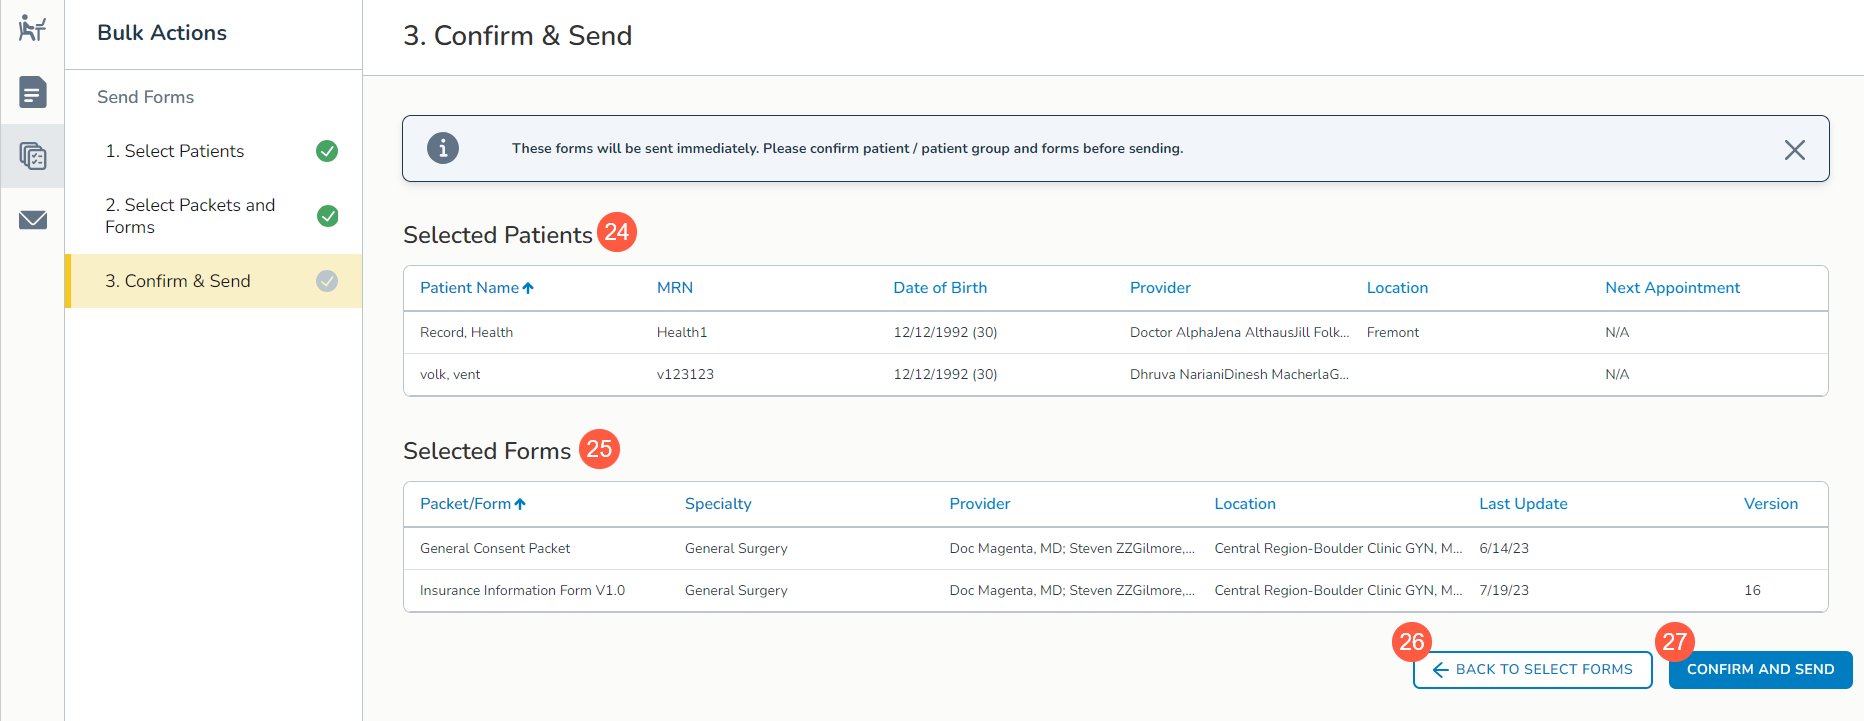
On the Confirm & Send page, you will see the selected patients, and which forms they’ll receive (callouts 24 and 25).
-
If you need to make changes, click Back To Select Forms. To send the form(s) to the patient(s), click Confirm And Send (callouts 26 and 27).
Ontada Health Patient Portal Guide
The Ontada Health patient portal allows patients to keep track of doctor visits, view test results, review past and current medications, review and schedule appointments and send direct messages to their care team. This guide provides a full overview to help patients navigate the portal.

