Ontada Health Patient Portal Release Notes
June 6 | Patient Portal 3.3.5
New patient messaging feature in admin tools
We are excited to introduce a new feature in the Ontada Health patient portal admin tools that allows practices to send bulk messages to patients, regardless of whether they're enrolled in the portal. This feature is ideal for sending important announcements, such as office closures or changes in practice operations.
IMPORTANT: When sending messages to larger groups of patients, there could be a few hours' delay before the message lands in patients’ inboxes. Try to send announcements as early as possible in the day to reduce the likelihood of these delays.
NOTE: Practices cannot send messages to caregivers at this time.
How to access the new messaging feature:
-
Your Ontada Health permissions must be set to access the new messaging feature.
-
To add or update permissions, navigate to Admin > Ontada Health, select the Support Tools icon, and open User Roles and Permissions.
-
Permissioned users can initiate the process to add or update permissions for Announcements. If you don't have this level of access, please contact your Ontada Health Account Manager to update your permissions.
How to use the new messaging feature:
-
Navigate to Bulk Actions:
-
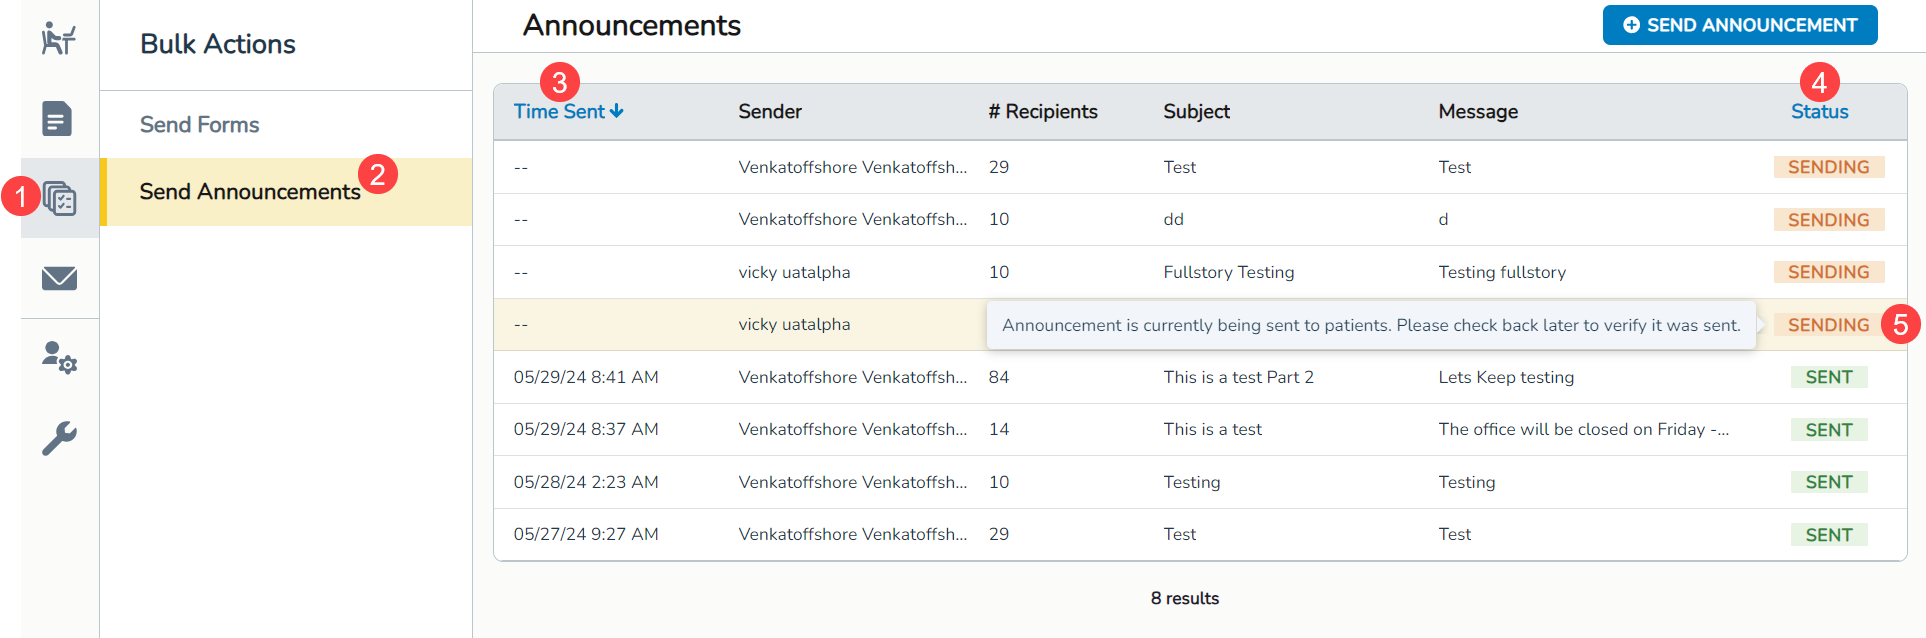
From the admin tools, select Bulk Actions from the left-hand menu (callout 1).
-
Click on the new Send Announcements option in the middle menu (callout 2).
-
-
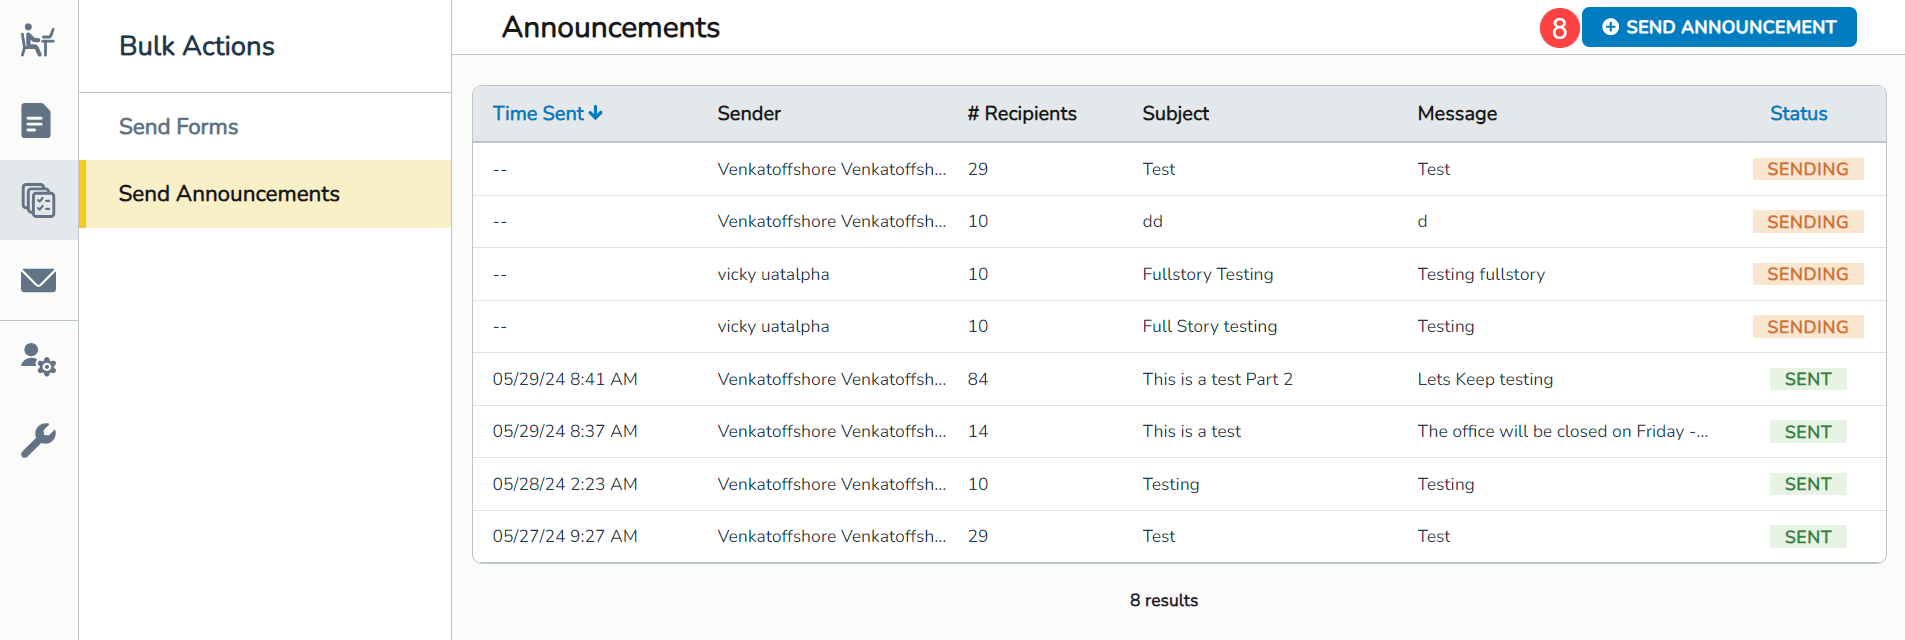
Announcements page:
-
A table will display any previously sent messages organized by Time Sent, Sender, # Recipients, Subject, Message, and Status.
-
Sort messages by Time Sent or Status by clicking on the column headers to choose ascending or descending order (callouts 3 and 4).
-
Hover over a status to see a tooltip explaining the status (callout 5).
NOTE: The system will automatically attempt to resend failed emails for each patient.
-
-
Review sent messages:
-
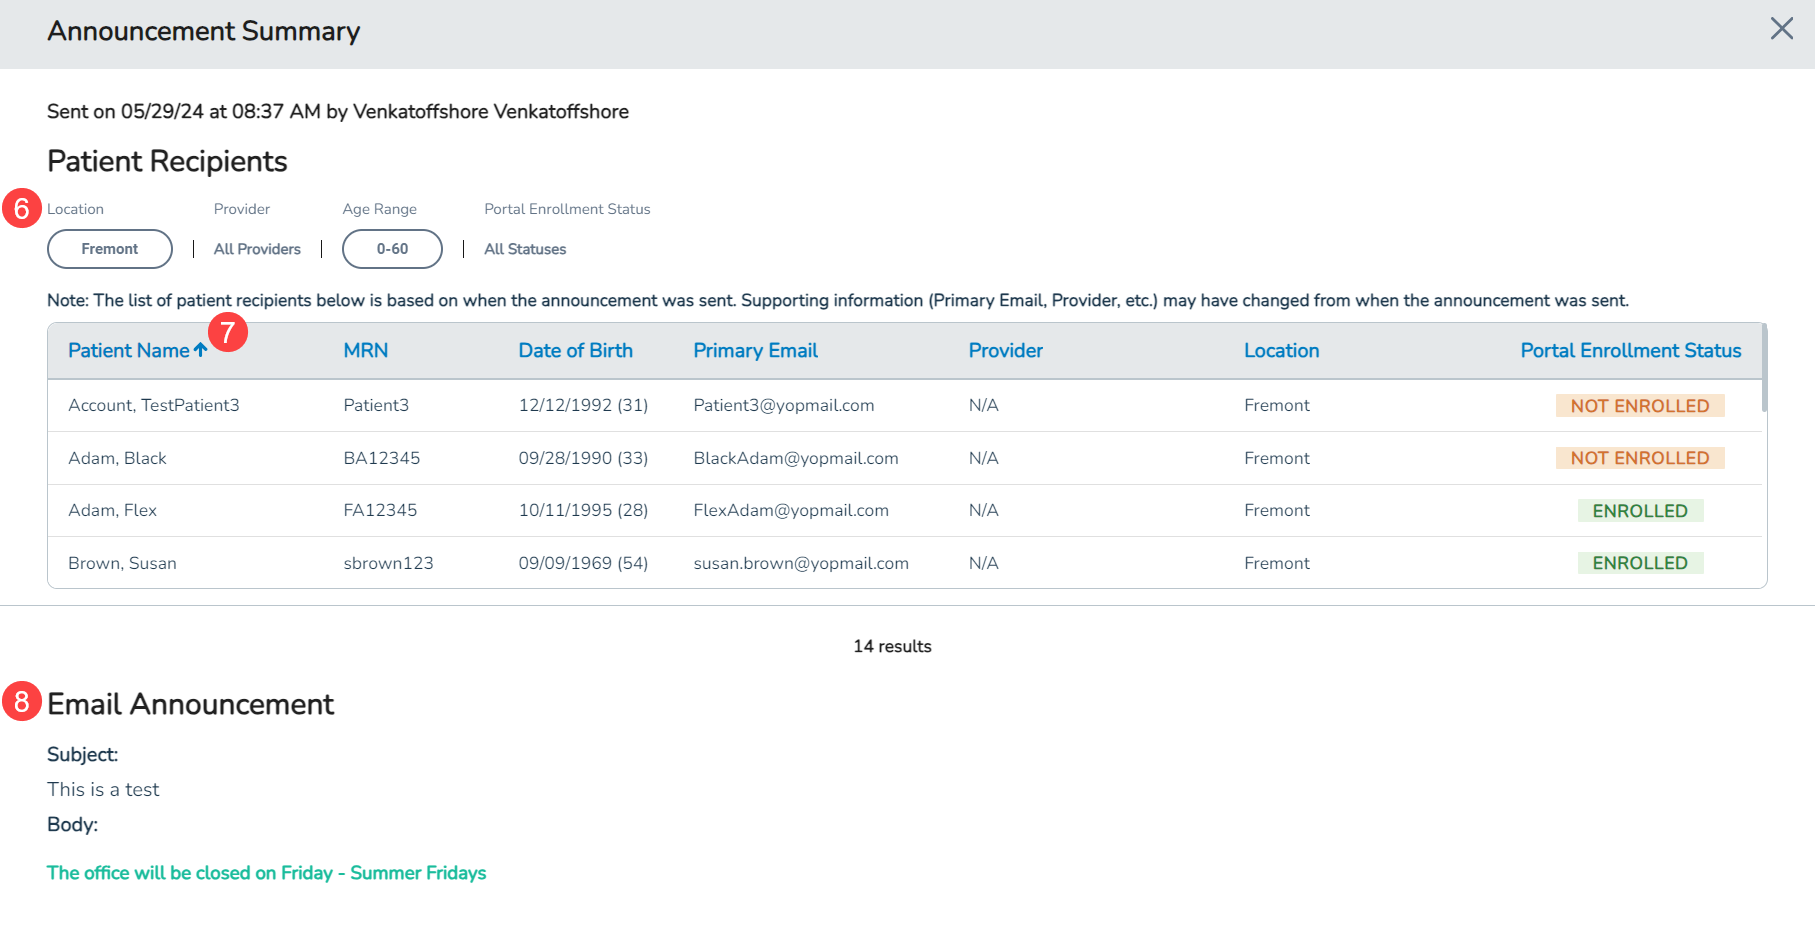
Click on an entry in the table to review details about the sent message.
-
The Announcement Summary window will display:
-
Location, Provider, Age Range, and Portal Enrollment Status of patients that received the message (callout 6).
-
A table listing each patient by Patient Name, MRN, Date of Birth, Primary Email, Provider, Location, and Patient Portal Enrollment Status.
-
Sort the table by clicking on column headers (see callout 7 for example).
-
-
-
Preview the email sent, including the Subject, Body, and any Uploaded Documents (callout 8).
-
-
Send a bulk message:
-
Click the Send Announcement button (callout 8).
-
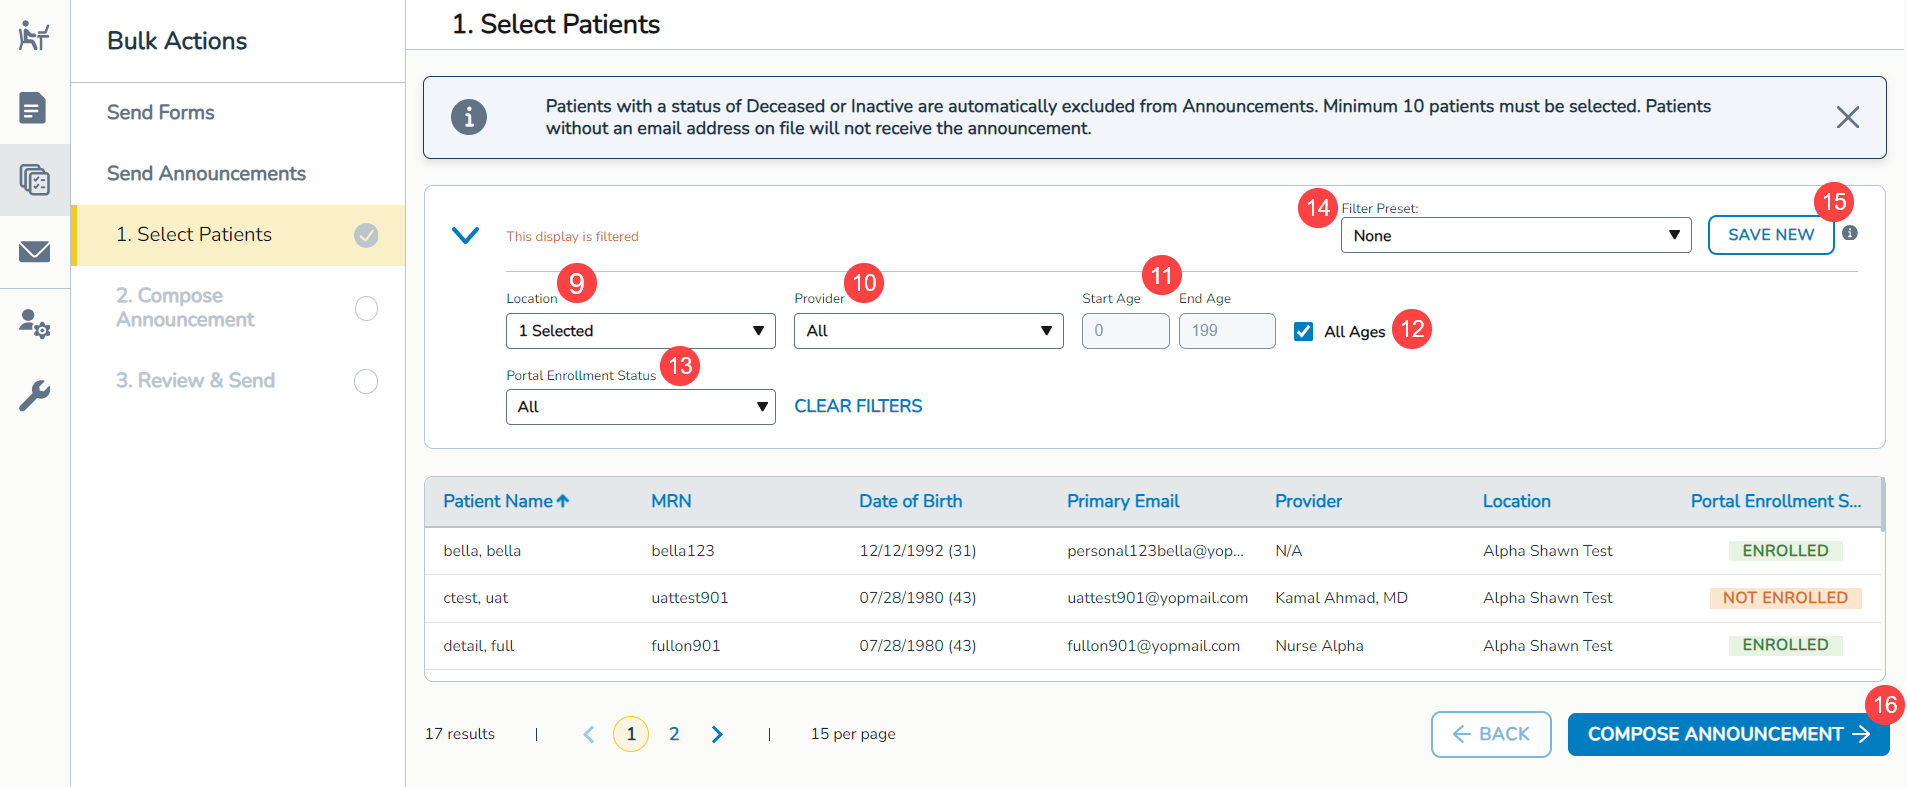
Select patients:
-
Use filters to locate patients by Location, Provider, Age, and Portal Enrollment Status (callouts 9-13) or select a previously saved Filter Preset (callout 14).
-
To save a new preset, click the Save New button (callout 15).
-
Patients matching the filter criteria will appear in the results table.
-
These patients will be the recipients of your message.
-
Click the Compose Announcement button (callout 16) once at least 10 patients are selected (deceased or inactive patients cannot be added).
-
-
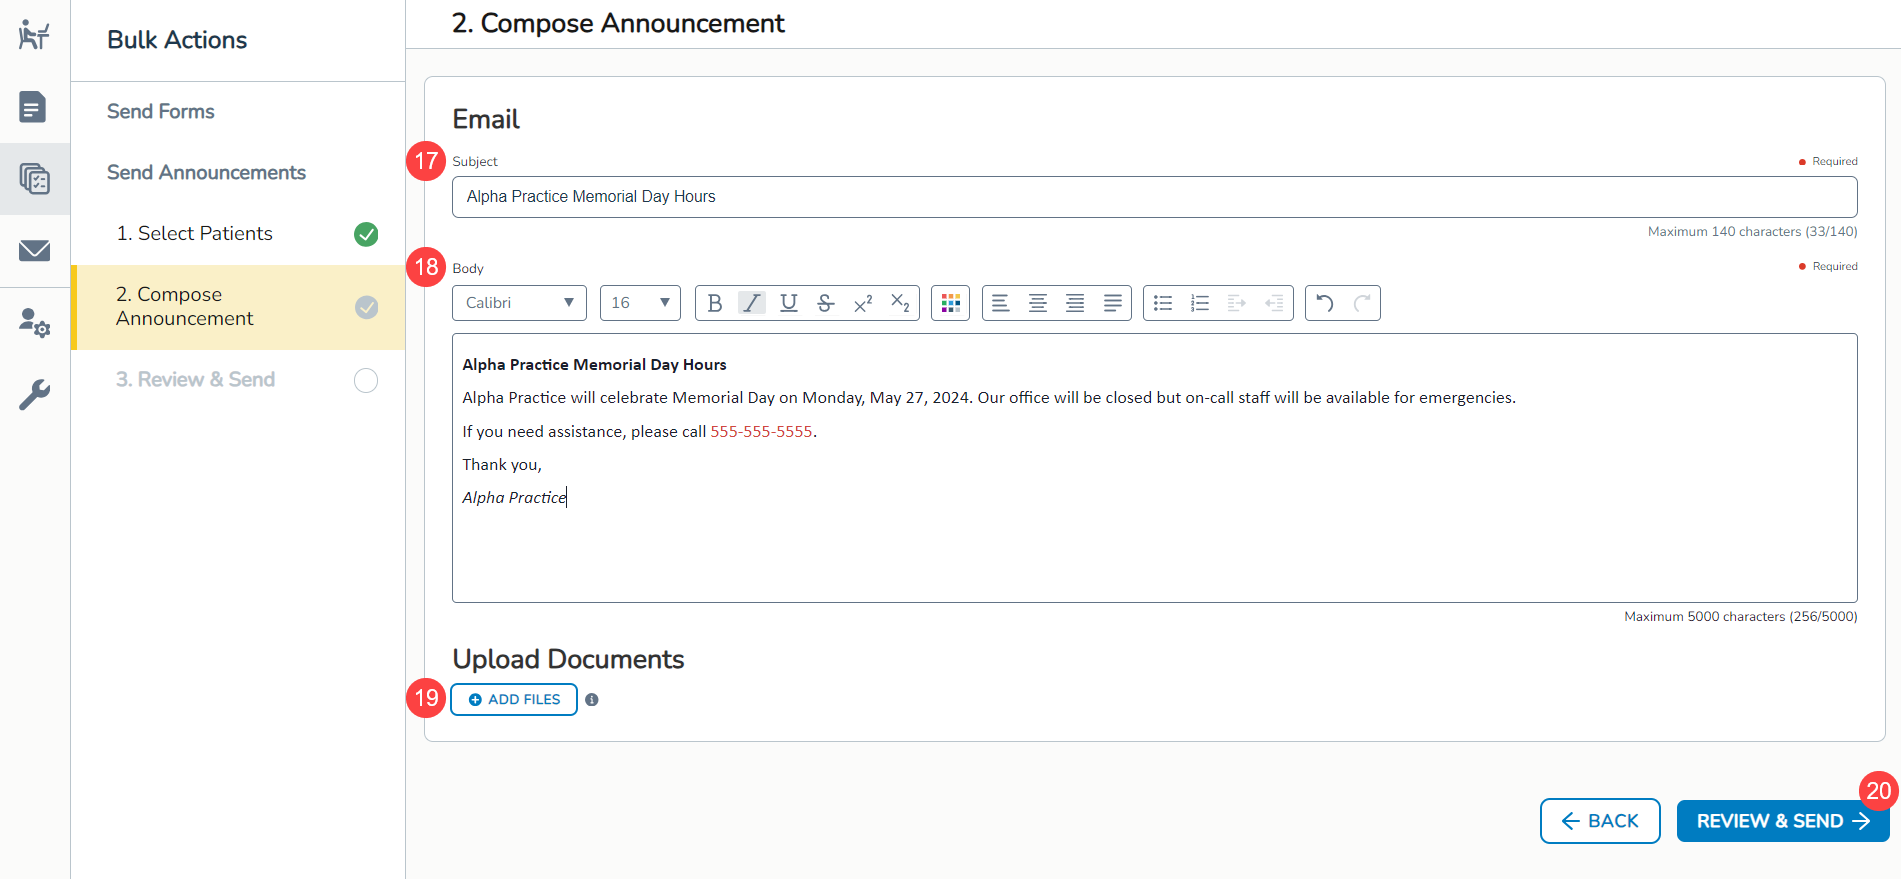
Compose announcement:
-
Enter a Subject of up to 140 characters (callout 17).
-
Write the Body of the message with a maximum of 5,000 characters, using formatting tools as needed (callout 18).
-
Add up to 5 attachments, if needed, by clicking Add Files (callout 19).
-
Click Review & Send to review your message (callout 20).
-
-
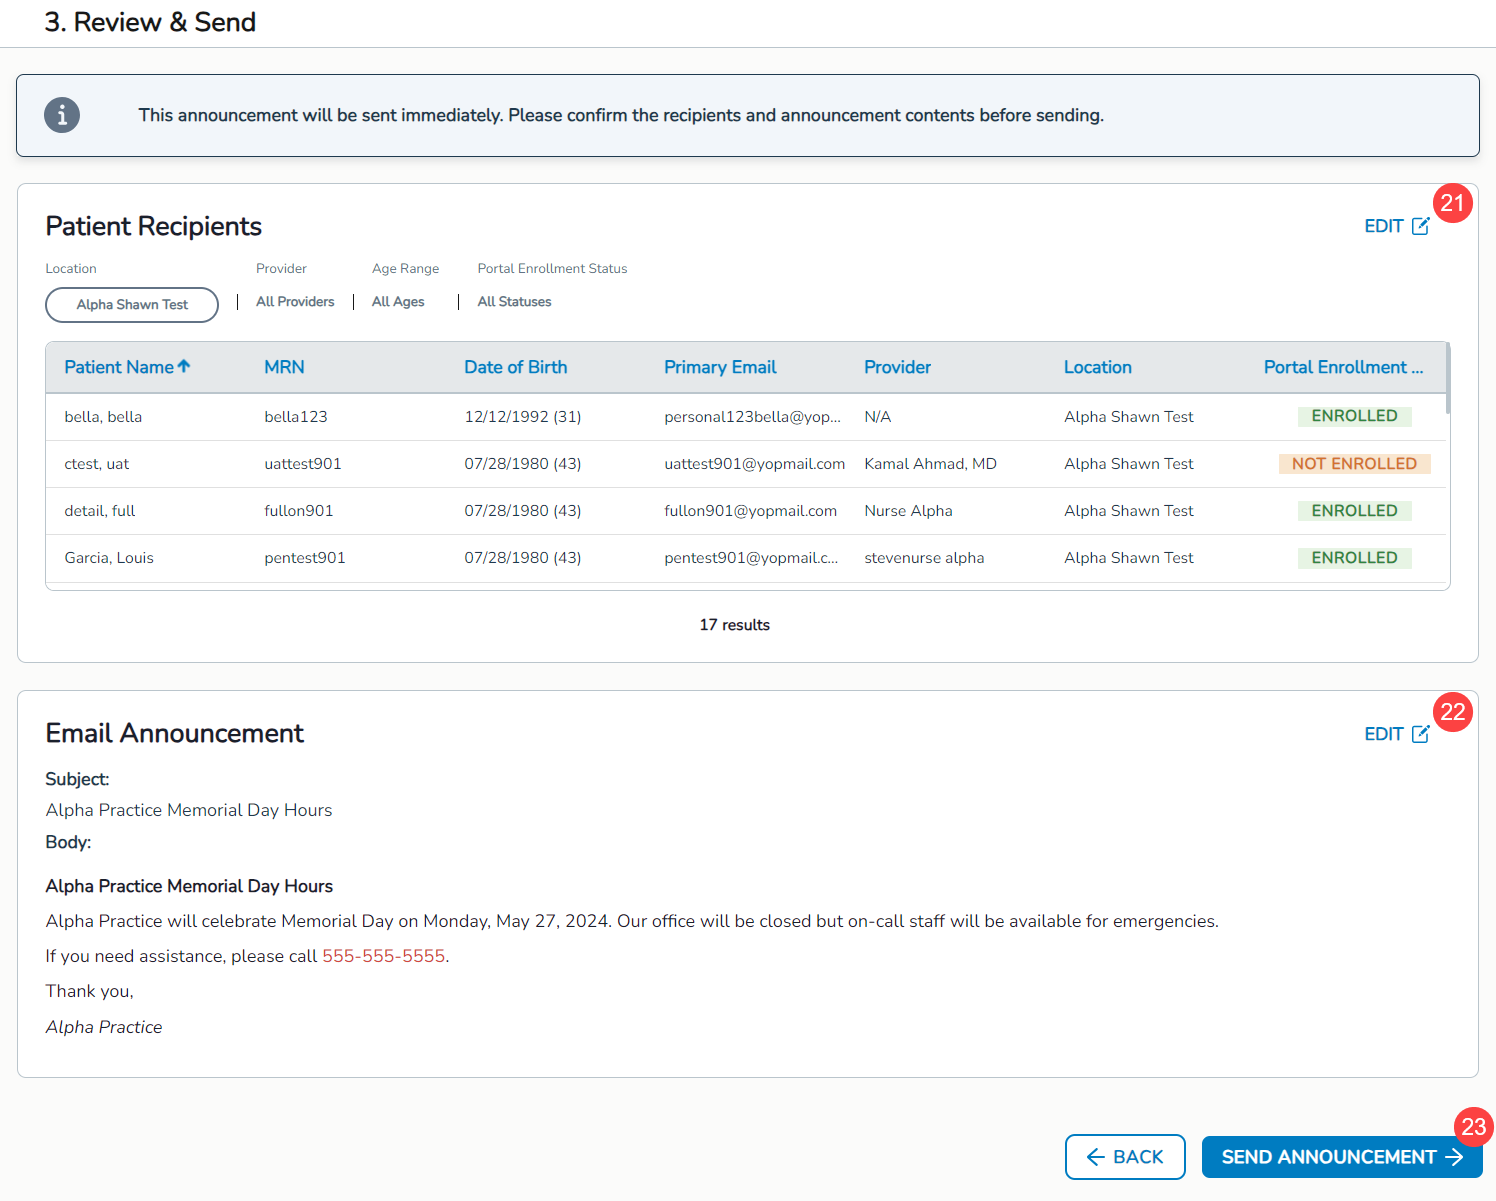
Review and send:
-
Review the recipient list and message to ensure it includes all necessary patients, content, and attachments.
-
If you need to make changes, click the respective Edit buttons (callouts 21 and 22).
-
If your message is ready, click Send Announcement (callout 23).
-
-
Updates to reports for messaging support
-
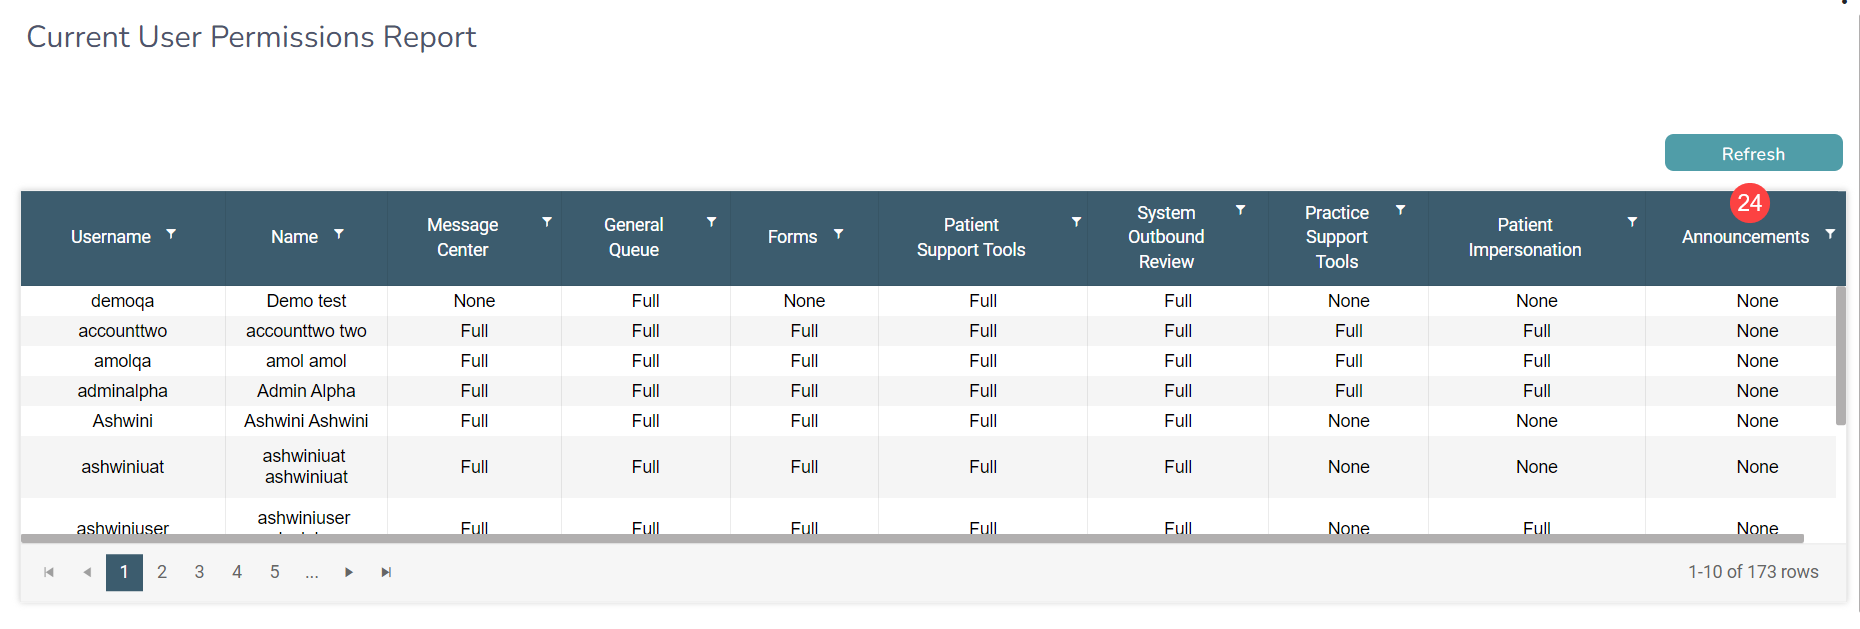
Current User Permissions Report:
-
Now includes an Announcements column to indicate which users can access this feature, improving visibility and permission management (callout 24).
-
-
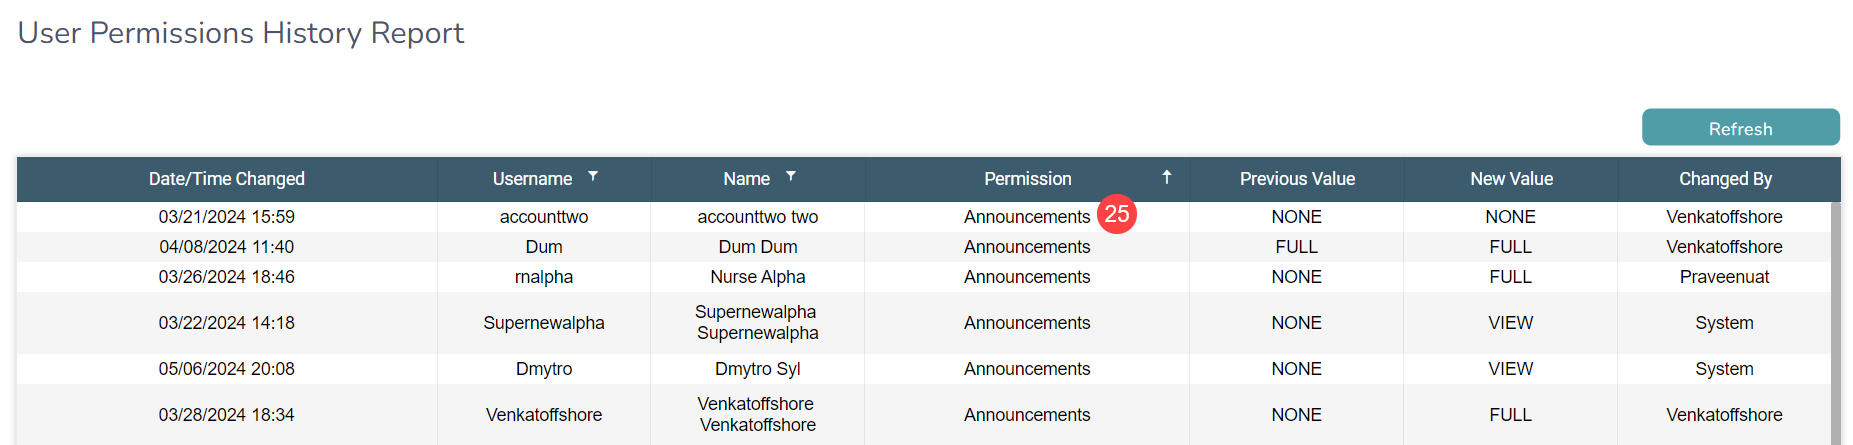
User Permissions History Report:
-
Lists Announcements under the Permission column when changes are made, providing a comprehensive audit trail (callout 25).
-
-
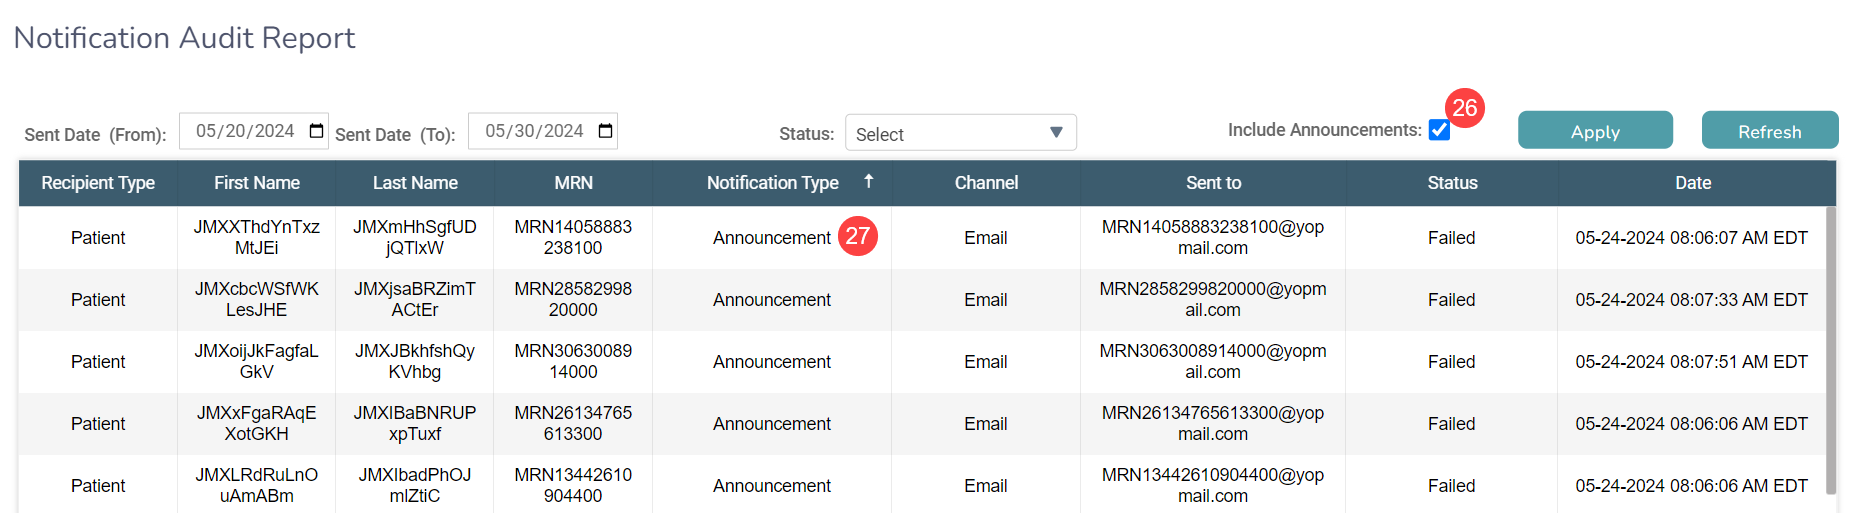
Notification Audit Report:
-
Starting Friday, June 7, 2024, the report will be updated to include announcements.
-
A new checkbox to Include Announcements will appear on the table (callout 26).
-
The report will list Announcement under the Notification Type column when announcements are sent to patients, giving a detailed view and status of all notifications sent by the system (callout 27).
-
-
Additional privacy controls for restricted patient charts
With our last update on May 7, 2024, Ontada Health introduced privacy measures to honor restrictions set on patient charts within iKnowMed. We implemented visual indicators for restricted charts and masked or limited certain details for these patients.
Now, we’re introducing additional controls to ensure that patient privacy preferences are strictly adhered to, maintaining the highest data security standards.
Key enhancements to privacy controls
-
Restricted chart access:
-
Users without the appropriate permissions will not be able to view restricted patient charts across various Ontada Health admin tools, including the General Queue, Forms Queue, Support Tools, and Message History.
-
Attempting to access a restricted chart will prompt a message stating that permission is required for access.
-
-
Permission requirements:
-
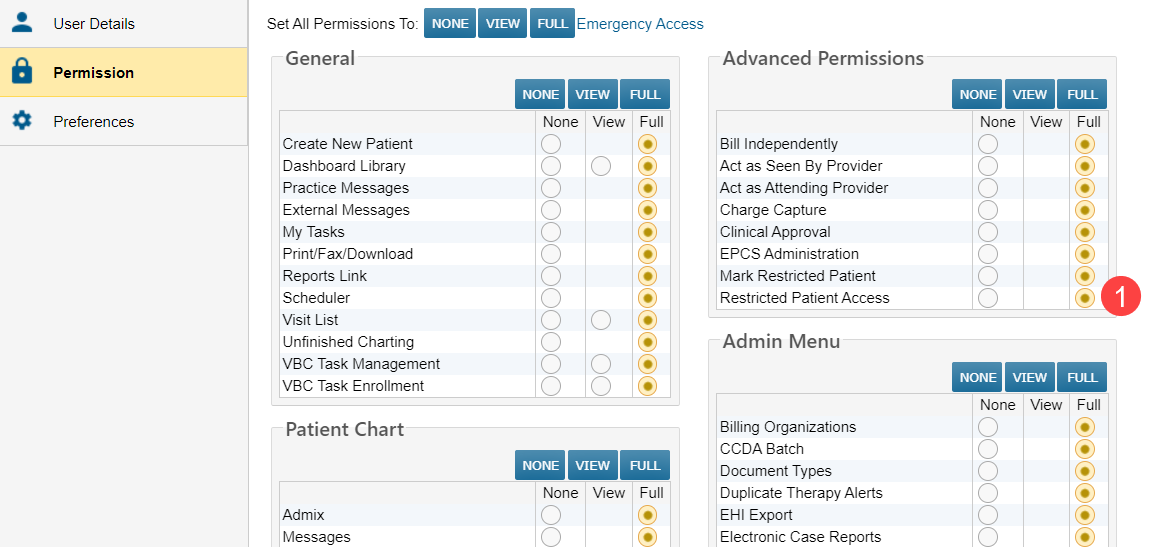
Users must have the iKnowMed Restricted Patient Access permission set to Full to view these charts (callout 1).
-
-
Accessing restricted charts:
-
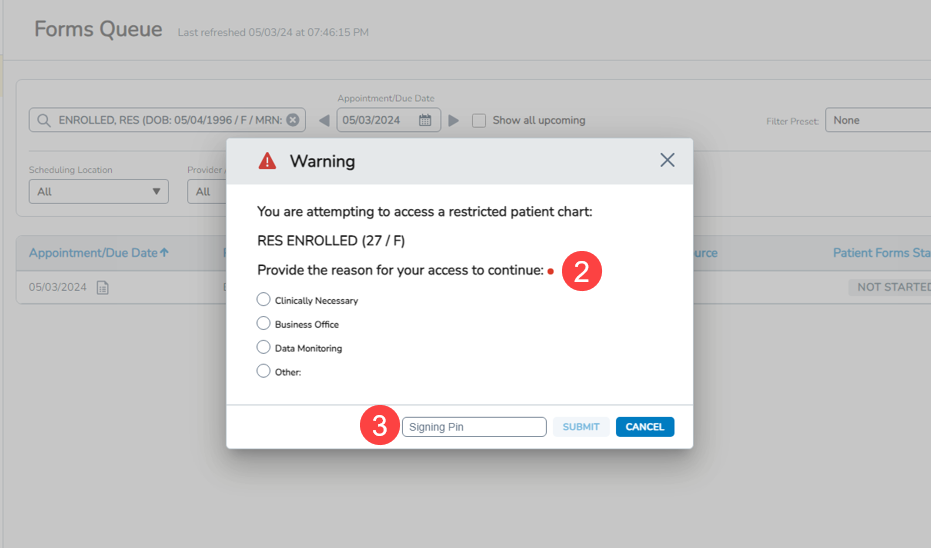
Upon accessing a restricted chart, users with the correct permissions will be required to select a reason for entry (callout 2).
-
If "Other" is selected as the reason, users must provide an explanation in a text box (limited to 100 characters).
-
Users must also input the PIN linked to their iKnowMed account (callout 3).
-
To set up or change your PIN, follow these instructions on the Help site.
-
-
-
Session-based security:
-
The reason window will appear each time a restricted chart is accessed during a new session in the Ontada Health admin tools.
-
All required information must be correctly entered to access the patient chart.
-
Enhanced security with Multi-Factor Authentication on the patient portal
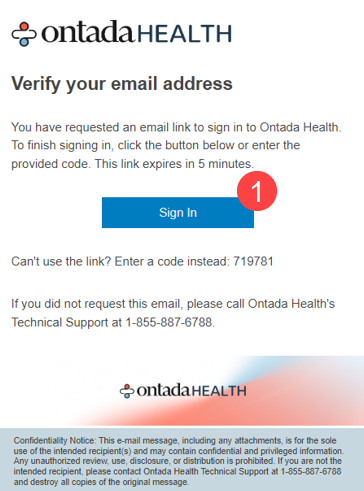
Starting Thursday, June 6, 2024, the Ontada Health patient portal will support Multi-Factor Authentication (MFA) to enhance the security of the login process. This update will prompt new and existing users to set up MFA for an added layer of protection, ensuring that patient and caregiver data remains secure.
By default, this will not be enabled for your practice. To enable MFA, please contact your Ontada Health Account Manager.
How users complete MFA
-
Once MFA is turned on for your practice, both new and existing users will receive a verification email during their first login attempt post-activation.
-
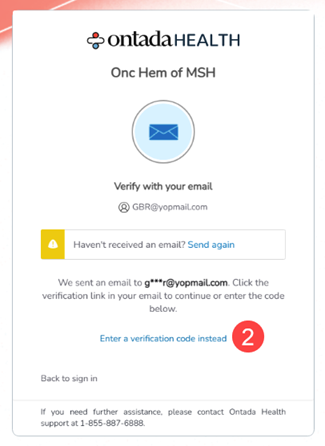
They can confirm their identity by clicking the Sign In button (callout 1) in the email, or manually entering the verification code on the portal screen (callout 2).
-
Once their identity is verified, users can access the patient portal as expected.
-
Users will be prompted to verify their identity each time they log in going forward.